Flare Knees to Arms:
For this, I’ll say “ideally.” This means that from the previously recommended stance, one may not have the ability to flare the knees out to the extent of touching the arms, especially with a wide snatch grip. So, you can push the knees out as much as you can WITHOUT losing the stable/tripod foot. (Commonly you’ll see an athlete attempt to flare but the big toe and the base of the big toe will be off the ground to different extents; we definitely don’t want this). We can also widen the feet slightly to accomplish the touch, but again we want to make sure we do not lose the stable/tripod foot, and knees are not directed inside of the toes. (It’s common with a wider and turned-out foot in the start to see the arch collapsed with a loss of pressure at base of the pinky toe and knee directing inside of the big toe to go along with it). If you are struggling with this part of the set up, I guarantee there are limitations we discovered with the squat assessment that you should already be working on that WILL absolutely transfer over and assist you in this set up.
The knees can be outside of the toes following the same standards as we gave in the squat and once again for most of the same reasons (knees not going beyond the inside of the knee cap in line with the outside of the pinky toe). Knees flared out to directly in line with the toes or out to as much as the outer range engages the glutes and legs more optimally. This cue and action of “knees out” can make all the difference for some athletes to be able to accomplish the rest of the checklist and ultimately lock the back in. CERTAINLY it creates more freedom for everyone to use the 3 Essential Steps (mid-foot pressure, bar touching, and shoulders appropriately aligned with the bar) as there is more room to situate the body between the knees and position the hips down (which as a reminder optimally centers, aligns, and engages).

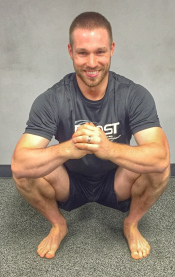
So what exact parts of the knees and arms should be touching? Well, if you have executed the 3 Essential Steps along with flaring your knees to this extent, then the part of the knee that is touching is what is supposed to be touching (meaning it is a by-product). As a reference (SEE the image above), in the start position of my snatch, the top outer edge of my kneecap is touching in the lower half of my bicep (the bicep is fitting nicely and sitting snug in the crease between the outer “teardrop” of the quad and the kneecap). In the start position of my clean, the bottom of my quad (the outer “teardrop”) is touching the pit of the elbow (now, the “teardrop” is fitting nicely and sitting snug in the crease that is the pit or inside of the elbow). Once again, this will vary a little amongst different athletes, and the touched areas within the snatch and clean will and should be different for each individual. For each individual to accomplish touching in their optimal areas, and to create the desired pressure between the legs and arms, the next point on the checklist must be executed: “Straighten Arms and Point Elbows Out.”
Straighten Arms and Point Elbows Out:
We’ve indicated that we recommend the arms/elbows to be straight when the bar contacts at and through extension in both lifts. These “straight arms” need to be initially established in the start position. To give the elbows a check and ensure they are straight here in the beginning of the lift, think about flexing the triceps at the end range of your elbows (extension). (NOTE: This is UNLESS you are amongst a small, exceptional percentage of athletes that have the ability to excessively hyper-extend the elbows, meaning your end range elbow extension goes much beyond a literal straight arm in this direction. In this case, you’d need to experiment and learn how to lock the arm into what would be a mid-range elbow position as ultimately we are looking for a long, straight arm that is taut and free of bend in either direction.) For those that can flex at an end range that is straight, this action helps guard against premature bicep use. Using the biceps in the start position and before extension is reached, is a “muscling” action that is less sustainable (if the elbows are straight, they cannot give and straighten any further whereas a bent elbow through the 1st Ascent and especially at contact/extension can).
Before we move on to the “Point Elbows Out” part, we have to move down from the elbow and talk about the wrists. They are a commonly overlooked and under directed area within the start position, BUT they have potential bending ability that we don’t want to leave to chance. Simply put, since the wrists are a part of the “arm”, the cue/direction of “straighten arms” goes for them as well. We can establish straight at this joint by looking at the backside of the hand (the dorsal side) and the first few inches of the topside of the forearm. It is here that we want to see a relatively straight line (no angle or bending at the wrist).
It is common to see athletes completely unaware with soft and slightly extended wrists from this vantage point, or over-exaggerated and showing different extents of flexion. The wrists being slightly extended (which is usually seen with beginners/novices before much weight is on the bar) will make it harder to keep the bar close through the 1st ascent and hinders/slows the pull under. During the “pull under” the wrists need to flex to keep the bar close and allow the arms to move around and under the bar faster. So, if the wrists are extended any amount they are “behind the line” and “unprepared” to flex as quickly and as completely as they need to. Also, this limited ability to keep the bar close through the 1st ascent and pull under contributes to an early arm bend as a compensation.
A flexed wrist is more similar to a bent elbow in the start position and through the 1st ascent. The more flexed the wrists are, the more “muscling” is taking place that is less sustainable. A flexed wrist that gives and goes straight at any point through the 1st Ascent (just like a bent elbow that gives) is an energy leak that can lead to other compensations. So, like the elbow, we need a long, straight wrist that is taut and free of bend in either direction. Anything different from this in the start position will also change where the bar is front to back in relation to the rest of the body. For example, from a start position with the 3 Essential Steps intact, extending the wrists would roll the bar away and flexing the wrists would nudge the arms forward. Essentially it would throw everything off up from that point. So, straight wrists need to be a “given” in the start position to build the remainder of the checklist off of.
Now, with the wrists and elbows dialed into straight, there is some twisting ability that the arms have that we need to direct as well. We’ve talked a lot about twisting the arms BACK (“external rotation”) when you have the bar overhead or in the front rack. We also indicated that to find your snatch and clean grip be sure that you are twisting your arms IN (“internal rotation”) while measuring in the standing position (which points the elbows out). This is so you get the appropriate read from the arm position we’ll want to see when the bar is at the hip within those lifts. You will change from a “twisted in” arm position during the 1st ascent to a twisted back arm position during the reception for both the clean and snatch. These are the arm positions that not only engage the shoulders, lats, and rest of the body optimally for those two lifts but technique wise is also the most efficient way to move the barbell.
Interestingly enough, I see athletes all the time that are executing the opposite; arms twisted back (or out) in the 1st Ascent to arms twisted in (or forward) with the bar overhead or within the front rack. Remember, the more the arm is twisted forward with the bar overhead or in the front rack, the less the lats are engaged to help support the weight. The same is true in the 1st Ascent but with the arms twisted out; the lats are not optimally engaged to help create the best torso tension and keep the bar close throughout. All that being said, this “point elbows out” needs to as well start in the start position. From here, the inner arm can now push against the flared knees action. These EXTREME and exaggerated engagements (wrists straight and rigid, arms twisted in completely, elbows locked to straight, and knees out pushing against the arms) are how you are going to lift your heaviest weights, we cannot be partial or soft in these areas.
NOTE:
A few very common cues used in an attempt to get an athlete to keep the arms straight, or rather not bend the arms at the elbows as much in the 1st Ascent, is “relax the arms” or “let the arms hang like chains” (or “ropes”). I’ve used these myself as a coach, but honestly they never worked, at least not to the extent and completeness I wanted them to. In fact, in my experience, they’ve usually made the arm bend worse.For “relax the arms” specifically, I believe this is because you are holding weight in your hands and your arms are going to work whether you want them to or not. If you do not tense them in the opposite direction (twisted in and straight), especially if you already have a tendency to bend, then the compensation of trying to relax will be tensing in the direction of more arm bend, usually with the arms being more twisted out.
For “let the arms hang like chains”, I understand now that I was misunderstanding the cue and therefore misusing it as I believe many other coaches do. This cue is meant more for the arms to be literally vertical looking from front to back and side to side in conventional and sumo deadlifts. From what we’ve covered before, we know that in both the clean and snatch the hands are going to have to be wider than where the arm could be vertical looking from the front. Looking from the side if the bar is in-line with the back of the shoulder as we’ve recommended, remember that there will be a slight backward angle in the arm. So, they cannot “hang like chains” even just from the side as we must maintain or create an angle with the arm as we lift to keep the bar close. The arms cannot “relax” and do nothing as we have to use them to push back on the bar (even for those that may not require a backward angle, the “push back” pressure will still be needed for optimal upper body engagement).
Remember, with these lifts you MUST use your whole body, and the arms within the 1st Ascent and start position are no exception. There is NO TIME or any place within the entire lift to truly “relax the arms” (though as we’ve covered previously, this can be a much better cue/concept for your overhead position). They should be working very hard and aggressively, just in the right way and at the right times.
Take Slack Out of Body and Bar:
Do you shrug your shoulders up in the start position? Have you been told to squeeze your shoulder blades together? How about the bar, is it completely at rest before you begin to lift it from the floor (meaning there is no upward pressure; it is not taut)? Occasionally I’ll see athletes even pushing DOWN on the bar or resting on it with their arms and as they “rip” it from the ground and just before the weight leaves the floor you can hear the bar rattle. These are a few examples of areas that can have slack in them in the start position, and initiating from the ground with slack anywhere is allowing energy to leak as you move.
Lifting the bar from the floor with slack, especially the more one yanks or rips it from the floor, is very much like a dog running full speed into the end of his leash. It pulls them immediately out of the direction they were running in and flops them randomly and wildly in the air. Like humans initiating weight from the floor with slack in the body and bar, I can’t for the life of me understand how dogs don’t feel this is not right and learn on their own not to do it. Perhaps with specific training they will learn to behave and stay calm walking next to their owner. Perhaps with the understanding of specifically where slack can be in your start position, and cues to help you offset them, YOU can learn to behave in the set up of your lifts and quit “running into the end of your leash.”
Maintaining shrugged shoulders or shoulder blades together are isolating those areas of the body and taking away from not only their position of greatest potential, but a stronger combination of the body as a whole. Since these actions are far more likely to be lost than maintained, that “give” is happening while the athlete is moving and causing the bar to lag and the body to weaken further. For example, it is common to see athletes that squeeze their shoulder blades together not only lose that squeeze but slip too far in the other direction (now the upper back is rounded).
Now, I’m not against “squeeze the shoulder blades together” for some athletes as an exaggeration cue to help get them to where they need to be but the literal action of them being any closer than a natural, good posture position is too much and away from their strongest position. “Good posture” in this regard means that the outer edge of the acromion process is in-line with and in the middle of a flat back torso when looking from the side. Any further forward or back from this will be outside of the aligned structure we want to lock into and lift with. If an athlete’s tendency is to lift with the shoulders forward of this and that is where they are strong and comfortable, then using the cue of “squeeze the shoulder blades together” MIGHT bring them to the center that we want.
The arms are another area of potential slack and this is more obvious in observation. With the elbows or wrists bent in the start, you’ll have to use energy to keep them bent or they’ll give and the bar and body will once again lag. Applying the “Straighten Arms and Point Elbows Out” part of the checklist is the first part of “take slack out of body and bar” as a whole. From there we need to push the shoulders/shoulder blades DOWN. I’ve given the cue of “place your scaps in your back pockets” for a few different positions already, and it’s appropriate here as well. This will ensure that there is no amount of shoulder shrug, meaning that they are at end range down, where heavy weight will want them to be anyway. From here you’ll need to put upward pressure on the bar by lifting the torso at the low back as much as possible (without lifting the weight from the ground just yet of course) so that the bar is taut. We want silence of the bar as you initiate from the floor, and as a whole this will set you up for a smooth beginning that will carry through the rest of the lift. NO MORE running into the end of your leash!
Align Bar with Back of Shoulders:
Now, from the point at which you are leaning over/squatting down to grab the bar (checklist point #2), your shoulders need to be at least close to this alignment. You will make your way through the checklist from that point with this relative orientation and then “check” and 100% confirm the desired, specific alignment at this time. Of course you do not want to align the bar and shoulders before you establish mid-foot pressure or connect the bar and shins as you will just have to REALIGN them after the body and bar move around through those 2 steps. The same is true for checklist points 5-7. Take a moment to think about trying to maintain the perfect shoulder alignment while flaring the knees, straightening/lengthening the arms, and then moving the shoulders around and lengthening the body further while taking the slack out. We need the bar to be aligned with a shoulder that stems from a straight and twisted in arm, and a DOWNED, good postured shoulder (NOT one that is shrugged, squeezed together, etc.) Those characteristics that are established through “taking the slack out” ensures that we are not loosely aligned, but that the bar and shoulders/body are “tautly” aligned!
That being said, without this alignment, all the other points on the checklist will be less meaningful. Remember, this is the harder of the 3 Essential Steps to find and develop consistency with so keep an eye on it for longer than you think you need to. Do this through videos of yourself with the camera positioned directly from the side, or someone you trust that knows exactly what you’re trying to accomplish.
Another helpful tool to solidify the most optimal shoulder positioning is to set up opposite the fault you tend to see in your lifts. For example, If you always set your shoulders too far forward (which means your hips are likely too high) then sit all the way in a squat with your hands on the bar and bar against your shins first, and then make your way through the checklist as you try to rise straight up into the desired shoulder position from there. If you always set your shoulders too far back (which means your hips are likely too low) then lean over with your legs only slightly bent with your hands on the bar and bar against your shins first, then make your way through the checklist as you try to lower your hips down into the desired shoulder position from there.
To accomplish some or all of the characteristics on the checklist so far, you might be looking down and around at different parts of your body in confirmation. But, at some point you have to fix your eyes and hold your head still before you lift. So, let’s get our heads “straight” and ready to take in the information in the following blog!
Until next time,
Chad Vaughn,
2-Time Olympian, USAW
_______
With
Dr. Aaron Horschig, PT,
DPT, CSCS, USAW
_______

Leave a comment