With the bottom position goals defined (mobility, comfort, and strength), we will be using three revolving steps to help achieve them: Assess, Assign, and Repeat. But before we present any assessment (where we are), let’s first confirm where we want to go: we need a deep, upright, quality, and strong position to receive, support, and stand up from when we clean and snatch.
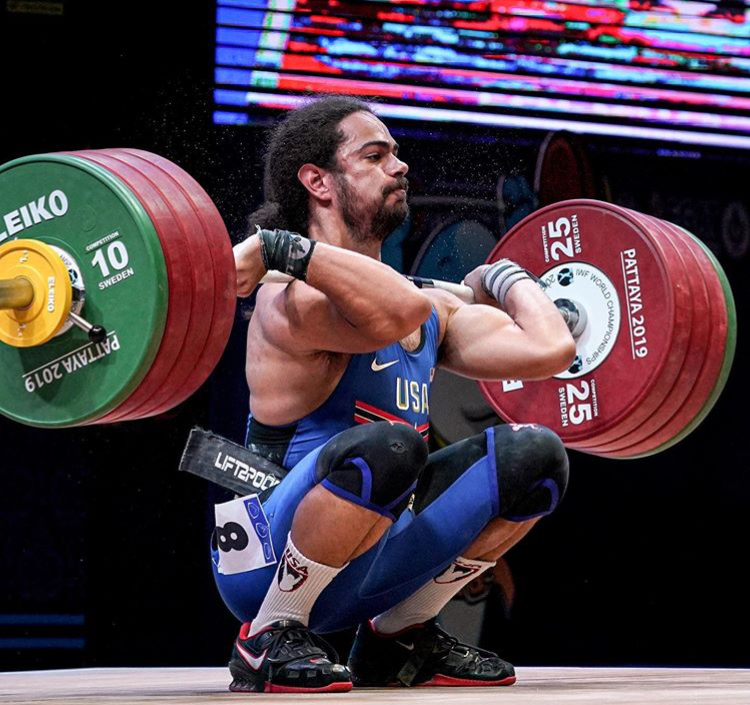
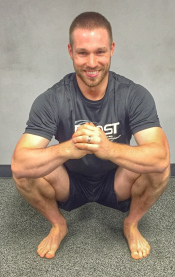
The “sculpture” shown above is a great model for us all to work towards! Specifically for assessment and optimizing purposes, let’s direct our attention to three characteristics of this beautiful work of art: foot position, range of motion, and quality:
- Foot Position – The feet are directly underneath the body, right at about shoulder-width apart. The toes are turned out only slightly and the tripod is intact (no collapse of the arches, no lifting of the toes; the load/pressure is evenly distributed throughout the tripod base locations).
- Range Of Motion – The depth is extreme. The athlete’s body is completely compressed, he could not physically go any lower. He is literally SITTING on his heels, which is only possible if the feet are underneath the shoulders and the athlete has sufficient mobility/flexibility to get that low. The ankles AND knees are at their end ranges which allows for the torso to sit completely upright. If the shins were more vertical, the butt would be shifted back and the torso angled further forward. Additionally, if the ankle and knee ranges were held back, the athlete would have to be strong enough to maintain that load, and that position would be nowhere near as stable to change direction against. (Remember how strong this complete compression is, especially when it is accompanied by ideal foot position and quality!)
- Quality – It is immaculate. The torso is upright and rigid, there is no rounding in the back or “butt wink.” The knees are in line with the position of the feet/toes (not directed inside of the toes from a collapsed foot). Additionally, it is important to understand that this quality is present WITH fulfillment of the first two characteristics. (Note: The front rack position is “textbook” as well and we’ll be breaking that down in relation to this bottom position more later.)
As we make our way through the assessment list below, we are testing for anything that is limiting ability within these three key characteristics (foot position, range of motion, and overall quality). Additionally, we are looking for any asymmetry from side to side of which will take priority over any symmetrical limitations in your assignments:
1. Barefoot Air Squat
2. Foot Stability
3. Ankle Dorsiflexion
4. Ankle Extension/Knee Flexion
5. Tibial Rotation
6. Hip External Rotation
7. Hip Internal Rotation
8. Thoracic Spine Extension
Test #1: Barefoot Air Squat
We recommend you complete this assessment with a buddy so they can observe, capture, and coach if necessary. You will perform air squats barefoot so to assess exactly what the feet are doing. First, do a few reps with the foot position you feel most comfortable with, and then again with what we’ll call the exaggerated, testing foot position of shoulder-width apart and toes straight ahead (this means a ZERO degree turnout of the toes). These two different set ups are important so that 1) you know what your natural tendencies are and what the squat looks like from that set up, and 2) you can see what you are capable of with this more demanding set up and a foot position closer to what you ultimately want to use in squats, snatches, and cleans. Also, ensure you are squatting as low as you possibly can, pausing in the bottom at least long enough to collect the needed information. This is a critical part of the assessment; your partner may have to coax/coach you to your true bottom position. Even if your back rounds, you pitch forward or fall over backwards, it’s all ok, we just need to know what happens when you go as low as you can.
More important than what we see, is understanding WHY it’s occurring:
- Why does the athlete feel more comfortable squatting with feet wider and more turned out?
- Why is their back rounded, arches collapsed, and knees caved in?
- Why is their depth blocked at parallel when their feet are set at shoulder width and straight?
- Why is their torso pitched forward at a 45 degree angle?
Dr. Horschig will talk you through the rest of the list and how to assess these common problem areas, ultimately providing you with a complete diagnosis of any limitation(s) – and the WHY behind them.
Test #2: Foot Stability
If you found it difficult to maintain your foot in an arch during the bodyweight squat, stand on one foot and try to perform a single-leg squat. Hold your free leg out in front and attempt to perform a full pistol squat. Do NOT hold on to anything for balance as our goal is to assess the quality of your movement on one leg. Turn your attention to your foot during this mini squat. If this single-leg squat caused your foot to collapse inward (excessive pronation) and knee to waver around like crazy you’ve just uncovered a problem in stability. In my experience, many strong athletes can “hide” their problems with stability. This test is great for illuminating these weak links that hinder movement efficiency and ultimately our performance.
Understanding the importance of stability when it comes to the squat all starts with focusing our attention at the foot. You see, the foot is like your body’s house of cards. Good foot stability sets the foundation for the rest of your body to move. When the foot collapses inward (excessive pronation) it leads to rotation in the tibia that forces the body to move in a sub-optimal manner.
Test #3: Ankle Dorsiflexion
Restricted ankle mobility is one of the most common factors in limiting the ideal deep squat position. In order for the hips to descend to the greatest depth possible while maintaining an upright torso position, the knees must be able to move forward over the toes. This forward knee movement comes from the ankle and is called dorsiflexion.
Limited ankle mobility will lead to movement problems and hinder your ability to perform to your greatest potential. In the book Anatomy for Runners, physical therapist Jay Dicharry uses a perfect metaphor for describing how these types of restrictions change our movement patterns.
An ankle with full mobility will allow the tibia to move freely on the foot. Think of this like a car being able to move straight through an intersection. A restriction in ankle mobility is like a European-style roundabout being constructed in the middle of the road. When the car enters the intersection, it must now go around the island in order to proceed on its previous route. Essentially our lower leg spins off its normal route and falls inward. As our lower leg goes around the restriction, the knee is pulled inwards. Movement breaks down.
The 5-inch wall test is a very simple screen you can perform on your own. Kneel down on one knee by something perpendicular to the floor – a wall, door frame, table leg, etc. – and place your toes 5 inches (roughly 12.5 cm) from its base; you can measure by using your fist plus one full thumbs length. Drive your front knee straight forward over your toes attempting to touch the wall without letting your heel pop off the ground.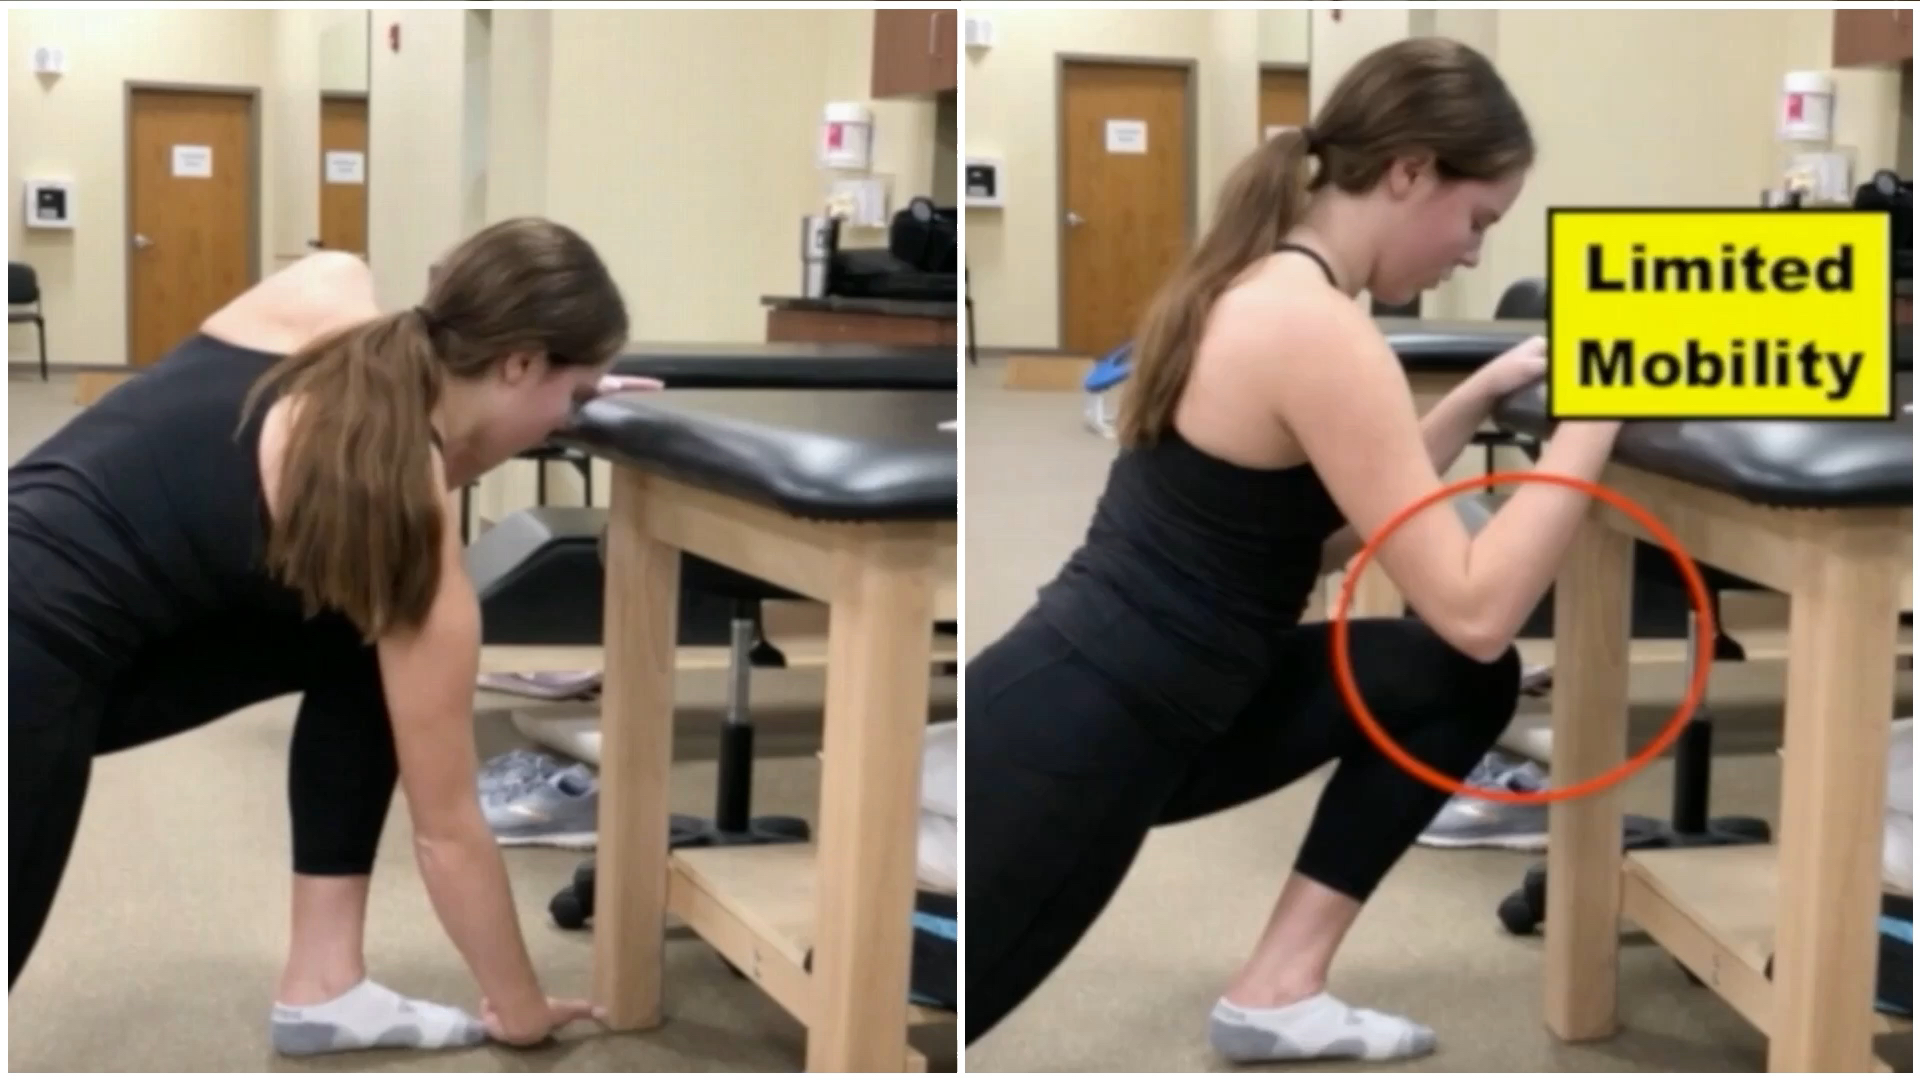
What did you find? Were you able to touch the wall with your knee, or did your heel pull off the ground? If you failed the 5-inch wall test, you just uncovered a weak link in ankle mobility that needs to be addressed.
Test #4: Ankle Extension/Knee Flexion
While ankle dorsiflexion allows someone to descend into a deep squat, ankle extension ensures sufficient foot health and mechanics. It is common to see athletes develop stiffness in the ankle and toe extensors as an adaptation to most fashion footwear. Excessive wearing of shoes with a heel and toe spring (where the front of the shoe is elevated from the ground) push the ankle and toe extensors into a shortened position and lengthen the muscle and tissues on the bottom of the foot (called the plantar flexors). Over time this can lead to a number of foot problems and poor foot mechanics.
This yoga pose will allow us to get a good idea of how much ankle extension you have, AS WELL AS examine your ability to bend your knee (the inability to squat to the depth of “butt to ankles” is usually not due to limited knee flexion, but sometimes it is so we’ll be able to rule that out or confirm it with this test). With the top of your feet on the ground in a kneeling position, place your big toes together with heels open as much as possible (heels open also expresses tibial rotation and ability in the opposite direction of dorsiflexion specifically in the range of the knee directing to the outside of the toes). Position your knees together in the front and aim to sit your butt between your heels.
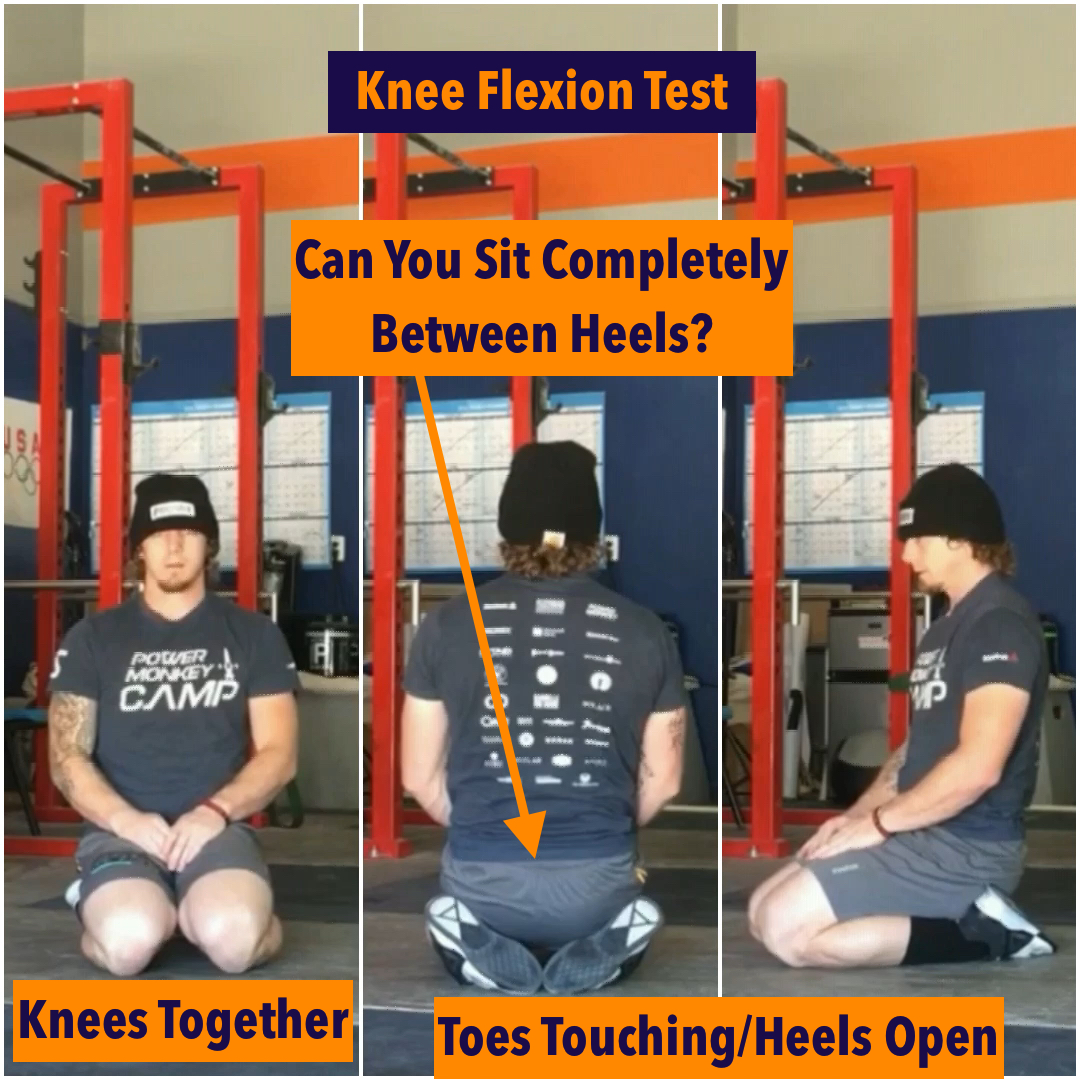
Were you able to easily sit your butt between your heels completely sinking into the space with comfort, or do you feel an excessive strain on the top of your feet, the outside of your ankle, or tightness in the knees with space between your butt and feet? If you were unable to easily sit into this position, this “test” pose can be incorporated in a few different ways as one of your assignment drills for ankle extension and/or knee flexion moving forward (things we’ll talk about later on).
Test #5: Tibial Rotation
In order to perform a full-depth squat we need the tibia bones (your shins) to be able to rotate symmetrically a certain amount. There is no current research to support any specific minimum standard here, but without being able to rotate any amount or only very little, you will be blocked from being able to open up the knees or squat deep in general without movement problems (foot collapse, knee cave, etc.). Asymmetry here can cause those issues to happen on one side and lead to detrimental compensations up through the rest of the body (i.e., hip shift that bleeds up to the shoulders/upper body). So, beyond symmetry, we are recommending a minimum of 20 degrees of toe turn in to be sufficient from what we typically observe in “good” squatters (for reference, Chad has about 45-degrees on both legs).
To screen for your level of tibial rotation, sit in a chair with your shoes off and feet straight forward. Grab your right knee and keep it from moving as you rotate your right foot in towards the middle of your body. Go as far as you can without your foot rolling on its side (excessive supination). Do the same with the left foot.
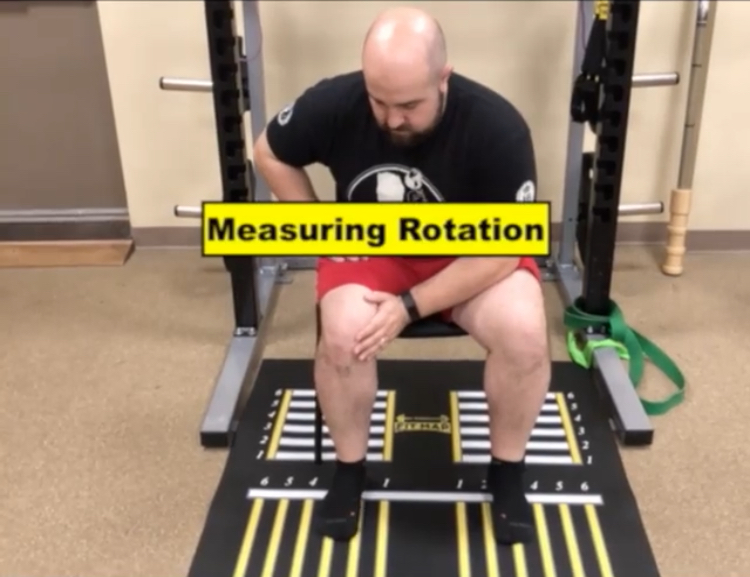
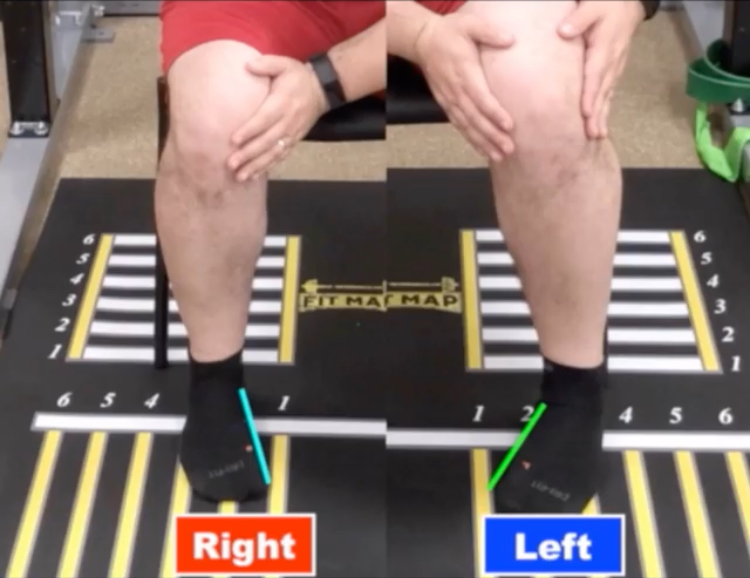
Did you notice one foot was able to rotate in more than the other or were you fairly symmetrical? Remember, building toward symmetry is priority, but if both were symmetrically under that recommended 20-degree mark, then we’ll need to consider working on both as part of your assignment.
Test #6: Hip External Rotation
The main focus of this and the following screen (hip internal rotation) will be to uncover side-to-side differences in how your hips move. Differences in hip internal or external rotation will create movement compensations and limit optimal technique. Limitation in both sides will lead to compensations in the feet and block squat depth.
Start with the FABER test (which stands for flexion-abduction-external rotation). Start by lying on your back. Cross the leg you want to test over the other leg and rest your ankle just above your opposite side knee. Relax your body and allow your knee to slowly drop down towards the ground. Make sure to keep your pelvis level as you do this (don’t let your opposite hip rise up as the testing knee drops). Test both sides and see what you find.
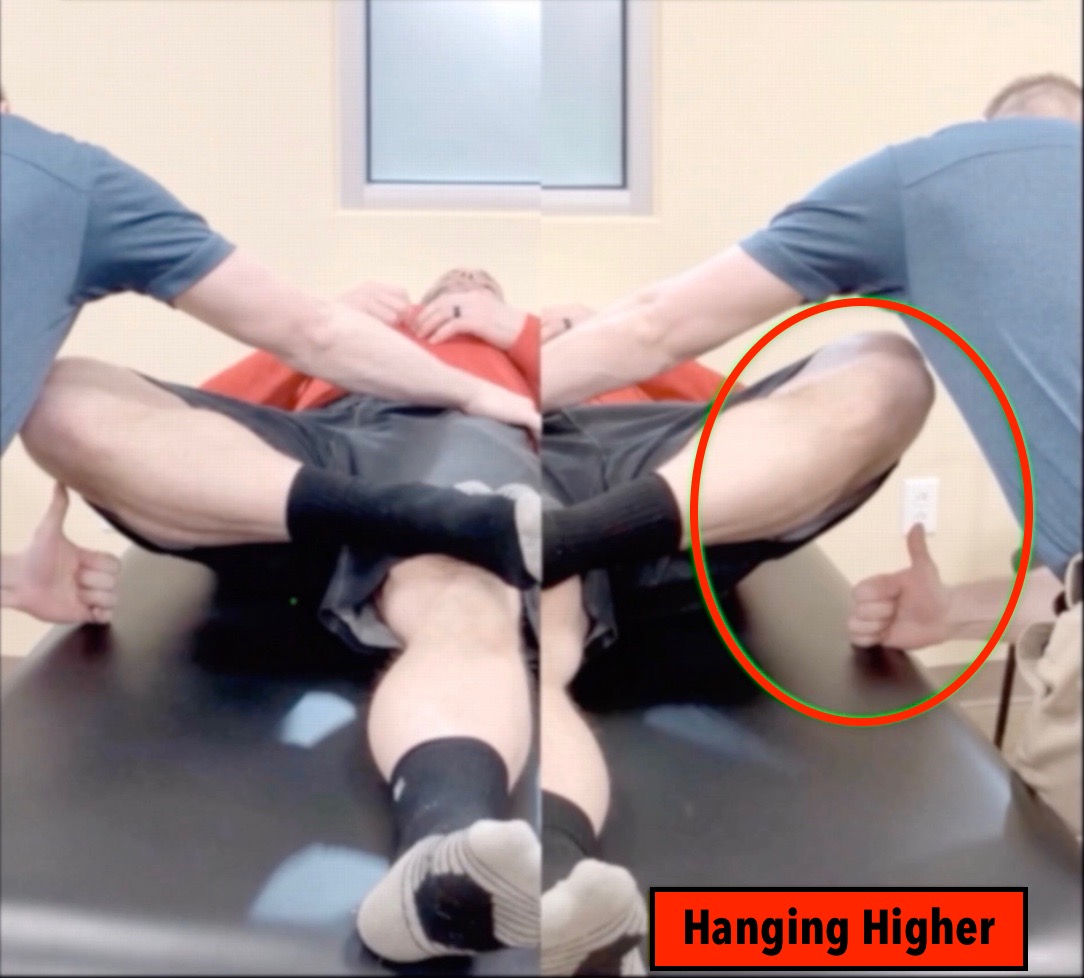
Your knee should ideally drop to a height of two fists from the floor. If you find asymmetry, if one side is painful, or if both sides are above the ideal distance from the floor, this is considered a positive test. If you tested positive, it means you probably have a difficult time extending or externally rotating the hip. This mobility issue could be due to restricted joint mechanics (something that requires mobility exercises like the Assisted Hip Airplane to correct), or stiffness in one or more of the surrounding hip muscles.
Test #7: Hip Internal Rotation
Start by lying on your back. Have a friend grab your leg, bend your knee, and lift your thigh to a 60-degree angle from the ground. From this position we can rotate the lower leg away from the midline of the body to assess the amount of medial or internal rotation you have. Perform the same movement on both legs.
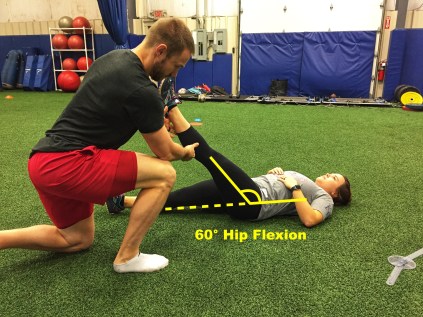
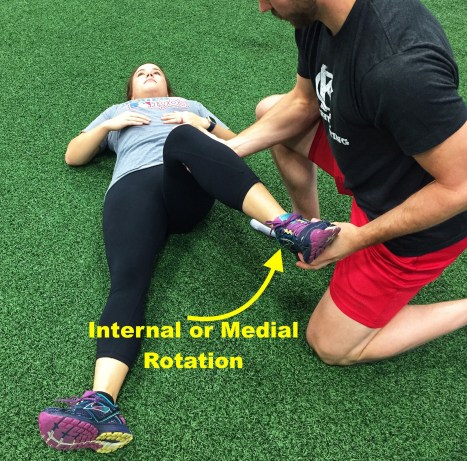
Did you find limited internal rotation on one leg or were both legs symmetrically unable to rotate out to a minimum range of 30-40 degrees? This restriction could be due to a problem at the joint or limited muscular flexibility (such as the piriformis muscle). If the limited internal rotation brought out pain/stiffness on the front or side of the hip, chances are your restriction is due to the way your femur is moving in the hip joint. I’d recommend trying banded joint mobilizations and the Assisted Hip Airplane (things we’ll talk about soon).
NOTE: If there is very little rotation on both sides it may be due to a variation in YOUR anatomy (the way your hips are shaped); refer back to the hip anatomy test we previously covered here. But remember, most athletes will struggle with a full-depth squat more due to mobility, and less by anatomy. Even if you test outside of “textbook normal,” don’t leave it as this “is what it is” as you still have just as much chance to improve positioning with mobility work as someone in the normal category. Additionally, any adjustments you might need to make to your squat positioning and standards should be minimal as opposed to the excessive extremes that many take it to (i.e., each foot 3-inches outside of shoulder-width with a 45-degree turnout of the toe).
Test #8: Thoracic Spine Extension
Mobility restrictions in the thoracic spine (mid-back) will lead to compensations when we raise our arms over our head (such as performing a jerk or snatch). Limitations will also hinder the ability to achieve the optimal extended torso position when pulling the bar from the ground or in the bottom of a deep squat.
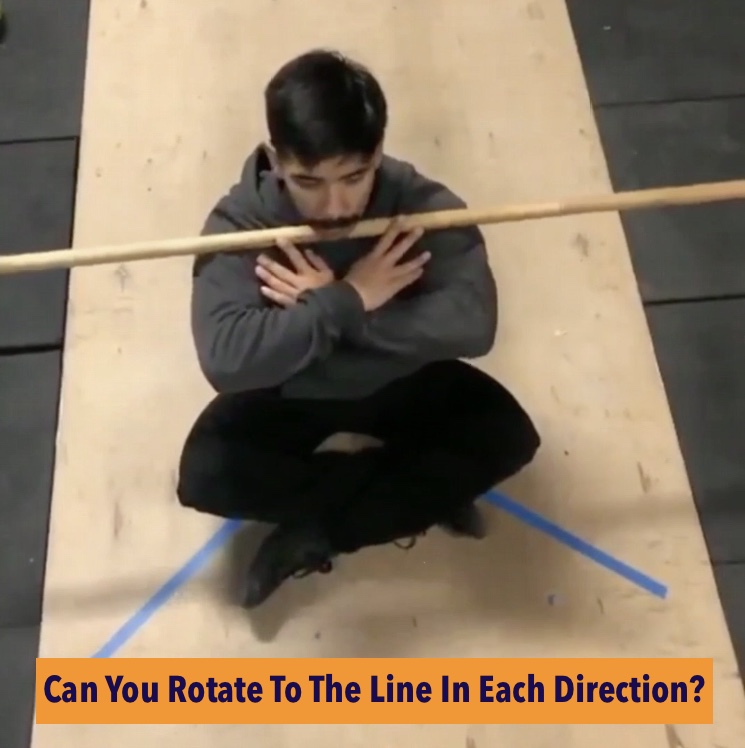
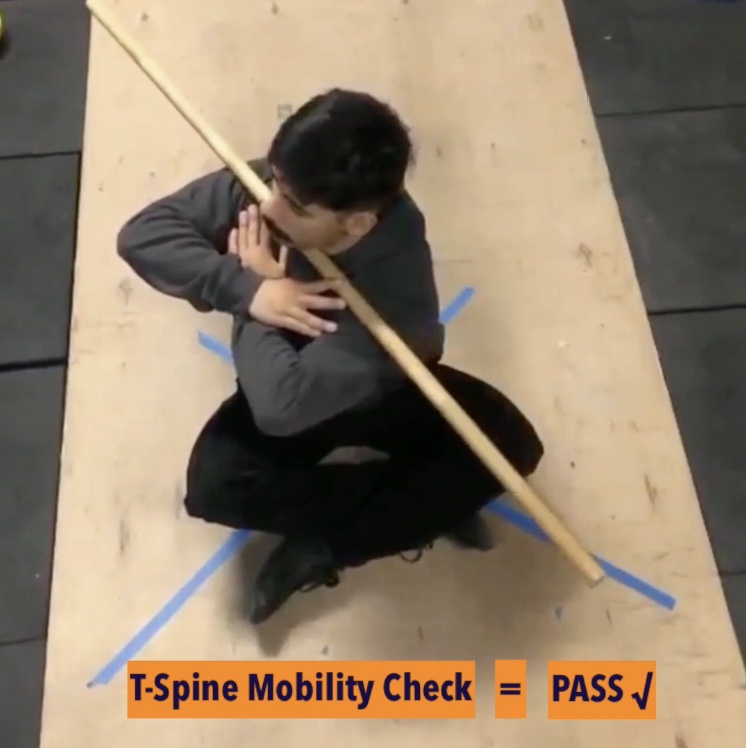
While assessing thoracic spine extension can be a little difficult without the help of an expert clinician, the seated rotation screen is a good self-diagnostic test that can give us a good idea of how well this part of your back is moving.
Tape an “X” on the ground with the edges forming 90-degree angles. Sit in the middle of the “X” so that the tape forms a “V” in front of you. With a PVC pipe across your chest, rotate as far as you can to the right and left side. Ideally you should be able to rotate your t-spine 45 degrees each way (this will align the PVC pipe with the tape on the ground). If you have an inability to rotate to at least 45 degrees each way or a significant imbalance in either direction, you just uncovered a potential factor to work on!
What about the Hamstrings?
Some of you may be wondering why the prior tests did not look into hamstring flexibility. This is because the hamstrings are rarely a limiting factor in reaching a deep squat. The hamstrings are a “bi-articulate” muscle group (meaning they cross two joints, the hip and the knee). As you squat, the hamstrings do not significantly change in length and therefore will not affect the ability of the hips or knees to move into a fully flexed position.
Now that we’ve made our way through the Dr. Horschig’s list, what did you learn about yourself, mobility in general, and/or the body as a whole? Were you tight in areas you didn’t even realize were contributors to your ability to squat? Were you more mobile or flexible anywhere than you thought you would be? Whether you found sufficiency or tightness in all of the tests (or anything in between), we have invaluable information to move forward with! We’ll use those results as we add to your “sculpting starter kit” with a squat sequence that we will show you how to individualize to help mold (and maintain) your bottom position.
PS. We’ve attacked your squat, but some of you may be wondering about your upper body mobility for front rack and overhead positions. Understood, and we’ll certainly be getting to that soon enough, but remember that we are always pushing for proper prioritization. If lower body mobility AND upper body mobility are limiting your overhead position for example, we need to get the lower body heading in the right direction first to allow for less upper body restrictions. (If your lower body passes all the tests but you still cannot perform an overhead squat, we’ve simply ruled the lower body out completely, and can make our way up the chain from there.)
Until next time,

Chad Vaughn,
2-Time Olympian, USAW
_______
With
Dr. Aaron Horschig, PT,
DPT, CSCS, USAW
_______

4 Comments