We are now ready to dive into all of the other technical points to help optimize lifting performance. The complete start position checklist (which includes the 3 Essential Steps we discussed prior) includes:
- Assume Stable Stance
- Grab Bar with Snatch or Clean Grip
- Find Mid-foot Pressure
- Connect Bar and Shins
- Flare Knees to Arms
- Straighten Arms and Point Elbows Out
- Take Slack Out of Body and Bar
- Align Bar with Back of Shoulders
- Set Head and Eyes Forward
- Tighten Back

YES! This is a long list. How are you supposed to remember it all? What about the idea of keeping it simple? Perhaps you feel overwhelmed at the site of this list? Well, before I attempt to try and ease your mind a bit, let’s go a little further down this road of complexity (which will help confirm the flow of the next few sections). The specifics mentioned above for each are only the tip of the details for what we’ll be breaking down further. Some of these details will continue to be in the form of foreshadowing as we talk about some aspects of the 1st Ascent and the rest of the lift. With this we’ll confirm some common errors that stem from a faulty start position, as well as what the recommended start position will better set you up to accomplish.
Looking ahead into the 1st Ascent in this way on top of the details of this already intricate position certainly sparks my fear of ever over-complicating anything. But, as a teacher and coach I’ve learned that I’m ok with “over-complicating” the start position because it SIMPLIFIES the rest of the lift exponentially. Lifting from a good and the right start position makes the rest of the lift fall in-line more easily, more automatically. If you are not starting off appropriately, then the rest of the lift will be compensated/limited. You will be “playing catch up” with the load more so controlling you as opposed to YOU being in charge and appropriately setting yourself up to STRIKE later in the lift. If the start position is not consistent, then the rest of the lift will be inconsistent and perhaps even a little different on every single rep (which means lack of development and ability to make desired changes through the lift).
All that being said, I’ve realized that this fear of me “over-complicating” is unfounded and the initial information overload to the athlete is actually not that big of a deal. It usually doesn’t take athletes long to learn how to set up consistently, at least mostly hitting all points, and then just a few reminders here and there will solidify further/completely. If one is already close anyway, then there is less need for stress in this regard. If one is having trouble, then we must do what needs to be done to establish consistency before moving forward (finding and holding the correct start position ONLY to get extra time and reps, and then slowly progressing into the rest of the lift from there).
We’ll use the remainder of this post to begin to take a closer look at each area starting with the feet, hands, and placement of the bar. With this we’ll confirm what actions are “musts”, and consider any potential variation within:
Assume Stable Stance:
As we did with the squat stance, we’ll give a “gold standard” range for the start position stance: hip to shoulder width with a 0-15 degree turnout of the toes. This is of course very similar to what we established for the squat and for the same basic reasons. We need a strong and stable foot that will set the body up from that point for success, in and coming out of the start position. In maintaining this through the rest of the 1st Ascent the athlete will be able to generate greater potential power with the feet more up underneath the body.
Take a look at these “Toe Out Examples” from the linked blog post above on the squat to get an idea of what the mentioned degree turnout of the toes looks like with the feet:
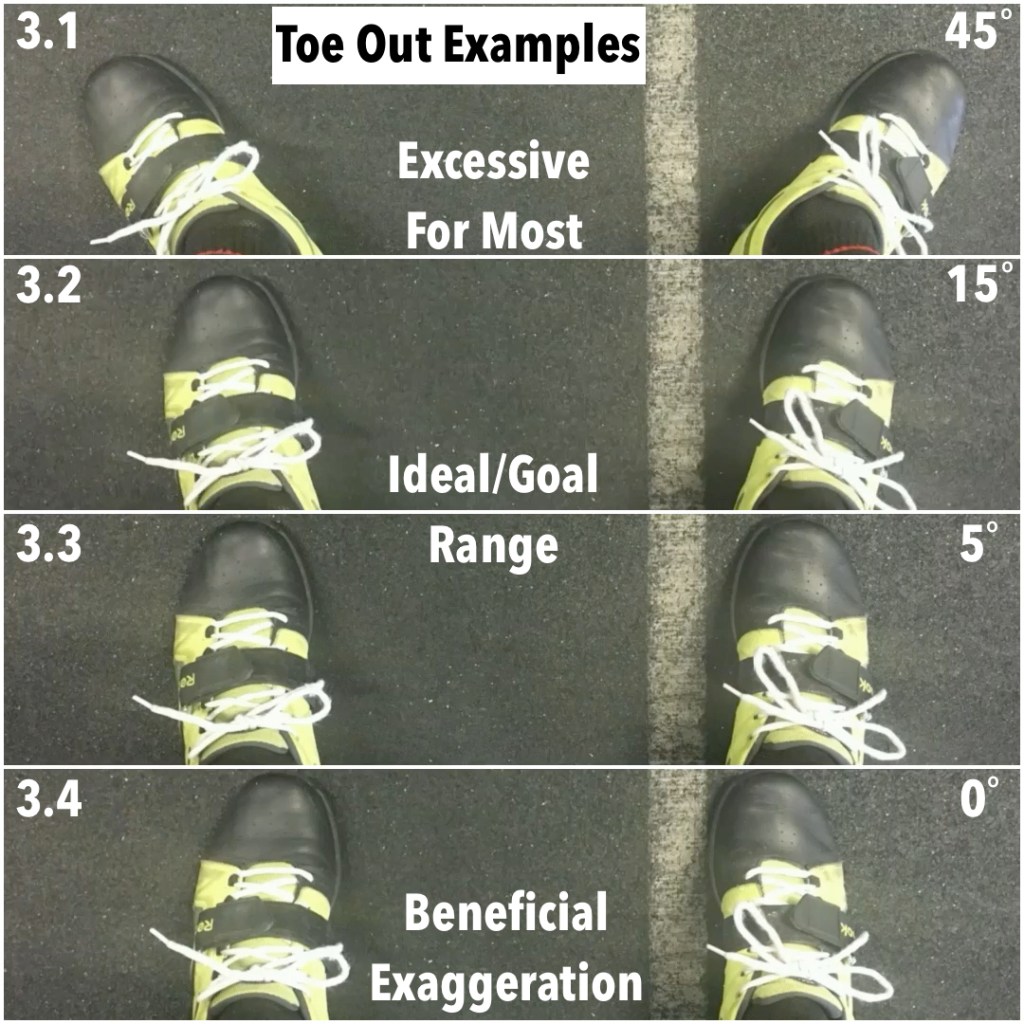
Simply put, where would you put your feet if someone asked you to jump as high as you can? Now, your stance in the start position doesn’t have to be spot on with this (there are more factors, such as mobility, and more of the body involved when you are leaned over to the level of grabbing the weight from the floor). But, the more Olympic lifting you do and the more overall mobility you have, the closer these stances will be if not spot on the same. In any case, the point is the feet are more under the body when you jump. Turning the toes out excessively when you jump often leads to the knees collapsing inwards and limiting your efficiency in vertical power production.
Any wider and more turned out than the outer range of shoulder width with a 15 degree turnout and you are engaging your body quite differently and with a higher chance of compensation. Beyond 15 degrees especially with feet that are wider will be less stable, and as with the jump, the knees are more likely to direct inside of the toes.
What about a sumo deadlift stance where the feet are well outside of shoulder width and usually with a 45 degree turn out of the toes? Why is that used in powerlifting and how is so much weight lifted from there?
Well, the athletes using that stance have the mobility to set the knees in-line with the wide and turned out feet AND the position of the hands that are INSIDE of the knees and feet allow them to do so. With the more narrow grip of a clean especially, one will not have the room to open up the knees that much as the arms will be in the way since the hands have to be outside of the feet and knees. Also, though sumo can be a very strong position to pick up weight with, it is not a fast and powerful jumping stance (think about trying to do a vertical jump from there). NOTE: Stay tuned for more on the sumo AND conventional deadlift later, and why at least better understanding of them matters for the Olympic lifts.
Lastly, the 15-degree turnout that is part of the recommended outer range is mostly there just to express a little bit of leniency and give room to those with mobility limitations. Adjusting feet to the outer range or even slightly beyond can allow certain athletes to achieve the rest of (or more of) the characteristics we’re looking for in the start position (namely a tight, flat back) but this should be considered a temporary band-aid at best. If one is unable to lock in their back or set the hips where we’d like with their feet shoulder width and 5-degrees out, they should be working on improving mobility in a few areas we identified in the squat assessment and/or may have other limitations that need to be considered. The more capable you become with your feet in the bottom position of your squat, the more capable you’ll be with your feet in creating and using the best and most powerful stance for your clean and snatch. DO NOT accept less than a stance of greater potential.
Grab Bar with Snatch or Clean Grip:
Refer back to the post on establishing the snatch and clean grip. I hope it is obvious that this is where your hands will need to go in the start position of each of those lifts. This is one of the very few differences in the snatch and clean start position; for the snatch the hands are wider, out closer to the collars of the bar, and for the clean your hands are closer to the start of the knurling towards the middle of the bar. We’ll talk about what this dictates the rest of the body to do and the few other differences it leads to as we go.
While we are talking about grip, we have to mention how you will need to lock your hands to the bar by using what is known as the “hookgrip”. This will be necessary for you to be able to hold onto your heaviest weights within your snatches and cleans as you initiate the bar from the floor, continue through the 1st Ascent and violently exert power at extension, and then pull your body under the bar (NOW we can “pull”). We’ll cover the how, where, and why of the hookgrip more later.
Find Mid-foot Pressure:
Recall the first of the 3 Essential Steps: without the whole tripod intact and even (whether that be front to back or side to side), the body up from the feet will not be optimally engaged or coordinated.
One way to help learn, strengthen, and engrain this action is to perform your first 2-3 warm up sets of any snatches, cleans, or snatch/clean deadlifts barefoot. This way you can more easily FEEL the connection with the ground that not only we want in the set up, but throughout the rest of the lift. As a bonus, this will add strength work for the feet and make your lifts as a whole feel that much better/easier once you throw those weightlifting shoes on.
NOTE:
Beware of taking this too far and going beyond the first 2-3 warm up sets recommendation. In the spirit of specificity and consistency (especially if you are just learning and/or making changes to your start position and technique), we need to be doing by and far most of our reps WITH weightlifting shoes on (what you are going to be wearing in a meet or when you are trying to lift your heaviest). That being said, this is a form of “exaggeration” that is very powerfully beneficial to your overall ability with the Olympic lifts (it is more difficult to get into your start position in general, and then stabilize through the lift). Additionally, we should always want to be a well rounded athlete and a healthy human first, and from there we acquire more potential with the Olympic lifts. Any time we can spare to go barefoot maintains/adds to our athletic variety, human ability, and health and longevity!
Connect Bar and Shins:
I’ll risk sounding like a broken record: keeping the bar close is essential and this starts at the beginning of the lift. Remember to “close the circuit” and “turn the light on” so you are better connected and your path is more illuminated through the remainder of the lift. (NOTE: If you missed all this “Connect Bar and Shins” talk before; the how and why most of the best in the world are using this literal touch in their start position, click here to get caught up.)
This is one action that is a part of the checklist that I myself am still aware of as I’m setting up: I am conscious of placing my feet under the bar WITH the appropriate stance (that then disappears as it is checked off the list), leaning over/squatting down and grabbing the bar with hands at the appropriate width and placing the thumbs under the fingers to “hook” the bar (that then disappears as it is checked off the list), and then pushing back to secure the bar back into my shins and keeping it there. Other than then locking my back in as aggressively as possible, everything else in the checklist has become more subconscious or automatic. It is from that point of the bar touching the shins that sets off the automatic cascade through the rest of the checklist up to the point of locking the back in. I’ve found this to be a solid reference point for others as well to build everything else on top of. Be consistent with this, and you give yourself a better chance to be consistent with the rest of the list. Think of it this way, when you don’t take the time to bring the bar in and feel it touch, the set up has been rushed and is not as solid as it would be otherwise.
Next, we’ll make our way down the checklist – and UP the body – as we confirm what you should be doing with the knees, arms, and shoulders.
Until next time,

Chad Vaughn,
2-Time Olympian, USAW
_______
With
Dr. Aaron Horschig, PT,
DPT, CSCS, USAW
_______

1 Comment