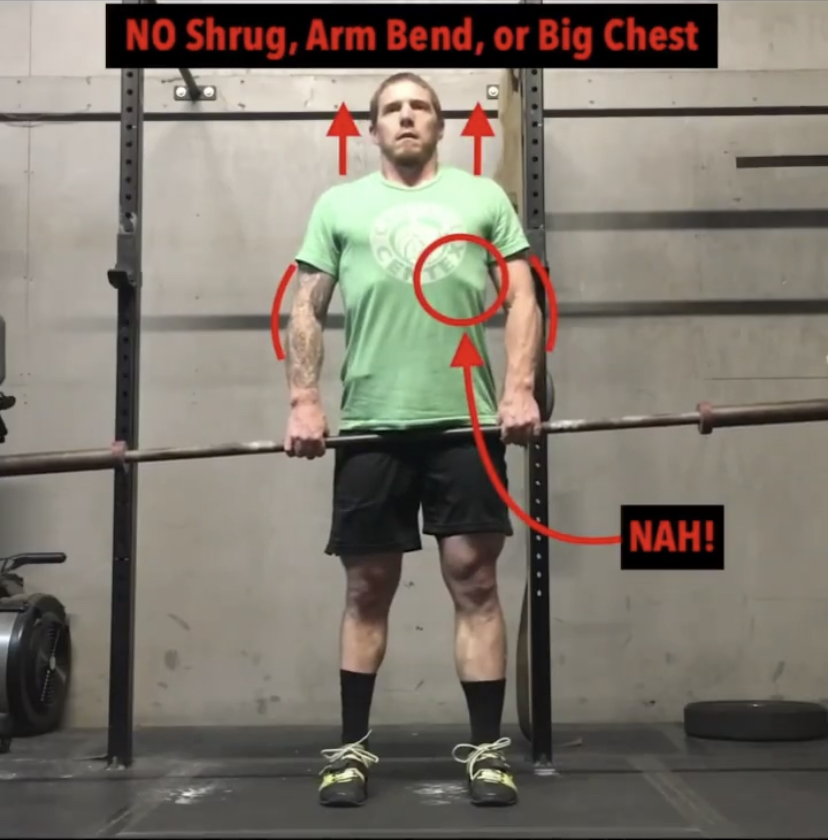
For the front rack position (similar to the overhead position), we also want to use end ranges and skeletal structure to support load as opposed to muscling actions. We’ll be using a setup that will help distribute the load throughout your entire body as opposed to overloading isolated areas (no shoulder shrug here either, or “big chest” which is a common cue/emphasis for the front rack). Aside from the obvious (grip width and bar placement) you’ll see the recommendations for overhead and front rack positioning are far more similar than they are different. And, just like the bottom and overhead positions, the prioritized goals for your front rack are to develop as much MOBILITY, COMFORT, and then STRENGTH as possible.
Now, just as overhead positioning relates to the snatch, these front rack goals must all be developed within a specific and ideal grip width for the clean. But, unlike the overhead position and variations of grip width for overhead squats, there is no real need to front squat with any width different than what is best for the pull of your clean; so we’ll be establishing that first. Your ideal grip width is identified by where and how the bar is CONTACTING the body before it gets to the front rack.
Before we get to the instructions on how to find the best grip width for your clean, understand that the contact point we are aiming for is different from that of your snatch. Remember that in the snatch, we set the grip to contact at mid-pubic bone (the “hip-crease” just above the genitals); for the clean it should be a little lower. For the clean, contact should be just under the genitals and as high on the upper quad as possible. Another marker to confirm this “sweet spot” for the clean is to identify the spot where your inner thighs meet your body (that is, the awkward starting spot for an inseam measurement). Like the snatch, we are in “dangerous” territory here. In particular for men to comfortably find and use this spot (without “racking” themselves), they must have ALL of their genitals tucked up (yes, the whole “package”). This means that boxer shorts will not suffice; you’ll at least have to pull out the tighty whities (that I know you all have) with biker shorts or a weightlifting singlet over the top, or better yet, get a jock strap (and all this goes for the snatch as well, but with the need to tuck down).


NOTE: For some athletes the contact point they use for their clean is the same as what they use for the snatch, but these athletes are very few and far between. I’m only indicating this exception as it is an argument I’ve gotten and therefore one you may potentially come across. We recommend against this since to contact in the same spot as the snatch – while using a more narrow clean grip – a big arm bend and/or shoulder shrug would be required to get it up to that point.

Since we do recommend straight arms at contact in either lift, use the following instructions to find the grip-width that will allow for the most effective contact point with your body:
- Hold a bar with a full grip in a standing position.
- Align the body (as we’ve defined in the set up of a squat; no bend in the knees or at the hips, and no arch in the back), relax the shoulders down, and straighten the arms with elbows pointing out (arms internally rotated).
- Adjust hands (out and/or in) until the bar is resting just under the genitals (remember guys, tucked up).

I’ll note the same warning here as we did with the snatch grip: WATCH OUT for muscling the bar up to this point by shrugging the shoulders and/or pulling up with the arms. For some reason as soon as some athletes touch a bar their entire body deliberately or subconsciously tenses. This includes traps and shrugged shoulders, deathgrip with forearms, biceps with bent arms, and veins popping out of the neck! Telling them to relax is like a failed attempt at getting a loud room full of excited kids to be quiet; a slight relenting of the noise followed by increased volume. Often I have to put weight on the empty bar and have them hold it in the standing position for an undetermined amount of time. At some point the body will finally relax and the bar will slide down; this is what it really means to NOT shrug or pull with the arms in this position. It is only now that we can see where the bar will be touching the leg with the specific grip width they are using and if that grip is too narrow. A grip that is too narrow is the greatest root to an unintended early arm bend and/or shoulder shrug because the body WANTS this more efficient and effective contact point. Any lower than this is a meatier part of the quad that is only capable of sluggish contact and a dimmed transfer of energy into the bar.
Now, without moving the hands, let’s put the bar in the front rack and see how it looks and feels. For most athletes, this will set the index fingers 2-4 inches outside of the edge of the shoulders. Luckily, this is the perfect distance offering the greatest potential in the front rack position. This means not only is the grip-width ideal for contact, but also for coordination and support.

But, what about those who are inside or outside of the 2-4 inches? If inside of two inches – but the contact point is what we want it to be – then we’ll proceed with that grip. If outside of four inches, we need to consider how comfortable the athlete is: If they are feeling no stretch or pain anywhere while standing with the bar and especially within a squat, then we’ll proceed with that grip. If there is discomfort, pain, inability to keep the bar in the hands, and/or if the bar is floating above the shoulders (not actually touching the front rack), then we need to consider a bent-arm technique in the pull with a more narrow grip (as we discussed for the snatch if the grip width placed the bar too close to the head) or progressing out to that width over time.
Even at 2-4 inches outside of the shoulders, many athletes will still exhibit the difficulties mentioned above. In either case, the idea is to MOLD the front rack grip width and position to what will allow for the best straight arm contact with the body at our “sweet spot” as much as possible. The effort toward accomplishing this will be with mobility work and using the grip consistently over time. “Consistently” means that first and foremost you are actually front squatting with it as well as cleaning with it. Let’s take this moment to reconfirm anything and everything you do in your squat will either reinforce the desired or undesired within your clean and snatch reception; if you are front squatting with a different grip width than you are trying to clean with, you are not strengthening that specific width. Instead, you are working against yourself and this usually leads to compensations within the reception of your clean.
We also want to be able to wrap our fingers/hands around the bar in a certain way in the front squat and maintain that within the clean at the specific grip width we’ve established here. Stay tuned for instructions on how we should be holding the bar in the front rack.
Until next time,

Chad Vaughn,
2-Time Olympian, USAW
_______
With
Dr. Aaron Horschig, PT,
DPT, CSCS, USAW
_______

I really struggle to get anywhere near full grip on the bar in front rack. At best I have my fingers around it. Even when this is the case, my hands are over the shoulder and not outside at all. I understand this is likely to be mobility based and I have been working on my lats. This has helped get further under but gaining additional width seems impossible for me, but seemingly easy for everyone else! I recently dropped a heavy clean on my forearm because of this and I know it will transfer to better lifts. Any tips on how I can improve this area?
LikeLike
Hello Liam! Thank you for reaching out here. I understand you’re issue and I’m happy to help point you in the right direction. I would recommend to read through the remainder of the 4-part series which will be released through this Thursday and these will cover more on how to hold the bar (the next blog indicating that the minimum standard would be all fingers underneath, not necessarily full grip required), then elbow positioning, then putting it altogether. In the coming weeks we’ll then be releasing an upper body mobility assessment which will be followed by steps one can take and protocols one can follow to help fix/mold their front rack position with the best grip width. Once you make your way through the rest of this 4-part series, I’m happy to go ahead and jump ahead with you if you like as I’m sure there are a few things I can go ahead and get you started on to make the changes you desire. Best, Chad
LikeLike
Appreciate this bblog post
LikeLike