Squatting Like An Olympic Lifter: “GO!” Part 2 – The Descent
Right after that initial break of the hips, knees, and ankles, comes the largest portion of the downward movement of the bar and body: the descent. The descent is only a continuation of a proper setup and initiation; improper execution of either of those factors will likely lead to compensations as you squat. Go back and address those FIRST! That said, if all’s well on those previous actions, then we must maintain and build off of what we’ve created.
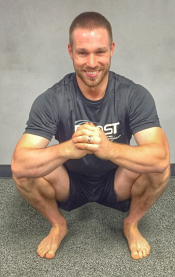
The tripod foot establishes the “base” of knee alignment and stability during the squat descent. It must be established during the set up and maintained through the entire descent!
(Again, if you set up with excessively wide and turned-out feet, the tripod will be increasingly difficult to hang onto, or just non-existent from the get-go). Though it will differ for each individual based on anatomical variances, we’ll define “ideal” knee alignment as a range from the inside of the kneecap stacked vertically with the inside of the big toe, to the inside of the kneecap stacked vertically with the outside of the pinky toe.
If the knee ventures inside of this inner range, the tripod will be lost with a collapse in the arch of the foot, and possibly the pinky toe and its base losing connection with the ground. The further one descends like this, the more compensation we’ll likely see in the body up from the feet and knees: forward torso, rounded back, and limited potential depth.

If the knee is pushed outside of that outer range we might see the big toe and/or its base lose a solid connection. Though the knee may appear stable to the naked eye (as you cannot see the foot rolling on its side easily through shoes), a loss of tripod connection over time will wreak havoc on your movement quality and performance. This can also limit the depth in some athletes. To prove this point, try to squat down as deep as possible while driving your knees as far out to the side as you can. Let your big toe leave the ground and see how deep you can squat. Next, jam your big toe down and establish the tripod foot. Squat as deep as you can again, but this time keep your knee tracking within the recommended range (between your big toe and pinky toe). Were you able to squat any deeper?

The strongest position for the legs during the middle portion of the squat will be with the knees in direct alignment with the toes (closer to the inner range of “acceptable”). While you may be able to drive the knees out further, you will likely lose optimal control and engagement on the descent, and potential strength and power for the ascent. For example, I once had an athlete who increased his back squat max by 15 kilos in a month with only the cue to limit an excessive “knees out” descent. It wasn’t that he gained significant strength in one month, but rather, allowed his body to move more efficiently to produce more power.
It is acceptable, however, for the knees to drift out to a wider position (the outer range of “acceptable”) at the very bottom of the squat, provided the tripod foot remains in contact with the ground. This position is needed for some athletes to allow their hips to sink to the greatest depth and their trunk to stay upright. Both of these factors are critical to efficiently lifting heavy weight within the olympic lifts.
Doctor’s Note:
Think about the opening and closing of a door. When you pull on the handle of the door, the hinge opens and the door opens smoothly. The movement of the metal hinge that connects the door to its frame operates similar to your knee.When we look at the knee joint, we find that it’s basically a hinge that is stuck between the ankle and hip. Your kneecap (patella) travels within a small notch in your femur called the patellar groove. As your knee bends and straightens, the tissues (muscles and fascia) that surround the joint keeps the patella traveling in a stable position.
However, what would happen if you pulled the handle towards you while simultaneously pulling upwards? The door obviously wouldn’t open nearly as smooth. This is because the metal hinge joint is being pulled off axis. These same uneven forces are placed on the knee joint when it moves out of ideal alignment during a squat.
Subtle alterations in knee stability over time can have a profound effect on the smooth lining of the underside of the kneecap. If you allow the knee to cave in or push too far to the side, it causes the kneecap to rub unevenly against the femur and can lead to erosion of the smooth cartilage on the underside of the bone.

If we view your squat from the side, what angles are being created in the shin, femur, and torso? Is the barbell staying balanced and tracking over your mid-foot?
We’ll once again start with the feet; where the pressure is here can dictate where the rest of the body goes and how it is engaged. Many coaches cue “heels” in the squat, and many athletes work to apply/exaggerate pressure there to the extent to where they are curling their toes up, or you can see space between the floor and their shoes. Let’s go back to considering the reception of the snatch and clean; when you squat on your heels rep after rep you’re teaching and telling your body it is ok to land your Olympic lifts there. Landing on your heels will lead to a loss of balance and poor lifting mechanics during the reception of the clean or snatch. Maintaining the tripod foundation (and not shifting excessively back to the heel) during the entire squat will allow for effective carry over to the Olympic lifts.
While “heels” is a word that many coaches use to teach with successfully, in my experience it is mostly unnecessary. The cue is often used for one of two reasons. For athletes who allow their heels to pop off the ground during a lift, coaches will yell “heels” in an attempt to re-establish balance. This problem can arise due to poor technique (shifting forward due to poor balance) or due to poor ankle mobility (something we’ll cover more in depth later). Coaches will also incorrectly teach athletes to focus on their heels rather than the movement (think about that for a minute). Ultimately, we need to use our entire foot – any optimal athletic movement does (yes, even powerlifting and CrossFit where these teachings, cues, and exaggerations are often MISINTERPRETED from). It’s worth repeating, we want a stable and balanced tripod foot throughout the descent.
Now, up to the shins, or rather the first angle that we see from the ground, and how that affects the other angles and squat as a whole. First of all, the more one is on their heels, the less shin angle we’ll see. On the other hand, if one is on their toes (heels leaving the ground), then there will be a greater angle in the shin. Understand that the shin and torso angle go hand in hand, meaning that the straighter the shins stay as one descends, the more the torso will have to lean forward (a greater torso angle); the more angle we can create in the shins, the more upright we can remain.
Remember, the most natural, efficient way to perform a full range of motion squat is to simply drop straight down, and stand back up. We want to simultaneously break at the ankles, hips, and knees to initiate. As we continue the descent, to slowly and continuously increase the angle of the shin – while maintaining tripod foot – where ankles reach their end range only in the very bottom of the squat, is most desirable. This keeps the torso upright, while the bar stays centered over the foot, resulting in greater ease in sinking to extreme depths. You should see the torso angle slowly and continuously increase until the femur is about parallel, then it will decrease (bringing the torso more upright), until the athlete’s lowest position is found. In this aspect, if you are never sinking to the extreme depth that you’re capable of, then you’re likely never finding, feeling, and learning your most upright and supportive position in a deep squat.
With this in mind, especially with those that do have sufficient ankle range of motion, we should look out for excessive patterns in both directions.
Very commonly, athletes will create a big angle in the torso, maintaining a more vertical shin without that continuous increase in ankle flexion (usually a result of the “hips only initiation”) and then make up for it almost all at once going forward with the shins and upright with the torso the last few inches in the bottom. (An extreme example would be a good morning into full squat, or kang squat; good exercises for some athletes, but not at all what we’re looking for here.)
Also, in over-exaggerating staying upright, some athletes will push the knees too far forward too soon, or rather get to the end range of their ankles too soon (this is usually a continuation of “knee initiation” and looks like a jerk dip). Once the ankles hit a wall, the torso will be forced forward and the hips shoot back, ultimately limiting position, quality, and depth in the bottom. (If you are someone with mobility limitations that has no choice but to be led astray in this way, we’ll be covering assessment and protocols for this.)
Ultimately, if the tripod is lost through the descent in ANY direction (side to side and/or front to back), you can lose quality and strength due to suboptimal activation (using less of your body as a whole). If the pressure is not evenly distributed through the three base locations then you are not engaging as much of your body as you could be.
WARNING: In response to an athlete who is unable to squat to full depth with the recommended stance and alignment without allowing the back to significantly round or flex, coaches will often jump to modify an athlete’s stance to a wider more toe-out position. While stance modification can help some maintain a more neutral spine alignment, I caution you against this as your first go-to change when seeing this problem. Athletes who use a wider stance with excessive toe-out position limit their potential squat depth and engrain this foot position for their reception of the snatch and clean. Instead, I look forward to giving you some different options for improving squat depth while also working to maintain the desired neutral spine position.
Next up, we’ll confirm just where the end of your descent should really be and where the ascent should begin. Personally one of my favorite – and very controversial – aspects of the squat (and Olympic lifts): the appropriate squat depth!
Until next time,

Chad Vaughn,
2-Time Olympian, USAW
_______
With
Dr. Aaron Horschig, PT,
DPT, CSCS, USAW
_______

1 Comment