The simplest form of exaggeration for your overhead position is with the exercise, “Behind the Neck Press & Stretch”. Therefore, it is our initial go-to exaggeration drill for mobility and position improvements, as well as a fruitful general warm up option for overhead preparation and maintenance.
Behind the Neck Press & Stretch:
To perform this exercise, first place the bar on your back as in a high-bar back squat position (at the base of the neck on top of the traps) and utilize your clean grip. From here, understand that this is a two-step, or two-position, exercise: 1) press and then 2) stretch. First, press straight up – with the bar in line with the back of the head – and hold there for a few seconds to settle into a more relaxed position. Then, without moving the head, push the bar back into the stretch; your goal is to increase the distance between the back of the head and bar (this will be less relaxed of course); hold for two seconds. To reset and do another rep, we’ll need to move the bar forward to align it again with the back of the head, then return the bar to the base of the neck. From there we can repeat.
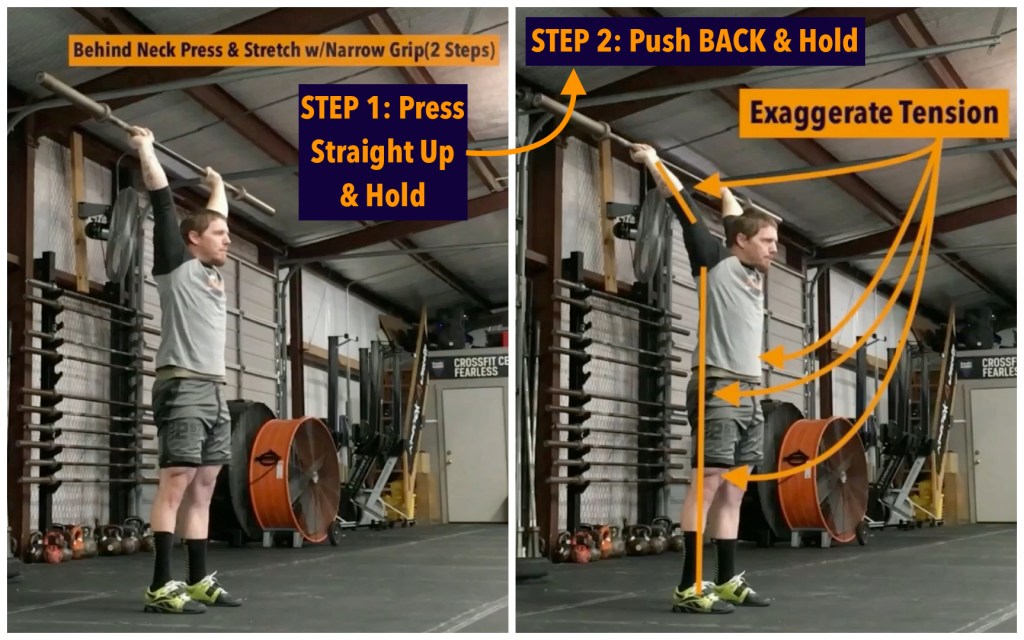
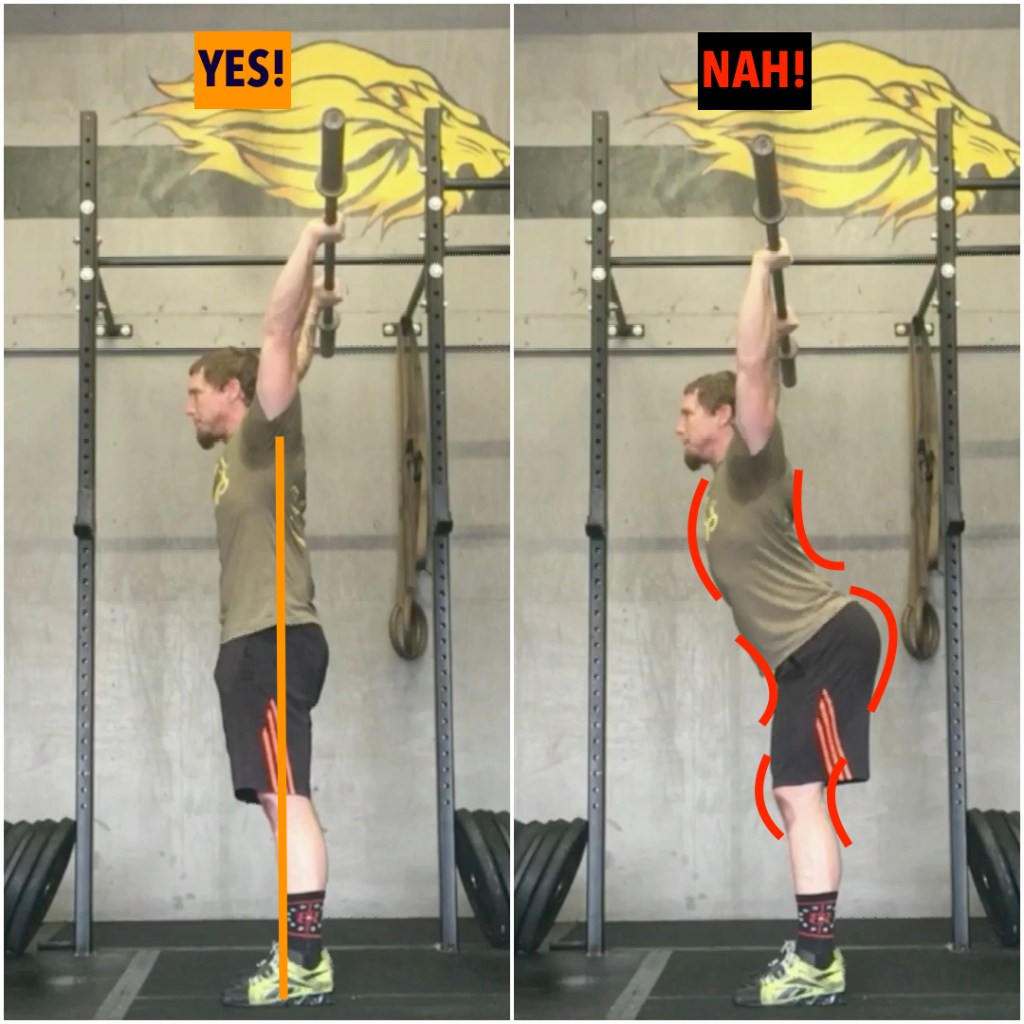
It is CRITICAL that the elbows stay aggressively locked and we want the body straight and tight here throughout. In the pushed-back position it is common to see athletes with very soft elbows and knees (somewhat random that the knees bend, but they do as the compensation trickles down the body), arms twisted forward (internal shoulder rotation), a hip hinge forward, back arched, and/or head forward and down. This is because each of these compensations allow for more range of motion and helps them accomplish the general instruction of “push back on the bar as far as you can.” But, range of motion is an inappropriate emphasis here. We do want you to push back aggressively, but only as far as you can with the elbows, shoulders, and stacked body standards intact. Otherwise you’ll reinforce these compensations that we’ll surely see in the overhead squat and snatch. Whatever your capability is here, it is something to take note of and build from. Keep in mind that sometimes that movement is maybe only a quarter inch. But that’s ok, we’re getting so much more out of the stretch when you are pushing back against your end ranges correctly.
The way that we ensure these characteristics for all athletes (even for athletes with more than sufficient overhead mobility and solid overhead positions) is by emphasizing exaggerated tension in those commonly compensated areas of the body. Starting from the ground up we’ll lock the knees by flexing the quads, keep the hips in line by squeezing the glutes, keep the torso straight and aligned by crunching the abs, fight against the arms twisting forward by twisting them back, and relentlessly flexing the triceps to keep those elbows locked. Again, we also must keep the head aligned with the body as this is not about pushing the head through to create the stretch, but rather pushing the bar back (remember we don’t want “head through” or down within the overhead squat either). This is a lot to think about, yes, but one is better off not doing this stretch at all if there is give in any of these areas.
One potential cue to encompass most of this for athletes with a gymnastics or CrossFit background is “hollow.” Creating a hollow position when lying on the ground means the feet are slightly elevated, the lower back is pressed into the floor, the torso/back is rounded up, and with arms overhead, shoulders (and arms) are elevated; the body is in a firm, slight curve (think of a banana). Now, a standing position with the bar overhead does not usually allow this exact shape (especially when the bar is being pushed back) but since “hollow” is in extreme opposition to hips backwards, chest out, and back arched it can be a very appropriate and effective cue here.
I need to backtrack a bit because while I’m asking the athlete to be tight in just about every area, I also used the word “relaxed.” Note for this exercise, relaxed refers to the shoulders and the wrists. Shrugging up is very common with this exercise, but we want the shoulders/shoulder blades/scapulas relaxed down as opposed to being shrugged up any amount. If you’re struggling to find that specific relaxation then it’s better to be forceful and exaggerate; “scaps in back pockets” is a good cue. Ideally, we also want the wrist relaxed back to full extension. Force if needed, but learn relaxation over time. In the end, the major difference in the amount of exaggerated tension you should have in step 1 versus step 2 is that in step 2, (the stretch) you’re holding onto this tension for dear life, particularly in the elbows.
Doctors Note:
As with all coaching cues, the magic lies in the end result. For example, I love Chad’s cue of “scaps in back pocket” as a way to limit excessive shrugging in the overhead position. Understand that this is not the same cue as “back and down” that many will use to set the shoulder blades for a back squat. Here’s why you must understand the differences.When performing a back squat, the cue some use of “back and down” pulls the shoulder blades towards the spine (the movement of scapular retraction) and engages the trap muscles to create a muscular “shelf” to secure the barbell. However, if an athlete continues to think about pulling their shoulder blades together as the arm moves overhead, it can lead to problems.
For example, shortly after setting a world record clean & jerk of 119kg in the -49kg weight category, Mirabai Chanu of India came to work with me on clearing up some shoulder pain she had been dealing with. When I assessed her shoulder blade movement (by simply having her move her arms directly to the side as high as she could) the problem was very apparent!
As the arm moves overhead, the shoulder blades must follow (this is called scapular upward rotation). When Mirabai moved her arms overhead, her right shoulder blade first pulled in towards the spine (retraction) and tilted the wrong direction (downward rotation) before then slowly starting to move in the desired position (upward rotation) to support the arm. Eric Cressey compared this to a sprinter starting 10 meters behind the starting line of a race. This limited scapular upward rotation led to problems in the turnover portion of her snatch lift (when the shoulder joint is in one of the more unsupported and vulnerable positions). By limiting this early retraction and promoting better upward rotation of her shoulder blade she was able to quickly eliminate pain and find improved stability in her lifting.
It can be easy for some to misinterpret cues. The cue “scaps in back pockets” is not intended to have you pull your shoulder blades together with the bar overhead. This limits the ability of the scapulas to rotate upwards. Much like a seal balancing a ball on its nose, the shoulder blades still need to move out and up slightly (upward rotation and slight protraction) to provide stability for the arm. Keeping them “in your back pocket” just ensures you stay in a stable and stacked position.
Modifications
From the standard setup of your clean grip, we can move the hands in or out to decrease or increase difficulty. For example, in step one, if you’re unable to sit the bar completely on the base of the neck, press from behind the neck (including locking out the elbows or aligning the bar with the back of your head), and/or if you have a lot of discomfort or pain with using your clean grip, then you can widen your hands as much as needed to be more comfortable/maintain standards. From the adjusted starting point, the plan will be to progress the hands in over time as able through sets, days, and/or weeks. Conversely, if your overhead mobility and position is already good and you’re using this for maintenance, the clean grip might be easy for you. If so, you can do some reps more narrow than your clean grip as long as standards remain intact.
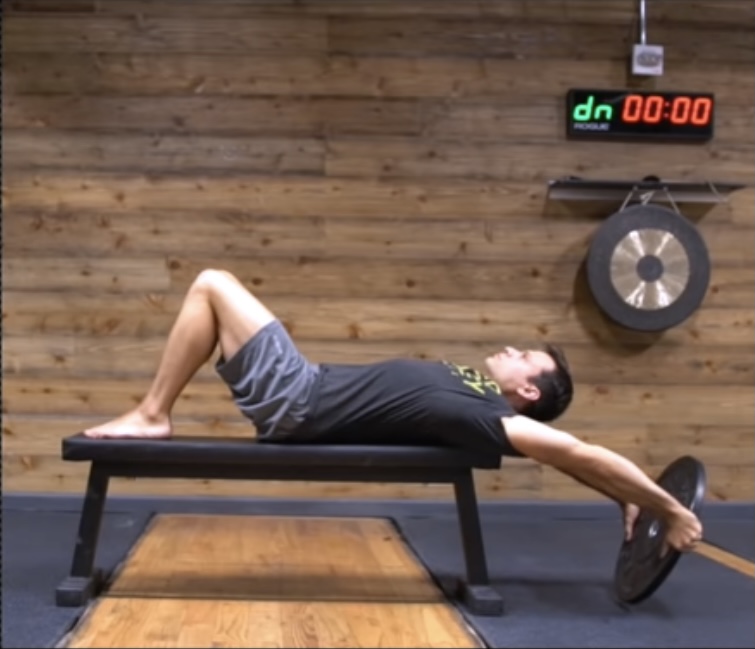
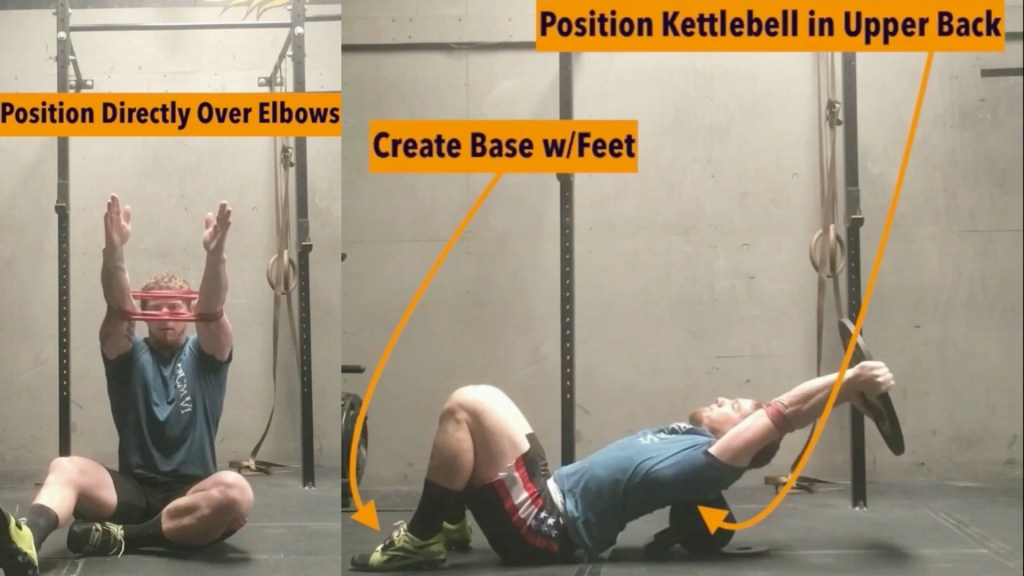
Other variations of this exaggeration drill involve using a light bumper plate instead of a bar. Applying the same body-tightening cues, you would hold the bumper plate tightly and directly on the sides (at its greatest diameter). Holding it here with the palms facing each other will help force the arms to stay more twisted back in the position we want. In using the plate there will be no press (beyond the body-tightening setup), but you can perform the stretch either standing up, laying on a bench, or over an object that is placed in the upper back (my favorite option is an atlas stone). Laying on a bench or over an object can be a good “training wheel” for those struggling to keep the back from arching. You must lay on the bench with the base of the neck at the edge, head off the bench (but keeping it in line with the body, not letting it hang). Or, the object should be on the ground between the traps just below the base of the neck. In either case, you still want them to try and offset the arch using the “hollow” cue. They may not be able to offset completely, but they are still going to get a more effective stretch as the resistance is positioned right at the point where we want the angle to be created and changed.
Also with these plate variations we can add a band around the elbows to help those that are having trouble keeping their arms straight and elbows locked while trying to perform the stretch. This has been an addition to the drill that has made ALL the difference (I’ll label this one “magical”) for those athletes that HAVE sufficient elbow extension (they can straighten their arms with the elbow extension test from the assessment blog) but their body just cannot figure out how to keep the arms straight within the stretch otherwise. (They’re likely having trouble with the elbows with their overhead barbell movements as well). Be creative with bands you might have available to you, but I’ve found most benefit from using what are known as “monster” or “pull up assistance” bands that are found in most CrossFit gyms. With these we’ll go with one of the smallest sizes (start with the smallest and work up as needed; if the smallest band available accomplishes the elbow lock sufficiently, then no need to change the band/increase tension) and make 3 equal loops with a single band. You’ll then place both arms through and direct the band to the elbows (in the setup and stretch the greatest diameter of the bands should be touching the points of your elbows). Now grab the plate, position the body appropriately and perform the stretch. If placed correctly, the band will usually brush over the top of the head as one moves in and out of the stretch.
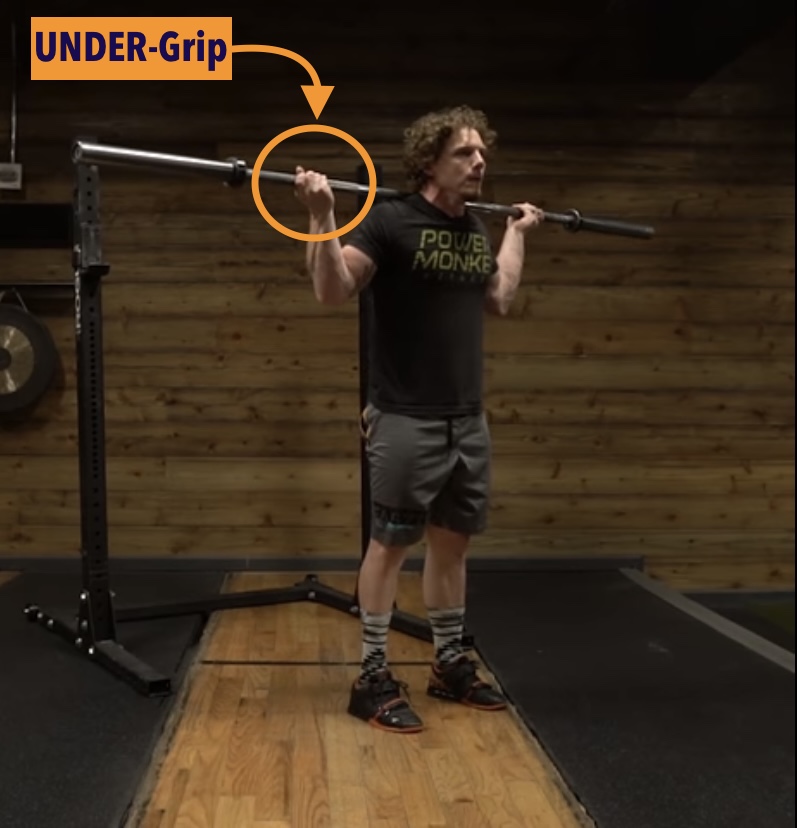
Another way we can increase difficulty is, instead of using a normal over-grip, try the exercise with an under-grip (with the bar on your back, the thumb will be on the outside of the hand instead of the inside). Typically the athlete will need to place the hands wider here than what they can with an over-grip; I usually start athletes at 1 inch inside of their normal snatch grip. In general it is harder to place the bar on your back and hold onto the bar since the hands and wrists are twisted in, and this grip will be more difficult in the stretch depending on where the individual is tight. If the athlete is unable to maintain the ideal shoulder position that we want within the standard stretch, try using the under-grip instead to FORCE external rotation and reinforce the desired orientation we want to see in overhead squats and snatches. This under-grip setup also isolates the lats, exposing and targeting any lacking mobility in that area (if the lats are tight expect less range in the stretch). Lat tightness is one contributor to the forward arm twist compensation, so if lat mobility is your greatest limiter, this will be the recommended setup for you.
Immediate performance enhancements
We can also use any of these variations as a drill for immediate performance improvements, especially with heavier or heaviest weights in the snatch or jerk. With athletes that become increasingly soft in the elbows and/or are “pressing-out” more and more with increasing weight, this is a great drill to try right before some of those heavier reps. Though this can be a sign that the athlete is lacking stability somewhere in the upper body (particularly if the athlete can lockout sufficiently and consistently with light loads but not heavy), and that should specifically be assessed and addressed, this exaggeration drill has still shown immediate benefit. It goes along beautifully with the stability work they should be doing as it teaches them the action they need to strengthen AND become more aware of in a more difficult position.
Not only have I assigned this to many athletes on heavy training days with success, I’ve now even used it with a handful of different athletes in the middle of competition! These athletes were either already known for pressing out, started pressing out on their heavier warm-up reps, or got called for a press-out on their 1st or 2nd competition attempt. For those that are known pressers, we’d already been using this in training and had a plan to use it for the competition. For the others I was able to react, pull the tool out, and throw it in when needed. One of the keys is that it needs to be done immediately before the snatch or jerk rep (or as close to that as possible). Though we certainly got some strange looks, as it’s unlikely to see a mobility drill right before a competition attempt, I know it has led to many “good” lifts for these athletes that would have likely otherwise been “no lifts” having been turned down by the judges for a press-out. I do hope this can become more common though as it is not any different than what is seen in other sports used to prime the body to perform.
With these variations and progressions in mind, here are some specific protocols for maintenance, mobility improvements, and immediate performance:
For general overhead mobility and positioning maintenance, perform your chosen variation for 5-10 reps before the first 2-3 warm-up sets of your first overhead exercise of the day 2-3 days/week.
2-3 Rounds
•A. Behind the Neck Press & Stretch Variation: 5-10 reps
•B. Warm-up set of 1st overhead exercise
For overhead mobility and positioning improvements, add your chosen variation to your protocol established in the assignment blog that incorporates your upper body mobility drill most in need and warm up sets of your first compensated overhead exercise of the day.
3-5 Rounds
•A. Mobility drill with given instructions
•B. Behind the Neck Press & Stretch Variation: 5-10 reps
•C. Warm-up set of compensated overhead exercise
For immediate performance improvements with heavy attempts in training or competition, perform a set of your chosen variation right before a heavy snatch or jerk attempt where you typically have trouble locking your elbows overhead, or find yourself having trouble on any given day.
1-5 Rounds (as needed)
•A. Behind the Neck Press & Stretch Variation: 3-5 reps
•B. Heavy attempt of compensated snatch or jerk
Now that we’ve got your overhead position moving in the right direction, let’s look into the same specifics and potential protocols for your front rack.
Until next time,

Chad Vaughn,
2-Time Olympian, USAW
_______
With
Dr. Aaron Horschig, PT,
DPT, CSCS, USAW
_______

Leave a comment