To perform the “Front Squats with Straps” exercise I’m recommending, you first need straps. If you don’t have any, GET SOME! If you are reading this blog I know you’re serious about moving better, achieving your goals, and reaching your potential in weightlifting, and this inexpensive and effective tool can help you do just that . NOTE: I HIGHLY recommend Onyx Straps. They are leather and very durable, AS WELL AS comfortable. Of all the different material and brands I’ve used through the years, these are by far my favorite!
Straps 101
There are two different styles of straps:
- Deadlifting (or lasso) strap: Designed with a loop on one end of each strap and the opposing flat end is to be placed through that loop to create a bigger loop for your hands to go through; pulling the flat end through further will make the loop for your hand smaller, and cinch it to your wrist.
- Olympic lifting (or closed loop) strap: Made without loops on either side and the loop for the hand is created by overlaying one end on top of the other, typically sewn together or held together with tape.
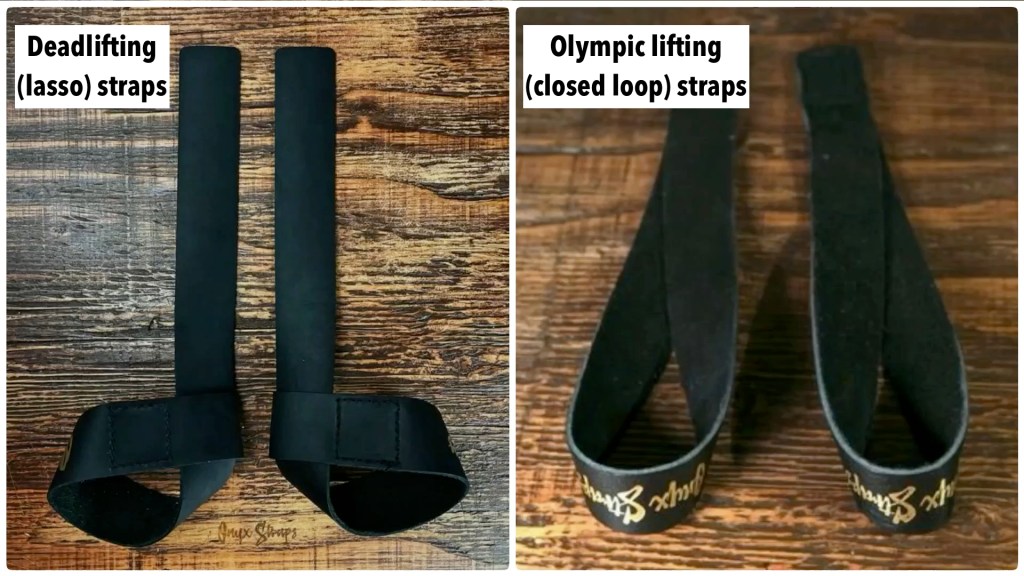
Each style has what we’ll refer to as a front and a back; they also have a left and a right. When a strap is connected correctly to make the loop for your hand it creates a concave shape (“bowl-like”); be sure that the ends of each style of straps coming together to make the connection are positioned or rotated in a way to create such a shape. This inward curve is what will be/should be facing forward when the straps are hanging from your wrists. So, to put the straps on your wrists correctly, you have to place your hand through the BACK of the strap. (It is common to see athletes incorrectly put their hand through the front as the concave opening is “welcoming” in that way and to those that don’t know better, placing the hand through the back feels wrong). For the deadlifting straps, the flat end being pulled through the small loop is to fall to the inside of each hand (from the bottom of the wrist towards the thumb). For the weightlifting strap, the overlaid end should be on the inside (for the left hand strap the right end should be on top, and for the right hand strap the left end should be on top).
Now that we have the straps on your wrists appropriately, it is time to strap to the bar; you will want to follow the concave shape, not go against it. You must direct the straps to go UNDER and then around the bar, then wrap the strap around to the INSIDE, ONE time around. For the deadlifting straps this is pretty natural if you have the straps on the right way/correct hands, but it is common to see athletes have these straps on the wrong hands and therefore wrap to the outside. For the weightlifting straps it is common to see athletes wrap to the outside or the middle, and/or wrap long straps around the bar as many times as one can. But, with either style, you have potential for the snuggest grip and most solid lock to the bar by wrapping to the inside just ONE time, no matter the length. Furthermore, this specific wrap also offers the most freedom to bail out of the strap hold (“unlock”) if needed.
Go one hand at a time using your dominant hand to assist your non-dominant hand first (then you can perform a miraculous magic trick to get your dominant hand strapped in). You may also have to have some help a few times so that you can get the hang of it. Once you’ve got the wrap, be sure your thumb is under and around the bar as well (opposing your 4 fingers) and then you can wiggle your hands out or in as needed to the appropriate grip width. From there you can tighten the straps by continuing to twist the hands up and down in place (no longer side to side), trying to grab more of the strap each time.
You will strap to the bar the same way regardless of exercise; only your grip width changes depending on your goal. Strapping to the bar effectively (easily, tightly, safely) is a skill that will need to be practiced and developed. To summarize:
- Insert each hand through the BACK side of the appropriate strap (left and right).
- Approach the squat rack aiding your non-dominant hand with your dominant hand first.
- Wrap the strap under and around to the INSIDE, ONE time only.
- Wrap your thumbs under and around the bar, slide hands into position as needed, and wrap tighter as able.
“Front Squats with Straps”
Athletes using straps within the front rack for any reason will need at least a little more weight than just the bar to benefit optimally. That being said we don’t need to use straps with anywhere near max weights with full front squats. Initially while learning and trying to make change, we can build up to as much as 50%, and as comfort and ability increases, we can build up to as much as 70%. (For the exercise, “Front ¼ Squats,” one can increase the load over time safely to as much as they can and really overload this area with the stretch. There are other uses and benefits to this exercise we’ll cover later.)
Be aware that the stretch from using straps in the front rack can be VERY aggressive for some athletes, which is why it is so good and effective; this intensity is a powerful motivator to make it less aggressive over time. We should progress slowly and pay attention to our comfort level and initial frequency. In the beginning you should just step out of the squat rack and hold the bar in the standing position (without squatting). If you have intense pain from the standing position, then loosen the straps as much as needed, or plan to revisit strap use after you’ve improved mobility to a sufficient amount through other avenues (don’t give up on this method entirely!). But if you are experiencing an intense stretch, hang in there. Do this as many times as needed until you feel more comfortable moving to the next variation. To increase difficulty we can make our way through the following progression:
- Standing with loose straps.
- Standing with tight straps.
- Front ¼ Squats
- Full Front Squats with heel elevation: Start with high elevation and progress down through sets, days, or weeks (i.e., 2 inches, down to 1 inch, down to half an inch).
- Full Front Squats with NO heel elevation.
- Full Front Squats barefoot (now of course we’re on the maintenance level).
- Full Front Squats with TOES elevated (and now adding to our insurance plan).
We can also increase difficulty or pinpoint an area of need more by widening or narrowing the hands from the clean grip. For example, if you’re comfortable with straps and your front rack is good as a whole, then playing with some reps wider and/or more narrow will keep you more well rounded, even more comfortable at your specific clean grip width, and away from cementing to a specific width. If you have recently adjusted your hands out wider to accommodate our recommendations for clean grip, you might try to do some reps even a little wider than your new clean grip (in this case you will not want to do any reps more narrow than your new clean grip). Conversely, with tight triceps and lacking ability to bend my arms, I benefited tremendously from doing some of my sets with my hands more narrow (the more narrow the hands the more one will have to bend the elbows).
Wherever you are on the spectrum and whatever variation you’re using, you must fight for the application of the front rack setup we established in the front rack position posts. Along with aligning the body, we need “elbows up and in, all fingers wrapped, and scaps in back pockets.” The straps have you covered on “all fingers wrapped” so you can put more emphasis and energy into those other aspects. With that simple fact, perhaps we put this “training wheels” type of benefit of strapped front squats in even greater perspective.
Now, with these variations and progressions in mind, here are some specific protocols for maintenance, mobility improvements, and immediate performance:
For general front rack mobility and positioning maintenance, perform your chosen variation for 1-5 reps before the first 2-3 warm-up sets of your first front rack exercise of the day 2-3 days/week. If this first exercise is front squats, then you’ll simply put straps on for the first 2-3 sets as you build up in weight through warm-up sets up to no more than 70%. Additionally you’ll need to pause in the bottom of some of your full front squats for 3-10 seconds (the less reps you perform, the longer the pause should be and it is good to mix and match here). Once again if that exercise is front squats, you’ll simply pause on half of the first half of the reps for each set. At this level you’ll likely just be using straps with full front squats, but if using them with front ¼ squats then your pauses or holds should be in the standing position.
2-3 Rounds
•A. Front Squats with Straps: 1-5 reps with 3-10 second pause in the bottom
•B. Warm-up set of first front rack exercise
For front rack mobility and positioning improvements, add your chosen variation to your protocol established in the assignment blog that incorporates your upper body mobility drill most in need and warm-up sets of your first compensated front rack exercise of the day.
3-5 Rounds
•A. Mobility drill with given instructions
•B. Front Squats with Straps Variation: 1-5 reps with 3-10 second pause in appropriate position (bottom of squat or standing position)
•C. Warm-up set of compensated front rack exercise
For immediate performance improvements with heavy attempts in training, perform a set of your chosen variation right before a heavy clean attempt or heavy front squat set where you typically have trouble maintaining grip width and/or all fingers under the bar, or find yourself having trouble on any given day. (Note: I do NOT recommend this one for competition as it is a little more time and energy consuming and one is not going to get red lights or a “no lift” just for the hands sliding in and/or fingers slipping out from under the bar in competition).
3-5 Rounds
•A. Front Squats with Straps Variation – 1-5 reps with 3-10 second pause in appropriate position (bottom of squat or standing position)
•B. Heavy attempt of compensated clean or front squat set
With these drills we’ve found ways to exaggerate to help improve your mobility, maintain what are key support positions, and lend to your health, longevity, and insurance. Additionally, with some of the Behind the Neck Press & Stretch variations, and all Front Squats with Straps variations, we are able to force your body as needed to do certain things that it just doesn’t want to do, or is having trouble figuring out on its own. We leave it with no choice but to maintain the positions or orientations we set it to and therefore you must move differently. Since we are controlling those major aspects of the position and movement, you have the opportunity to focus on other areas. With that, we complement your specific mobility work to help change your body and teach you something different – something better.
So, once again, let’s make our way back down the body completely and see what else we might be able to do (as needed) to solidify our foundation. We’ll turn our focus to the feet and explore “Contraption Squats” to add to our arsenal of exaggeration drills and individualized mobility work.
Until next time,

Chad Vaughn,
2-Time Olympian, USAW
_______
With
Dr. Aaron Horschig, PT,
DPT, CSCS, USAW
_______

Leave a comment