For assignment purposes, let’s first go back to the concept of “Ground Zero.” Is there anything you do on a daily basis outside of the gym (your habits, your day job, etc.) that could be contributing to any limitation(s) exposed from the assessment tests? If in fact you have pinpointed one or more contributors, are you in a good position to make a small adjustment to your routine? Remember, we want small, simple, and prioritized moves, so if there is a habit you need to change from a previous section, that takes priority, and any new discovery should be put on hold until the other change is solidified.
In any case, what can you do now to begin addressing your most-in-need upper body area? Notice that I said “area” and not “areas”; I did not accidently leave off the “s.” As we’ve continually discussed, I want you to work on only a few weaknesses as a whole at a time, not all or many. At this point, adding just ONE protocol into your workout is the best course of action. We will achieve this by performing a mobility drill before the first 3-5 warm-up sets of any exercise where this tight area is causing compensation. (If you are performing multiple exercises in a given workout that the tight area is affecting, just applying this with the first one for the day will be minimum and suffice to start with.)
For example, if you have front squats in your workout for the day and you found that your lats are your greatest upper body limiter, then you’ll do the lat mobility drill with the accompanied instructions and repetitions before the first 3-5 warm up sets for those front squats as you build up in weight. If the next day you have snatches and then jerks in your workout, and the tightness is causing compensation in both movements, then applying the protocol to the snatches only is sufficient. The idea is to add up over time without overwhelming you or making your overall workout too long. That being said, in this scenario, if once you get to your jerks you want to see if the drill can help that movement feel better and you have the extra time, then by all means do a few extra sets of the mobility drill before some of your jerks.
Additionally, don’t forget that asymmetry from side to side takes priority over any symmetrical limitations here in your assignment. With any asymmetry you’ll perform the accompanied drills only on the more limited side.
Now, with your most-in-need upper body area in mind, let’s take a look Dr. Horschigs “go-to” drills on each of the areas we tested for you to take what you need and use within your program:
Thoracic Spine Mobility
There are two drills that I find work best to improve thoracic spine mobility:
- Self-mobilization (“Peanut Crunches”)
- Seated Rotation & Side Bend
A self-mobilization drill aims to improve mobility of the spine, one joint segment at a time. While a trained medical professional like a physical therapist may perform manual treatment mobilizations with their hands, you can find similar benefits with a “peanut.” Some manufacturers make a fancy peanut, which will cost you a pretty dollar. However, you can save a lot of money by taping two tennis – or lacrosse – balls together.
To perform a thoracic spine joint mobilization (we’ll call these “Peanut Crunches”), lie on your back with your arms crossed in front of you. This will pull your shoulder blades (scapulas) “out” to the side and provide space to place the peanut. The tennis or lacrosse balls should rest on both sides of your spine.
With your arms across your chest, perform a small crunch by raising your shoulders off the ground a few inches. Hold this position for a few seconds before returning to the starting position. Make sure to only move your mid-back during this exercise and keep your low back stiffened.
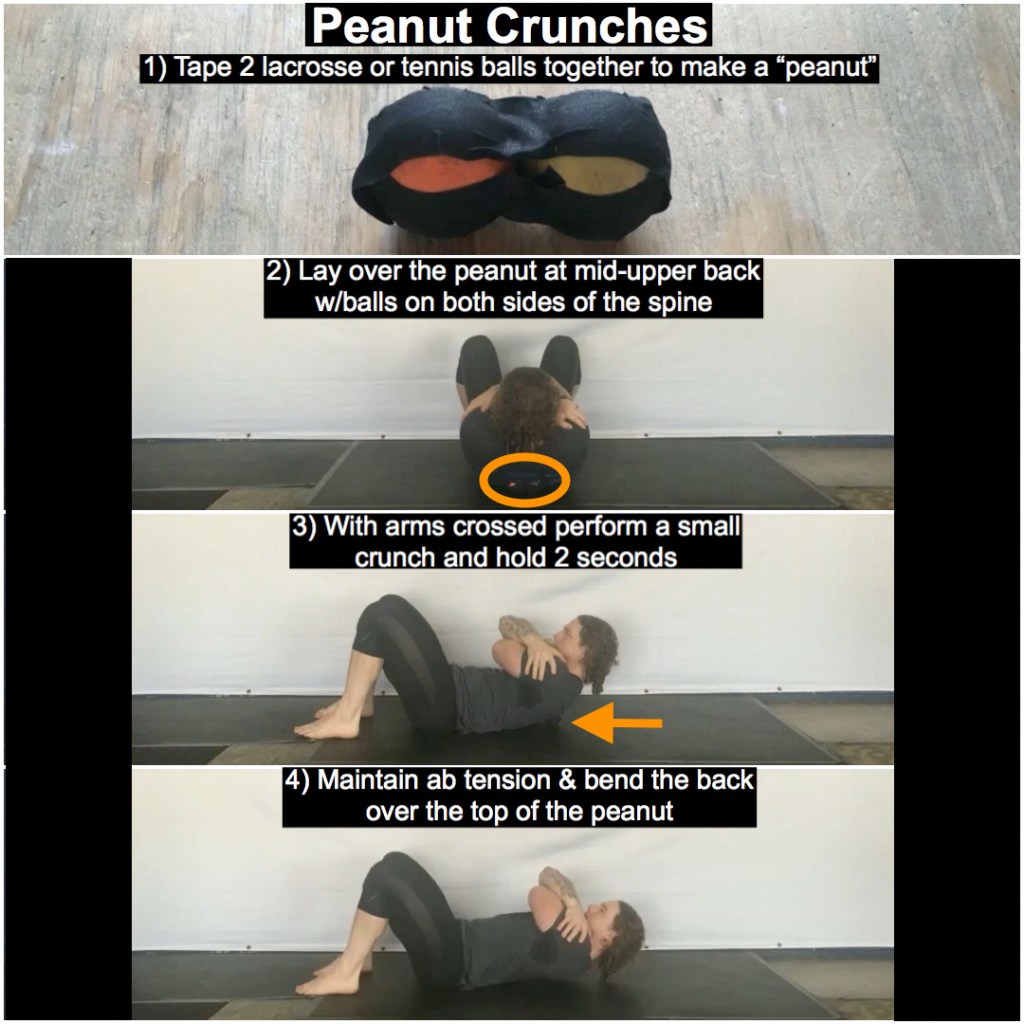
The peanut acts as a fulcrum on the spine (much like the middle of a teeter-totter) during this movement. When this force is applied to a stiff joint, it can help improve mobility.
Perform 15 repetitions for each set indicated in the protocol on each segment of your mid-back that feels stiff. If you don’t feel any stiffness at a particular part of your spine during the movement, move the peanut up or down to another segment. It is normal to have restrictions in some areas of the thoracic spine and not all.
The next progression for rotational mobility starts in a seated position with a PVC pipe across your upper back (as if performing a high-bar back squat). Squeeze a small foam roller between your knees to stabilize your lower body.
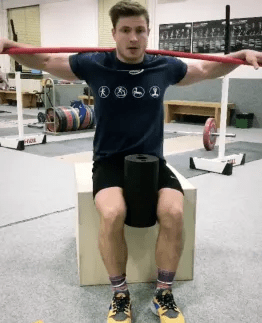
Start by rotating as far as you can to the right. When you hit your end range, perform a small lateral bend to the right away from the middle of your body. This will be a small motion as too much side bend will cause your hips to rise from the seated position and your low back to move. This motion should bring out a good stretch in your mid-back and possibly to your lats on the sides of your torso as well.
After bending back to an upright position, rotate as far as you can now to the left side (again performing a small lateral side bend once you hit your end range of motion in the twist). After 3-5 rotations with side bends to each side you may notice you’re able to now move further than before.
Lat/Teres Major
I like to take a three stage approach to improving flexibility limitations in the lats and teres major muscles:
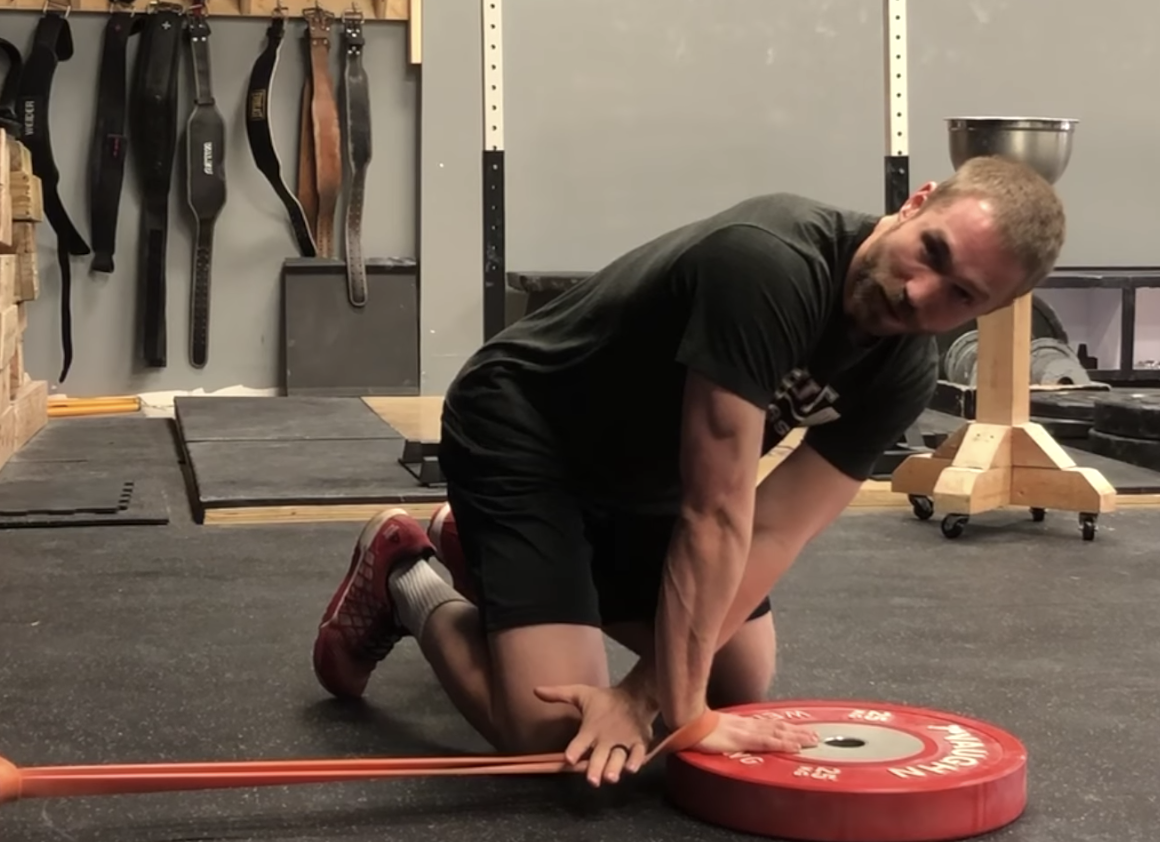
- Soft Tissue Mobilization (“Lat Smash”)
- Lat Box Stretch
- Eccentric Curl Ups
Soft tissue mobilizations with a foam roller or lacrosse ball can be a great way to improve the flexibility of any stiff or tight muscles. While these changes are often short lived if only performed by themselves, mobilizations will play a key role in a comprehensive plan enhance your movement.
Stand next to a wall and trap a ball between your body and the wall (this will be near the outside of your armpit where the larger lat muscle runs). Slowly move around until you find some stiff and tender areas. From this position, you can pin the tender area down and move your arm up and down slowly over your head. I recommend 2-3 minutes total (this will be broken up into 1 minute rounds within our recommended protocol).
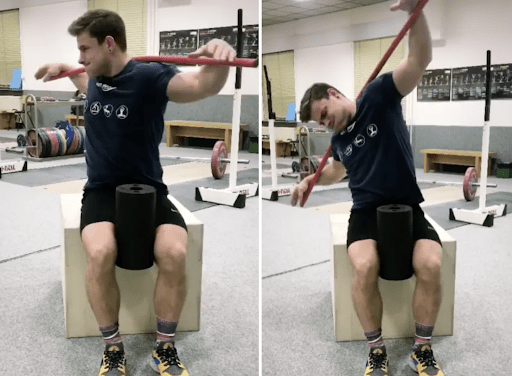
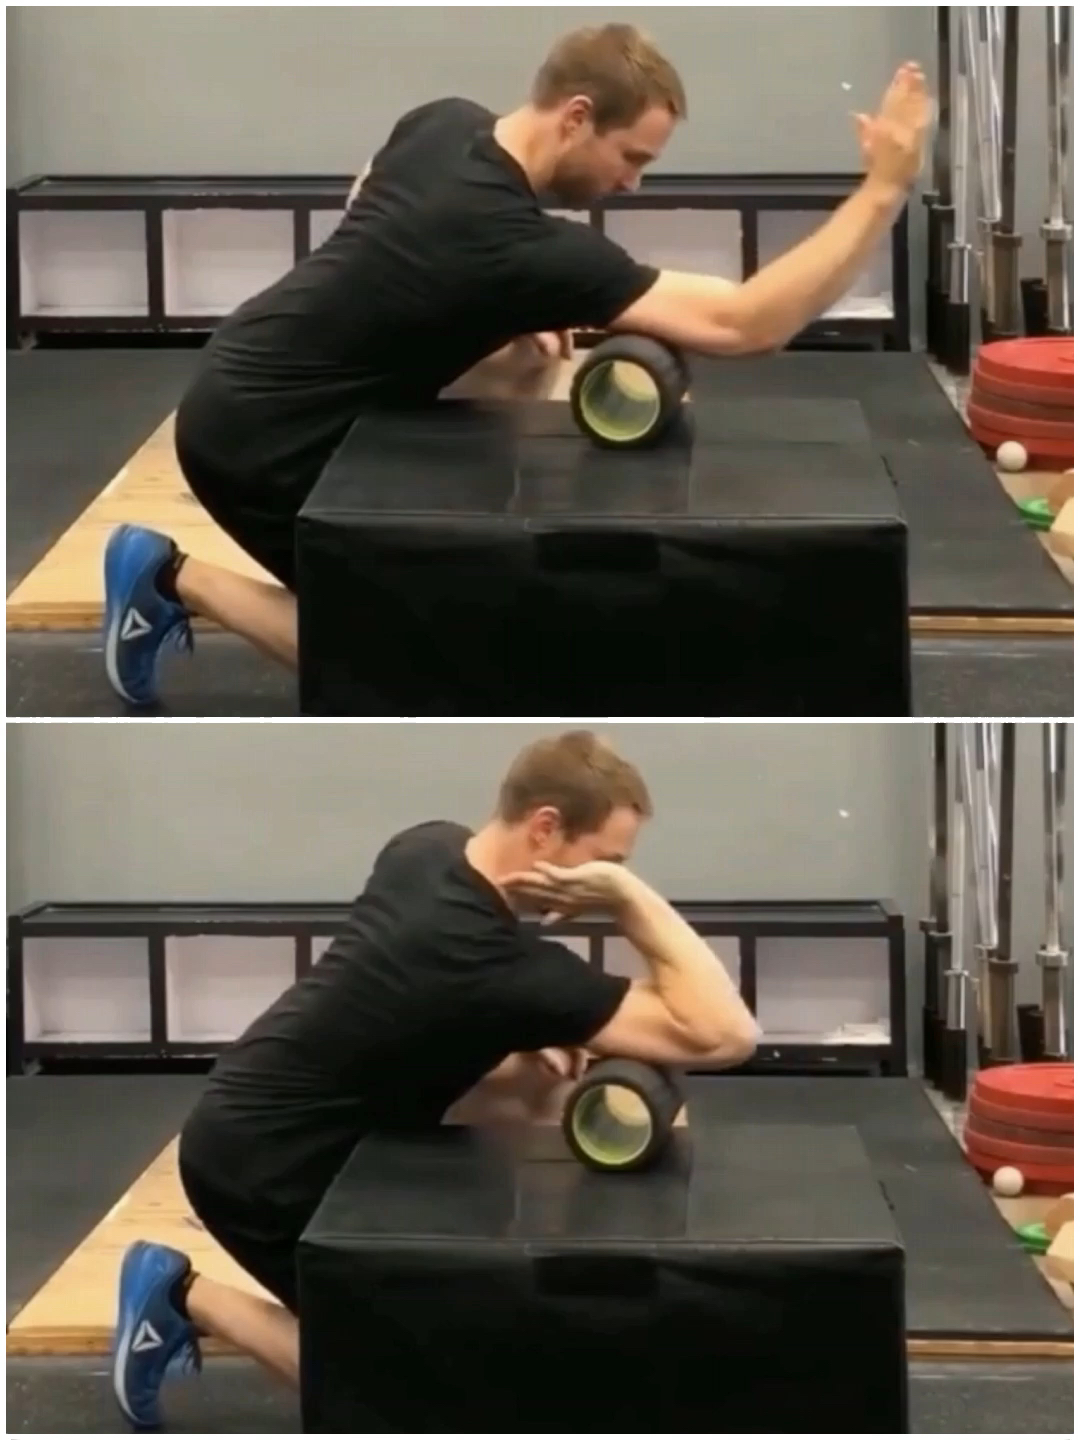
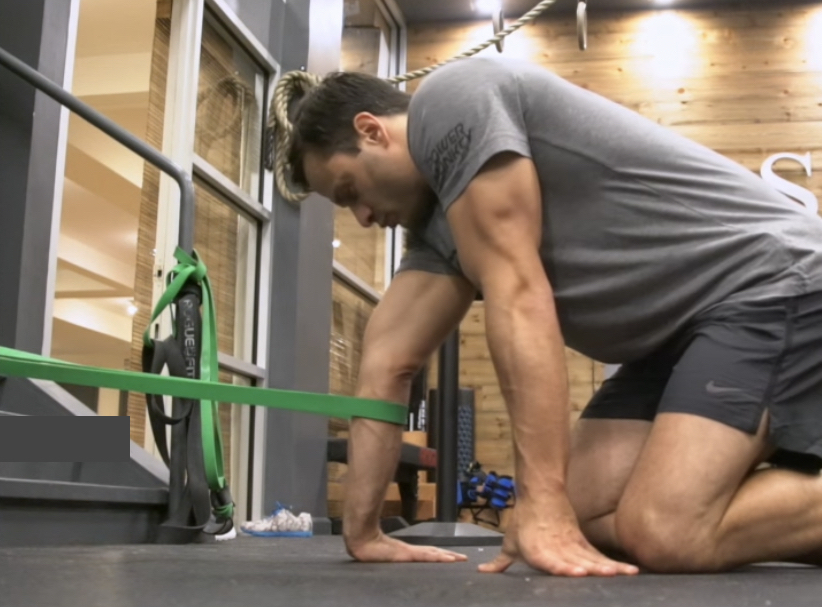
Next, let’s perform a Lat Box Stretch. Assume a kneeling position close to a box or bench. Grab a PVC pipe and position your arms in a “V” position (hands grabbing wide with elbows held close together). Face the box and place your elbows on top.

Sit your hips back on your heels and simultaneously round your upper back and pull your hips under your body as your arms are elevated over your head. Because the lats run the length of your spine, rounding the back as you sit your butt on your heels puts this muscle on stretch. If you’re doing this correctly, you should feel a stretch along the lateral part of your back and into the lateral armpit region (where these muscles attach to your arm). You should not feel this in your shoulder joint; if you do, widen your elbows on the box. Hold this end range stretch for 5 deep breaths in and out before returning to the starting position and perform 5-10 repetitions.
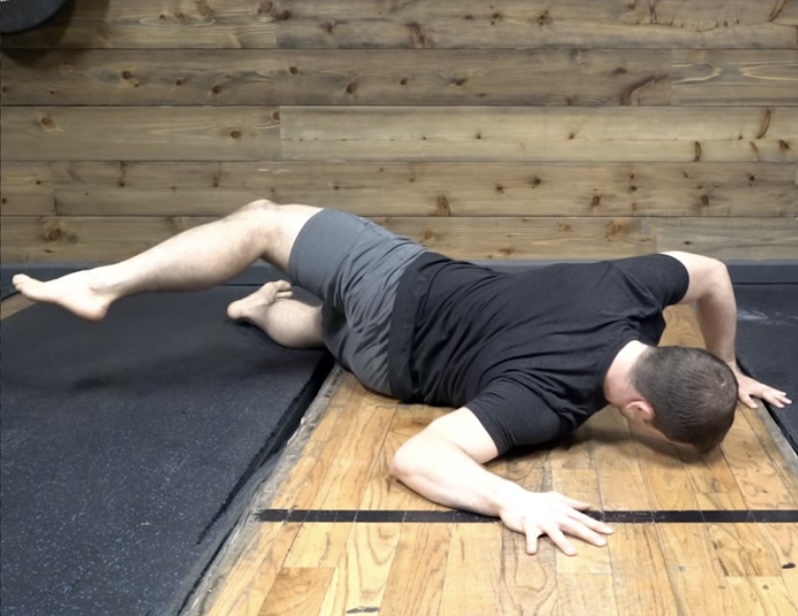
Next, perform an eccentric curl up if you have access to a pull up bar. An eccentric contraction describes the action of a muscle lengthening under tension. This is the opposite of what happens when a muscle shortens as it contracts (concentric contraction) like when you perform a bicep curl.
A way to eccentrically lengthen stiff lat muscles is with an eccentric curl up. With an underhand grip on a pull up bar (an externally rotated position to place a stretch on the lats) jump up to the top position and slowly lower yourself back to the ground. This lower should take no less than 5 seconds to fully extend your arms. There is a good amount of research that shows and eccentric exercise like this can significantly improve flexibility. Try 5 repetitions.

Pec Minor and Major
A great exercise to improve pec flexibility is the floor pec stretch. Lie on your stomach with 1 arm up at 90 degrees and elbow bent to 90 degrees. Place the opposite hand in push up position and use it to help rotate away from the arm being worked until a stretch is felt in the front of the chest. Make sure to keep your core slightly braced and aim to keep the front of the shoulder of the stretching side on the ground. Hold the stretch for 10 seconds and perform 5 reps for each set indicated in the protocol.
Shoulder Rotation – External
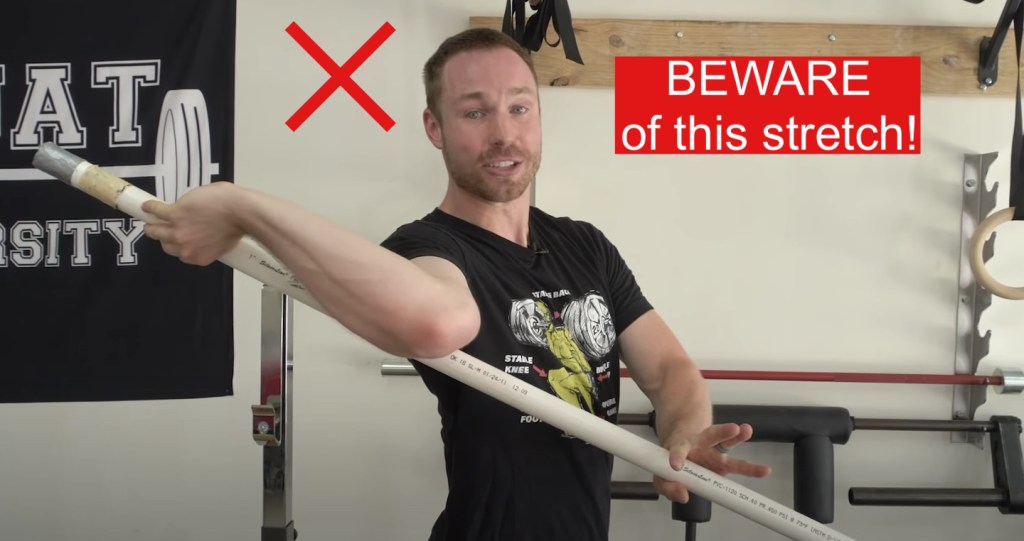
If you failed to show significant external rotation on the prior testing, I would recommend attacking the prior lats and/or pec flexibility exercises rather than performing any external rotation specific exercises you may have seen elsewhere. (While some may recommend a drill with a PVC pipe to improve external rotation, I find it often is performed incorrectly and too aggressively, leading to more harm on the shoulder than good.)
Shoulder Rotation – Internal
One of the most popular stretches prescribed to fix internal rotation deficits is the classic “sleeper” stretch. This exercise is in fact so popular that I have had a number of medical doctors ask specifically for this stretch for some patients. However, I’m not a big fan of this exercise and I caution you against using this stretch. The main reason is that the stretch is easily performed incorrectly and has a small margin of error. I’ll often see athletes roll too far onto their shoulder and aggressively crank their hand towards the ground. In doing so, they place excessive stress on certain tissues of the joint (posterior capsule) which can lead to more problems down the road.

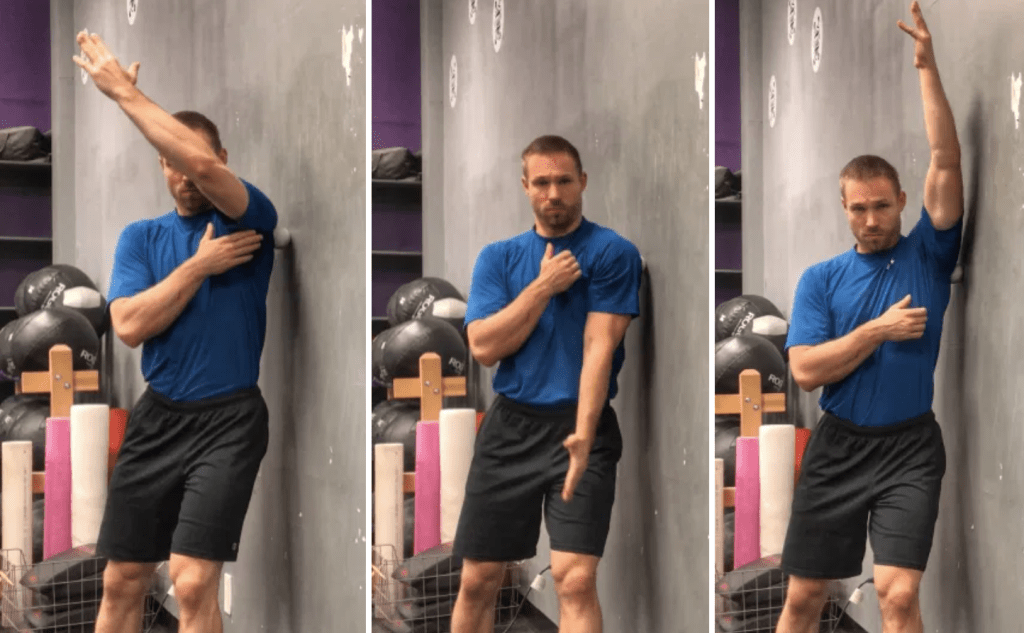
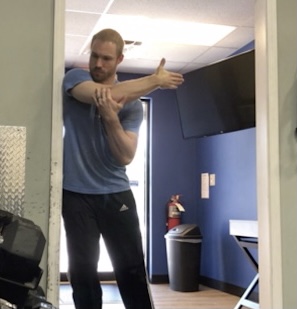
Even if you could do this stretch correctly, I think there are other alternatives that may be more effective and are generally less irritable for the shoulder. For example, the cross-body stretch can be more effective in eliciting improvements in shoulder internal rotation and less in my opinion.
To perform the cross-body stretch, grab your arm with your opposite hand (around the elbow) and pull it across your chest. Doing so should bring out a stretch to the back side of your shoulder. To make this stretch even more efficient, stand in a doorway and wedge the side of your shoulder blade against the wall to keep it from moving as you pull your arm across your body. Hold the stretch for 10 seconds and perform 5 reps for each set indicated in the protocol.
Another helpful way to improve shoulder internal rotation is to perform soft tissue mobilization with a tennis or lacrosse ball (“Posterior Shoulder Smash”). Stand next to a wall and pin the ball between the wall and the back side of your shoulder. Slowly roll the ball around the area until you find any tender areas. Pause on these areas while you slowly pull your arm across your body. Spend 1 minute on each side for each set in the protocol.

Elbow Flexion
One of the most simple methods to improve elbow flexion is to perform soft tissue work to the muscles on the opposite side of the arm, the triceps (“Tricep Smash”). Set up a barbell in a rack or a foam roller on a box and position your triceps on top. Slowly roll up and down the length of the muscle, pausing over areas that feel tender while bending and straightening your elbow. After a minute, stand up and recheck your elbow flexion to see if you were able to see any significant changes. Continue using this 1-minute timeframe as you go through sets within the protocol.
Wrist Extension
Improvements in wrist extension require two approaches:
- Soft tissue mobilization (“Forearm Smash”)
- Banded Joint Mobilizations
If the muscles on the front of the forearm (your wrist flexors) are stiff and tight, you will have limited wrist extension as a result. Performing some soft tissue mobilization to these muscles can be a helpful tool to improve this desired mobility.
Pin a small ball between your forearm and a box or bench and slowly roll up and down the length of your muscles for 1 minute per set (golf ball or children’s bouncy ball are a good size). Pause on areas you feel are tender and pump your wrist up and down for a few reps before moving to another area.

Next, we can perform some banded wrist rocks (exactly the same as the banded ankle rocks but now for the wrists). Grab a small diameter resistance band and loop it around a rig. Place your hand on a bench or stack of plates (palm down) and position the band on the top of your hand. Make sure the band is not positioned on your forearm. Your fingers should be facing away from the rig and the band should be pulling down and back towards the palm side of your hand.
Next, while keeping the hand flat on the bench or plate, lift your arm up and over the fingers into more and more wrist extension. Hold for a second before coming back and perform 10-15 rocks before resting.
Bonus Consideration: “Lockout”
Do you struggle with locking out at the elbow with the bar overhead as effectively as is optimal (the arm is straight and solid, and unrelenting from that upon receiving the bar overhead and through the remainder of the lift)? Were you able to confirm that it is due to a limitation directly at the elbow (the elbow is still bent when you try to fully extend the arm with the recommended test in the previous blog)? If so, our go-to recommendation will be “Banded Elbow Extensions.” Perform this drill with the following steps:
- Attach a resistance band to a rig or other solid upright (start with a small band and increase as comfortable and able).
- On your hands and knees position your body facing the upright and place one arm inside the band, with the top of your hand on the ground with fingers facing the body.
- Place the band just under the elbow joint and scoot your body and hand back to create tension in the band (start with a slight amount of tension and increase as comfortable and able).
- Slowly shift weight back and forth for 10 repetitions. Then, place the band just above the elbow joint and perform 10 more repetitions.
Plug this drill into the below described protocol if and when it might be appropriate for you.
Mobility Drill Recap:
- Thoracic Spine
- Peanut Crunches – 15 reps
- Seated Thoracic Twist & Bend – 3-5 reps/side
- Lat/Teres Major
- Lat Smash – 1 minute/side
- Lat Box Stretch – 5-10 reps holding for 5 breaths on each rep
- Eccentric Curl Up – 5 reps with 5 second descent/rep
- Pec Minor and Major: Floor Pec Stretch – 5 reps with 10 second hold on each rep
- Shoulder Rotation External: *See lat and/or pec flexibility exercises
- Shoulder Rotation Internal
- Cross Body Stretch – 5 reps with 10 second hold on each rep
- Posterior Shoulder Smash – 1 minute/side
- Elbow Flexion: Tricep Smash – 1 minute/side
- Wrist Extension
- Forearm Smash – 1 minute/side
- Banded Wrist Rocks – 10-15 reps/side
Your next step is to plug your most-in-need drill into your warm up sets as followed:
3-5 Rounds
- Mobility drill with given instructions
- Warm up set of compensated exercise
TEST & RETEST
In order to make sure the mobility and flexibility work you are performing is helping you move with better technique, always recheck the prior tests after performing these drills. If you are using the right drills for your body and with the correct technique, you should notice small improvements. If any one drill stands out where there are multiple recommendations for a given area, then zone in on that one. If you find that a combination of 2 or all of them that are recommended for a given area is showing better results for you, then it will be well worth the little bit of extra time to apply that sequence within the method described above. The use of multiple drills on the same area would be applied as followed (using a potential combo for tight lats and the need to improve the front rack position):
3-5 Rounds
- Lat Rolling
- Lat Box Stretch
- Front Squat Warmup Set
With what has been learned here, It’s now time to make another 4 week commitment. Remember the process of assess, assign, and repeat; with this in mind you’ll need to reassess after 4 weeks and move forward accordingly. Using the information, you might continue with what you were doing for another 4 weeks, adjust to a different drill, add another drill to be more aggressive with the same area, or emphasize another area that is now more in need.
Until next time,

Chad Vaughn,
2-Time Olympian, USAW
_______
With
Dr. Aaron Horschig, PT,
DPT, CSCS, USAW
_______

Great bllog you have here
LikeLike