This will be your complete upper body mobility assessment that encompasses both the overhead and front rack positions. While the overhead position (for a snatch) and the front rack (for the clean) are of course very different, they are also very similar in that tightness in any of the following areas we will be testing will likely cause limitations for both.
The following tests will screen for “weak links” that may be limiting your ability to create the desired characteristics in the standing position and/or to maintain these ideal qualities as you squat with the bar overhead or in your front rack. Additionally, we are looking for any asymmetry from side to side of which will take priority over any symmetrical limitations in your assignments:
1. Thoracic Spine Mobility
2. Lat/Teres Major
3. Pec Minor and Major
4. Shoulder Rotation External
5. Shoulder Rotation Internal
6. Elbow Flexion
7. Wrist Extension
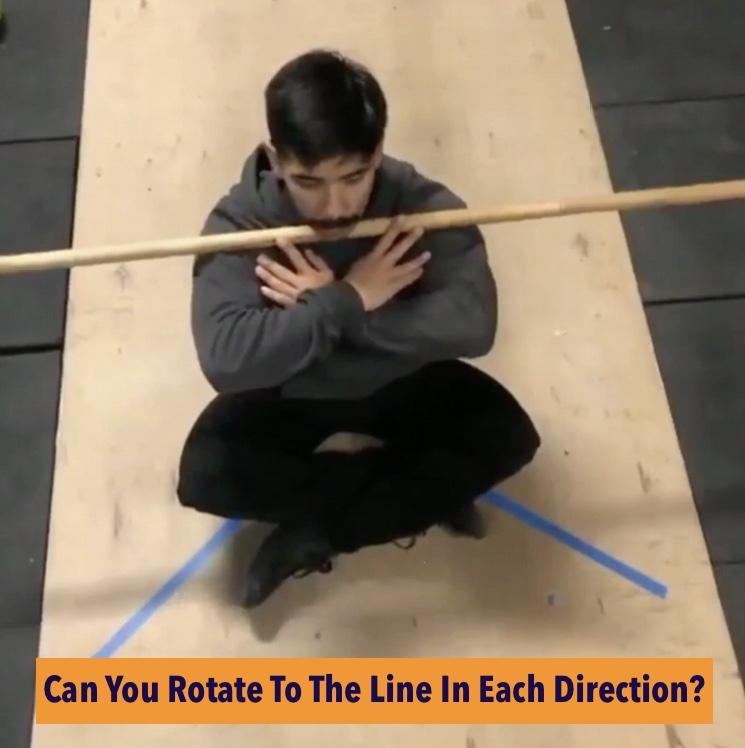
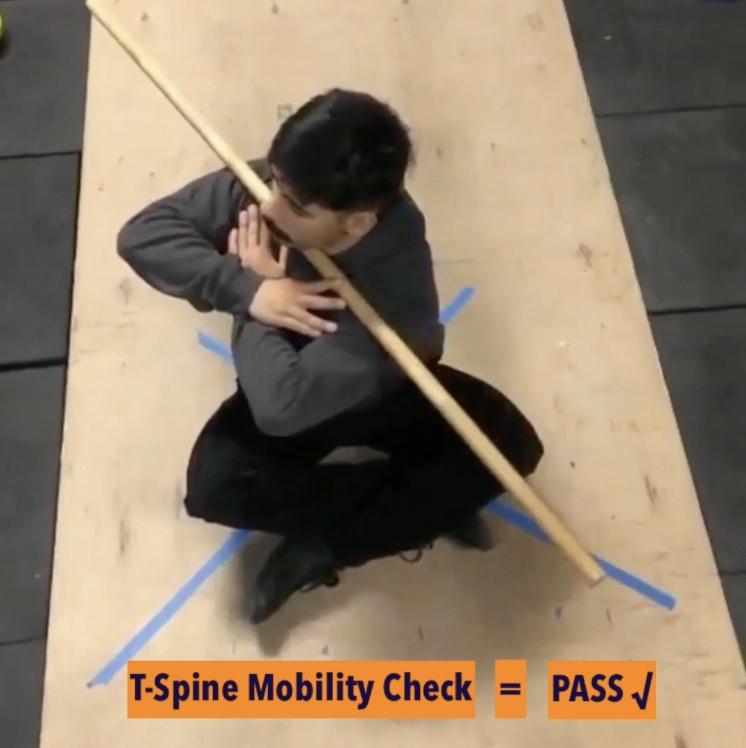
Test #1: Thoracic Spine Mobility
Mobility restrictions in the thoracic spine (mid-back) will lead to compensations when we raise our arms (such as performing a jerk or snatch). Limitations will also hinder the ability to achieve the optimal extended torso position when pulling the bar from the ground or in the bottom of a deep squat.
While assessing thoracic spine extension can be a little difficult without the help of an expert clinician, the seated rotation screen is a good self-diagnostic test that can give us a good idea of how well this part of your back is moving.
Tape an “X” on the ground with the edges forming 90-degree angles. Sit in the middle of the “X” so that the tape forms a “V” in front of you. With a PVC pipe across your chest, rotate as far as you can to the right and left side. Ideally you should be able to rotate your t-spine 45 degrees each way (this will align the PVC pipe with the tape on the ground). If you have an inability to rotate to at least 45 degrees each way or a significant imbalance in either direction, you just uncovered a potential factor to work on!
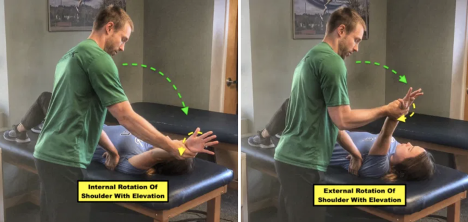
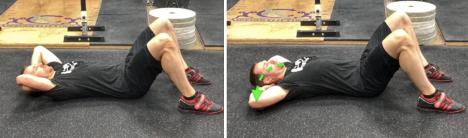
Test #2: Lat/Teres Major
Start by lying on your back. With your arm by your side, turn your palm towards you until your thumb points to the ground (shoulder internal rotation). Then, have a friend raise your arm overhead while they hold your shoulder blade from moving with their other hand. Next repeat this test in an externally rotated shoulder position (with your arm by your side, roll the palm up towards the sky).
If you were able to raise your arm overhead further with internal rotation,, it means you may have a flexibility restriction in your lat/teres major muscles. Using an externally rotated shoulder position lengthens the lats and teres major muscles slightly and therefore restricts someone with flexibility limitations in these muscles to move their arm overhead.
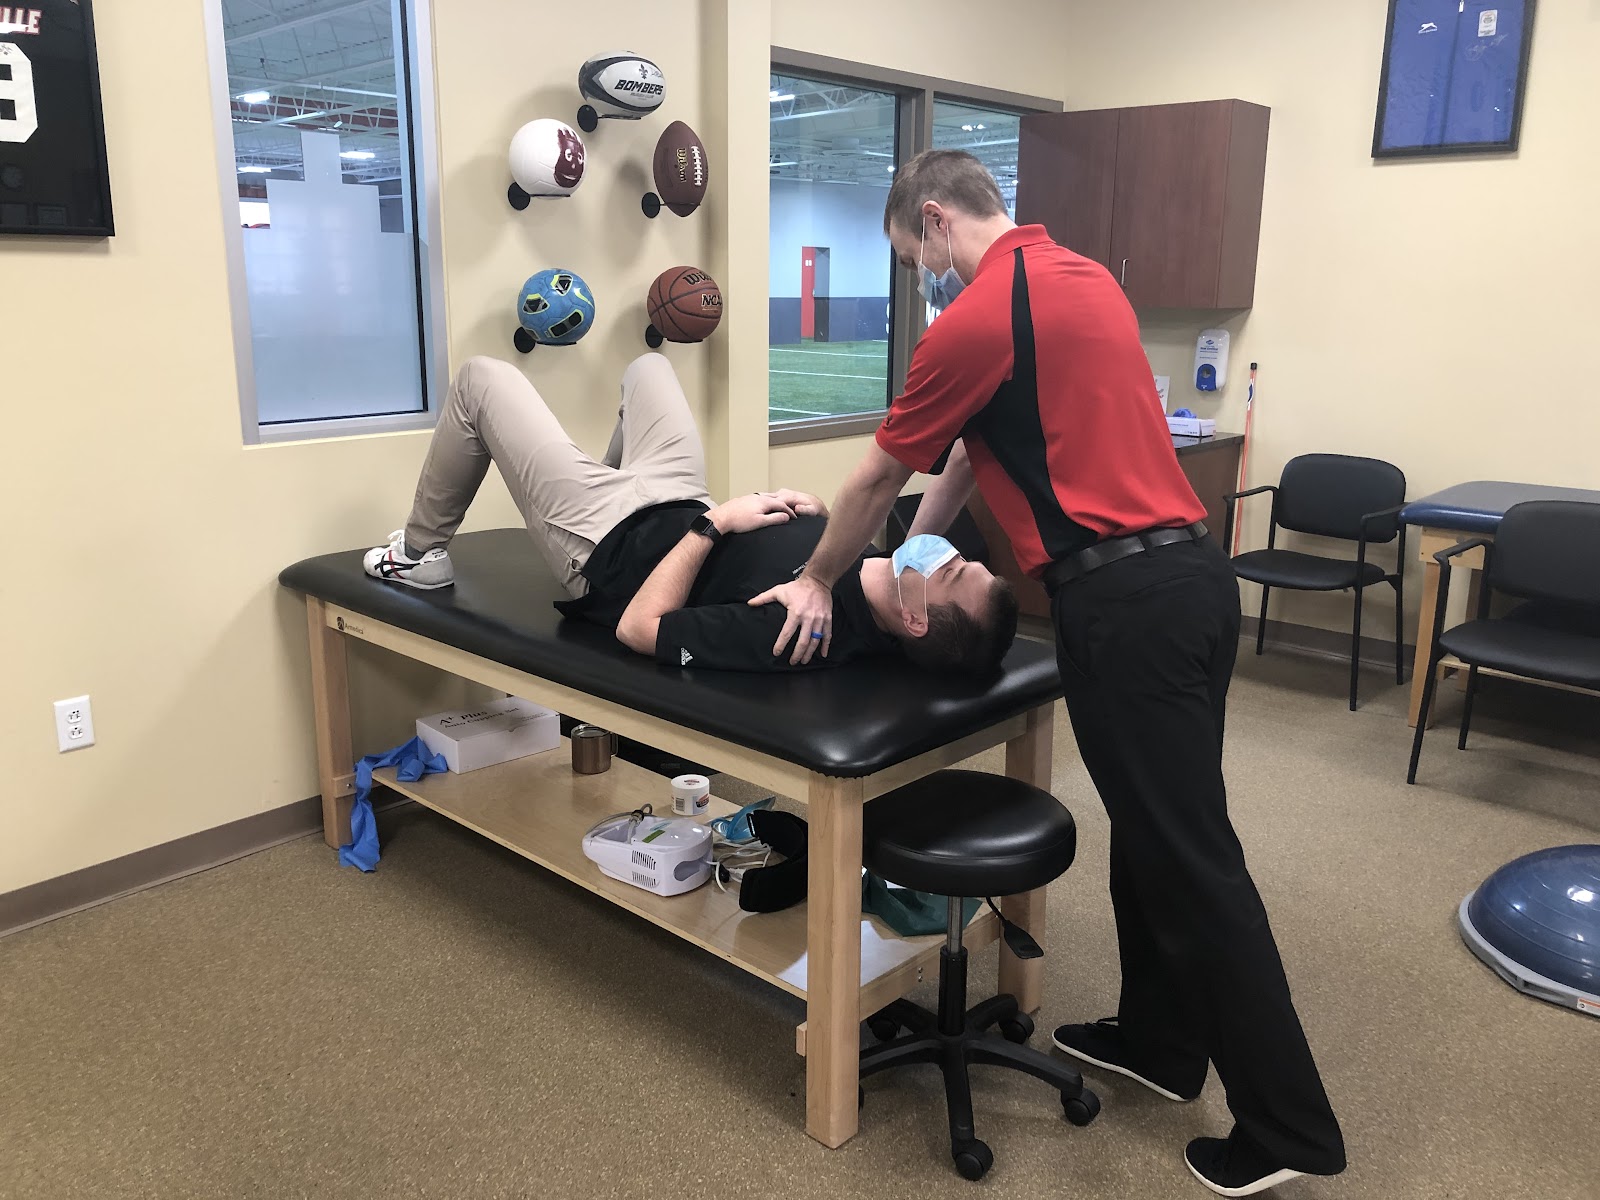
Test #3: Pec Minor and Major
In order to have optimal shoulder blade mechanics when lifting, you must have sufficient flexibility of the small pec minor muscle. An inflexible pec minor will lead to an inability of the shoulder blade to adequately move (leaving it protracted and anteriorly tilted) and could result in early impingement of the small structures in the shoulder joint.
To assess the flexibility of this muscle, start by lying on your back with your hands placed on your stomach and your elbows bent. Positioning your body like this will take slack off of the coracobrachialis and the “short head” portion of the biceps brachii (two small muscles that attach to the top of the shoulder and could contribute to a false positive in this test).
Have a friend place their palms across the tops of your shoulders over the bony part that sticks out (your coracoid process) and push down slightly. If there is sufficient flexibility of this small muscle the shoulders should easily drop all the way to the ground without any sensation of excessive muscle stretch in the upper chest.
Next, we need to test the flexibility of the larger pec major muscle that attaches directly to your arm bone (humerus). Stiffness in this muscle hinders your ability to get your arm overhead for the reception of the snatch lift and limits the needed shoulder external rotation for the ideal front rack position.
Start by lying on your back with your hands clasped together behind your head. Allow your elbows to relax as far toward the ground as possible. Make sure to keep your core braced and limit any back arching as your elbows drop. This test is positive for a short/stiff pec major muscle if you cannot easily touch your elbows to the ground.
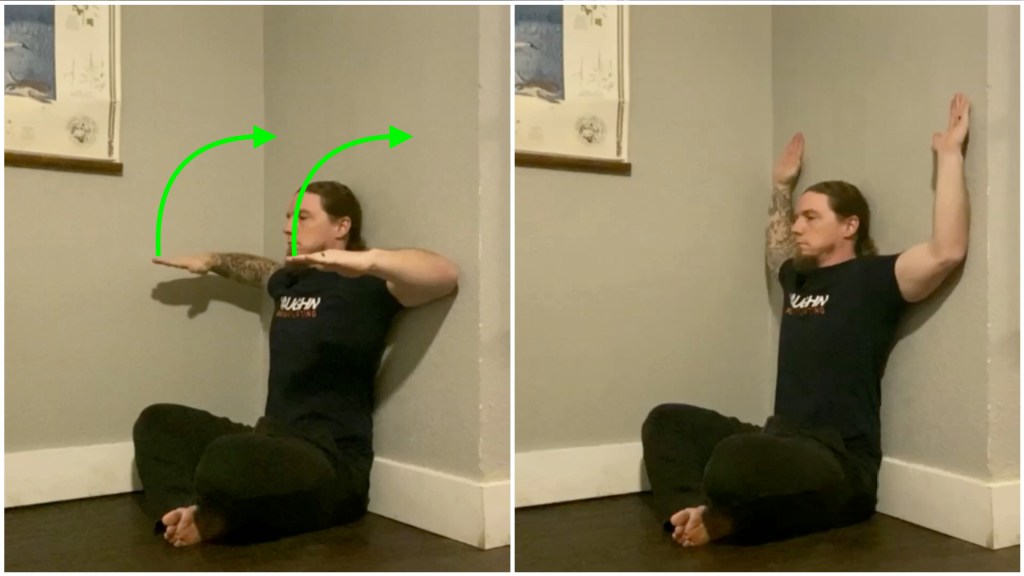
Test #4: Shoulder External Rotation
Start by sitting next to a wall. Your upper back, head, and hips should be in contact with the wall. You should have a neutral lower spine (don’t need to jam your low back into the wall but instead maintain a slight arch).
Next, place your arms on the wall in an “L” position. See if you can touch the wall with your entire arm (including your shoulder, elbow, wrist and outstretched hand) without any movement of the prior contact points. Passing this test means you can easily maintain the full “L” position without any movement from your head, upper back, and hips.
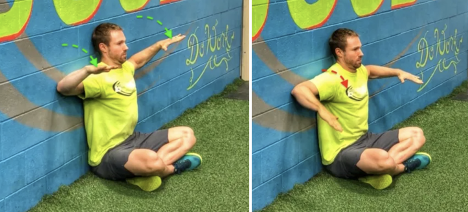
Test #5: Shoulder Rotation Internal
An athlete must also have a sufficient amount of shoulder internal rotation in order to keep the bar close to the body during the Olympic lifts (especially the snatch). Insufficient internal rotation will lead to either postural compensations (such as the athlete rolling their entire shoulder complex forward by excessively moving their shoulder blade) or technique compensations (such as the bar looping away from the body).
To screen for your internal rotation, sit against a wall with the same contact points as the prior test. Start in the 90-degree “L” position and rotate your hands as far toward the ground as you can without your shoulder blades popping off the wall. Ideally, you should be able to internally rotate your shoulder and the forearm to at least reach parallel relative to the ground.
Test #6: Elbow Flexion
Assume a front rack position without the barbell. Your palms should be facing the sky and thumb pointed towards your head. Make sure your upper arm is parallel to the ground and elbow pointed straight forward to resemble the ideal front rack. In this position, notice how far your fingers are from your shoulder.
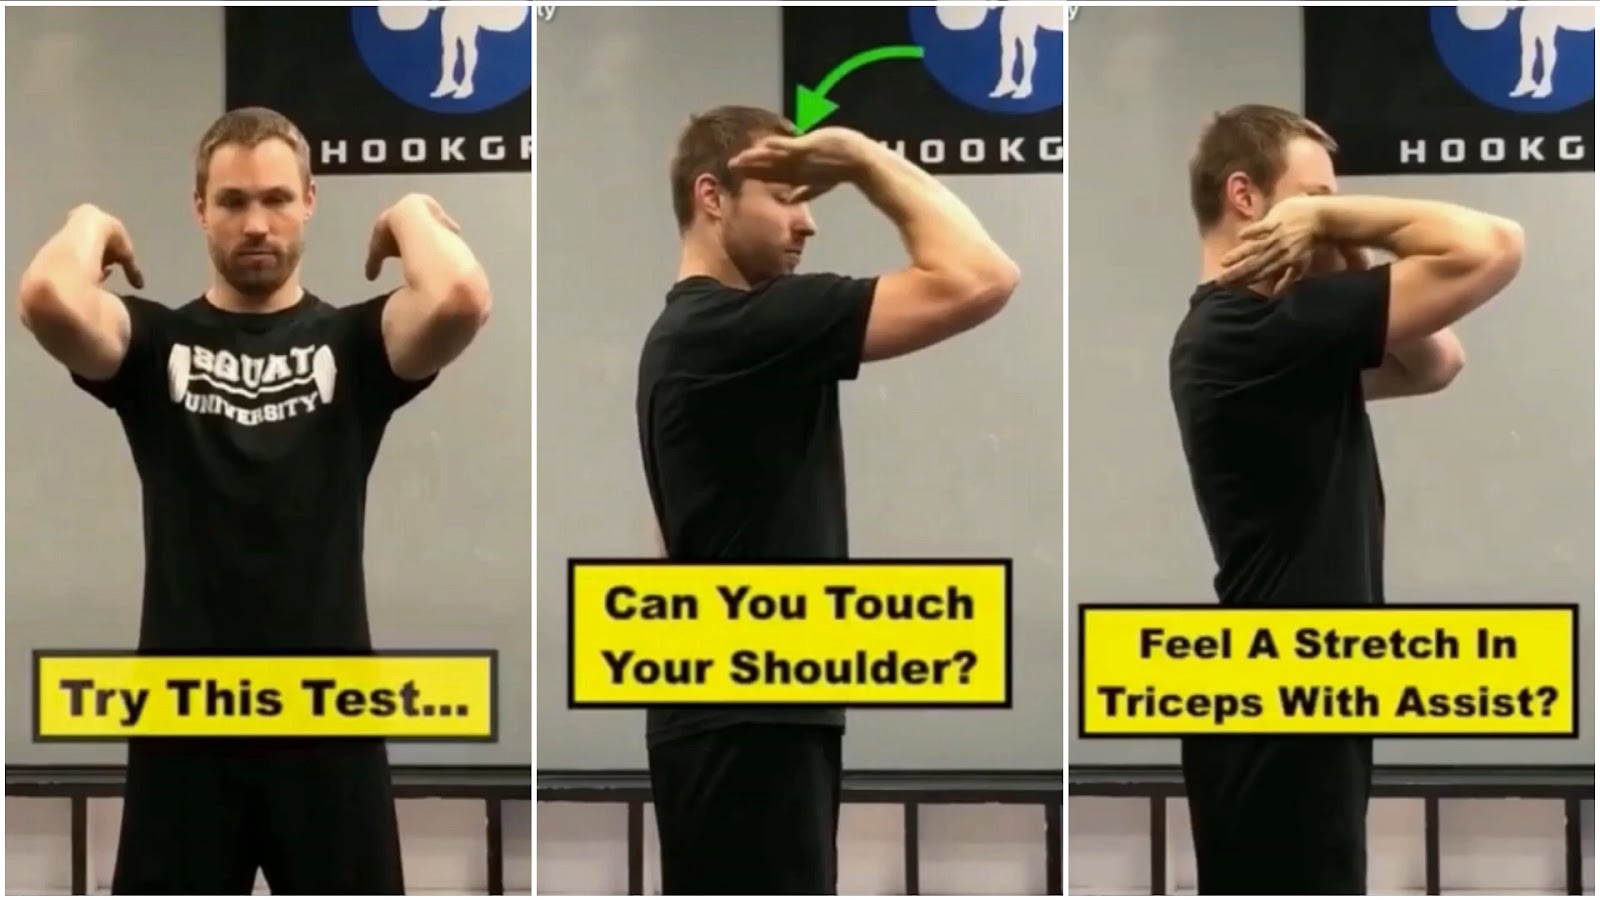
If you can easily touch your fingers to your shoulder, congratulations, you have optimal elbow flexion. If you are roughly 2-3 inches away from your shoulder, try to push your arm down with your opposite hand. Can you reach your shoulder? If so, you have adequate mobility. If however you wind up three or more inches away from your shoulder and cannot come close to touching even with overpressure from your opposite hand, you must make mobility work a high priority. A common culprit to limited elbow flexion is stiff/short triceps (something we’ll talk about how to address soon).
Test #7: Wrist Extension
Adequate wrist extension is essential for both the clean rack position and the snatch receiving position. We can assess this mobility two different ways.
The Prayer Screen: pull your hands together and down as far as possible (the prayer pose). Ideally we want to see your wrists move to a 90° “L” position.
The Box Screen: stand next to a box or table at mid-thigh height. Place your palm flat on the box so that your fingers are facing forward away from your body. While keeping your palm flat on the box/table, shift your body forward over the hand (creating wrist extension). Again, you should be able to reach a 90° “L” position.
If you came up short on either test or you felt like your wrist was going to explode at that end range, it could be due to stiff or short muscles in the forearm or limited wrist joint mobility (things we’ll work on fixing shortly!).
Bonus Consideration: “Lockout”
Lockout! What is “lockout”? This term is indicating how straight and solid your elbows are when you receive a bar overhead in the snatch or jerk, and how much they remain that way through the rest of the lift up to the point the athlete drops it from overhead.
In the weightlifting world one of the best compliments you can get is, “you have a nice lockout!” This is because it indicates a good, made lift that was solid and unwavering overhead. The key characteristic that would motivate someone to express this praise is a completely straight or slightly hyperextended elbow (no flexion whatsoever) that does not move from that position that is seemingly “set in stone”. To be solid in this way, one does not only need the literal ability to straighten the arm completely, but a sufficient amount of mobility throughout the rest of the body AND stability in the upper body specifically. In fact, like the “press-out” we discussed in a previous post, a lacking ability to lockout in this way is usually NOT due to a mobility limitation directly at the elbow (most athletes have sufficient elbow extension). With a bar overhead, especially within a full squat, the elbows are close to the very end of a long chain that starts at the feet. If an athlete has very limited ankle mobility, one byproduct might be a lacking lockout (in many cases this is the most apparent fault in this situation). If an athlete has lacking shoulder stability, it may result in a give at the elbow (this would be the athlete “muscling” the weight to guard the weak shoulder).
All that being said, we SHOULD rule out limited elbow extension as I’ve come across many athletes that assume this is the issue when it is not (just like having wrist pain in the front rack is usually not due to a limitation of any kind with the wrists). If a limitation is found, we’ll mark it down as a piece of the complete information we’ve gathered, and plan to address it as we would any other area.
The test is simple: Hold one arm at a time out in front of you (where you can easily see your elbow) with palm facing the sky, and then straighten your arm as much as you can (flex your triceps). If your arm is completely straight (or hyperextended) then you don’t have an elbow extension issue.

Wrapping It Up
“Check!” We’ve made our way through another list of mobility tests; let’s ask ourselves the same questions we did post squat mobility assessment: What did you learn about yourself, mobility in general, and/or the body as a whole? Were you tight in areas you didn’t even realize were contributors to your ability to to create and maintain good front rack and overhead positions? Were you more mobile or flexible anywhere than you thought you would be? In any case, once again we have invaluable information to move forward with! Next, we’ll take this information and show you how you can easily incorporate the work you need to make changes and “mold” these specific portions of your “sculptures.”
Until next time,

Chad Vaughn,
2-Time Olympian, USAW
_______
With
Dr. Aaron Horschig, PT,
DPT, CSCS, USAW
_______

Leave a comment