“Wrists back, elbows locked, shoulders down, bar in line with the back of the head.” These cues describe the recommended overhead position for supporting the barbell. The end ranges in that phrase apply to the front rack as well. Let’s now go through these areas of the body one at a time and confirm their specific role and action in the front rack.
“Wrists back.”
Hopefully, the unavoidableness of the wrists being completely extended is more obvious or easily understood when the bar is in the front rack. How about another visual:
- Position one arm out in front of the body.
- Bend the elbow completely (hand as close to the shoulder as possible with palm facing up), keep elbow directly in front of/in line with the shoulder, humerus parallel to the floor.
- Make a fist, straighten the wrist, and look down and take note of the space from where the bar would be in your hand and your shoulder.
- Maintain the fist, but now extend your wrists as far back as you can and you’ll see that the bar would be closer to your shoulder.
- While we’re at it, open your hand and see now how much closer to the shoulder the bar would be if it were in the fingers or all the way out to the fingertips instead of the palm.
In order to keep your wrists completely straight in the front rack you would need an extraordinary amount of bend in your elbows. Attempting to maintain this straight wrist position would be extremely physically demanding and mentally draining and therefore less optimal (just as it is with the bar overhead). The extended wrist is therefore the most optimal position for the upper body in the front rack position.
In Step 4, making a fist and extending the wrists shows you that if you’re going to use a full grip in a clean, you must have exceptional mobility (so much that you can perform this action without forcing it mentally or physically within the reception). Once again, a form of forcing here is a “death grip” on the bar, leading to compensations such as unnecessary tension bleeding down the arm and into the body (holding onto the hookgrip in the front rack can do this as well). This will all add up and make it harder to keep the elbows up and the body engaged where it needs to be (you are messing with the optimal coordination). This should be an area (with the wrists and hand) that you can relax and relent, and that is thoughtless.
When performing Step 5 (which is mimicking a fingertip grip), you can see that the bar would be closest to the shoulder with wrists extended and hand opened. This demonstrates why some athletes will HAVE to go to their fingertips when they receive a clean (or within the front squat), otherwise the bar and load would never be supported by the best front rack platform that we previously defined. Like the overhead position, wrists back in general is helping create the best platform to support the bar with. In contrast to the overhead position though, the palm/hand is not your platform of support; the shoulders and clavicles are (as we learned with the Frankenstein Front Squat). This is why a fingertip standard is acceptable and sometimes necessary. Even if you are using a full grip, the weight should not be bearing down on the palms and wrists.
NOTE: What IF the weight is bearing down on the wrists? Wrist pain or discomfort is a very common complaint/concern with cleans and front squats. Always take a step back and look at the entire body as the wrists are only the end of a long chain that is your front rack position, and the front rack position is the end of a longer chain that is the full front squat or clean movement. For example:If you are unable to lift your elbows up or bend them sufficiently due to one or more tight areas in the upper body (such as lat stiffness), the wrists will be placed in an unfavorable position and under excessive stress. Or, If your ankles are very tight, as another example, your torso will pitch further forward than optimal and if you don’t have sufficient front rack mobility to make up for that then once again the wrists are your last hope. While wrist mobility will be a part of our upper body assessment, you should always address areas further up “the chain” if you feel excessive pain or discomfort in this joint when in the clean or front squat.
“Elbows locked.”
For the front rack, the elbows are not “locked” in the sense that we think of when we hear or say the phrase “lock the elbow” in weightlifting: these words indicate a straight arm with complete elbow extension for the overhead position. But, the elbows should absolutely be locked into position in the front rack: they should remain still from left to right, and ideally up and down in relation to the body, as the lifter moves through a front squat, a clean, or the dip of a jerk. As for an end range here, complete elbow flexion won’t necessarily be the case for all athletes. If the athlete is limited in this direction, they may be at an end range, but that may not result in their best front rack position. If the athlete has complete range in this direction (the athlete can easily touch their fist to their shoulder), then we will not want them at their end range, but rather wherever it needs to be to accommodate the best grip and strongest “triangles.”
Going back to one of my most common phrases when cueing front squats, “elbows up and in,” most athletes WILL be at an end range with the elbows through this action (pushing the elbows in as much as they can). This is how they will lock them into that “still” position mentioned above. Especially with all fingers under the bar and at the recommended grip-width, they can push the elbows in and up as much as they can and it won’t be too much, and perhaps not even ideal. For those lucky souls with extraordinary front rack mobility though, there is a point in the amount of in and up that we do not want the elbows to go beyond: Anything inside of that halfway point of the index finger and shoulder, or up above the height of the shoulder is not only unnecessary, but will take away from the strongest structure and engagement. (In this instance, we want the athlete to focus on locking the elbow into those specific uncrossable lines and keep the elbows still so they engage appropriately.)
“Shoulders down.”
Yes, we need this exact same action here in the front rack as in the overhead position. My good friend and Olympic teammate, Cheryl Haworth, likes to say, “put your scapulas in your back pockets.” She usually uses this when teaching set up for the jerk, but it’s also a great cue for any other time the bar is in the front rack (it’s perfect for the overhead position as well). The shoulders being shrugged up here (or rather, not DOWN at an end range), is usually accompanied by or due to inappropriate breathing (holding the last big breath in the chest instead of pushing that air and pressure down to the bottom of the stomach) or the “big chest” cue (poking the chest out by arching the back). Once again these are muscled actions where instead we need compression.
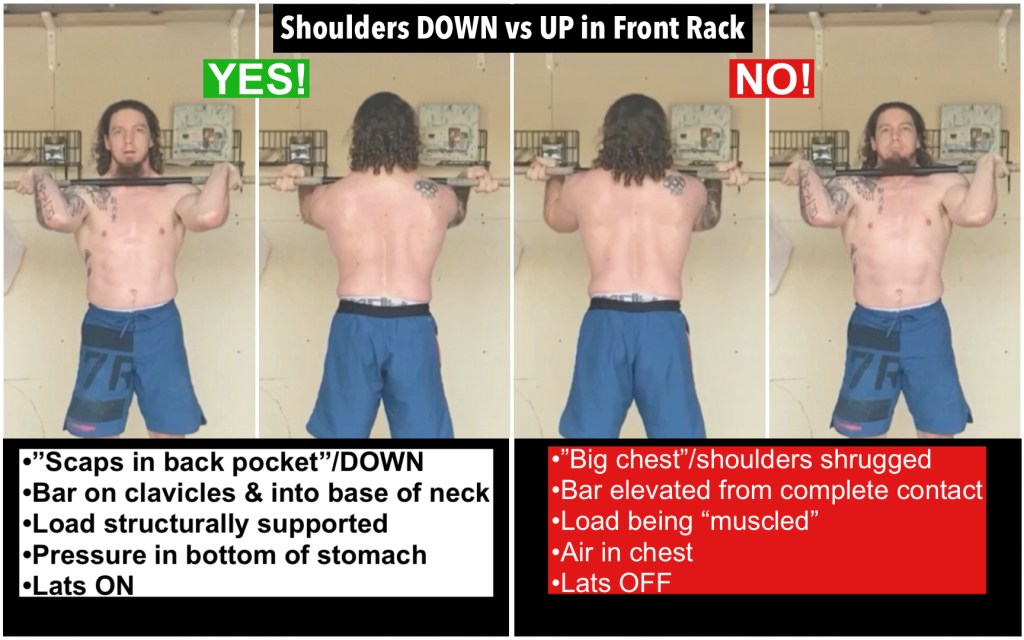
As soon as the bar lands in your front rack when you receive a clean, those scaps should already be in your back pockets. Not compressing to this end range until after you’ve reached your lowest squat position is a form of “crashing” and therefore outside of ideal timing/coordination. This will likely lead to the compensations of the bar sliding down out of the front rack, the back giving or folding leading the body forward and/or to a miss, or an extremely energy-consuming reclaim of position in an attempt to save the lift.
Recap
This will serve as a checklist for your front rack position, when setting up for a front squat. (Later we’ll address how this might remain the same for all other movements that require use of the front rack or how it might differ, depending on the individual.) Once again, the setup and squatting action with your legs and torso that was previously defined in “Squatting Like An Olympic Lifter” goes without being said here):
- Mimic the grip width of your clean, and place the bar into the base of the neck and on the clavicles.
- Force the standard of all fingers under the bar as much as possible. (Remember, 95% of you will be able to achieve this in setup, and maintain it through the squat, so this is not a statement of leniency or acceptance of the alternative.)
- Push the elbows up AND in, likely as much as you can (but no more “in” than the halfway point of the index finger and shoulder, and no more “up” than above the height of the shoulder).
- Retract the shoulders down (“put your scapulas in your back pockets”).

It’s all about figuring out the best coordination and ultimately becoming comfortable and automatic with that. Like the overhead position, this should be MOSTLY relaxed, only “tensing” where necessary. Also like the overhead, this tension in the front rack and maintaining solidity throughout a front squat is controlled with focus on the elbows more than anything else (not by shrugging the shoulders, poking the chest out, arching the back, etc.). In this spirit of relating the front rack to the overhead, let’s leave you with a phrase to simplify the execution of your front squat for best carryover to the clean reception: “all fingers wrapped, elbows up and in, scaps in back pockets.”
Until next time,

Chad Vaughn,
2-Time Olympian, USAW
_______
With
Dr. Aaron Horschig, PT,
DPT, CSCS, USAW
_______

Leave a comment