Let’s recall the 3 steps you can take to create what we consider the pillars of the most fundamental and widely used start position on the elite level: find mid-foot pressure, connect the bar and shins, and align the bar with the back of your shoulders. These 3 steps are optimizing the angles in the body for each individual and placing it where it needs to be in relation to the bar to set the stage for moving the bar in an efficient path. Since the start position is the precursor of your movement through the rest of the lift, and your movement is controlling the bar (hopefully), we need to talk about the path we’d like the bar to take here before going any further. This will help us better understand the need for these 3 steps and the desirable actions to follow.
First of all, the path that the barbell takes from the beginning to the end of the lift is simply referred to as “bar path” or “barbell trajectory”. This path can be traced and examined to help determine the effectiveness of a lifter’s technique and the efficiency of the movement of the bar in relation to the body. For these purposes, the tracing that makes an observable image is taken directly from the side. Also, it typically ends at the point at which the athlete reaches their lowest point in the squat when receiving the load since up to that point is where all of the “technique” is taking place. As an example of what a “bar path” might look like, we in the weightlifting community have been told for many years that the most efficient and effective bar path is one that looks somewhat like a flattened “S”. This means that the bar immediately travels toward the body and remains on this horizontal trajectory up until contact with the bar and body are made, then it loops out and around slightly (now traveling away from the body) before coming back toward and down with the body now underneath (more on this specific bar path later).
Additionally, just as we’ve said we want to look at the technique of the snatch and clean as being the same (just taking the bar to different end locations), this would also be true for “bar path”. With “technique” each individual should express positions and overall movement with the 2 lifts that are almost mirror images of one another (NOT 2 completely different, conflicting actions). With “bar path”, the major difference between the 2 would just be the overall length since the snatch requires a greater distance to be traveled.
Though these tracings of the snatch and clean can be extremely helpful in understanding the efficiency of the lift, “bar path” should be considered as nothing more than another by-product. In “The Weightlifting Encyclopedia”, Arthur Drechsler states that, “bar movement is more appropriately viewed as an effect rather than a cause”. This means that we should aim to correct any faulty bar path by focusing on adjusting our body positions during the set up and different portions of the lift. This is opposed to being fixated on bar path and trying to force a change on the pattern directly without adjusting any positions, actions, or timing within your technique. It is true that saying something like “keep the bar closer” through any juncture of the lift can elicit a positive change (or even a negative one for that matter), but it is an action from the body that made that change. Certainly keep cueing directly on the bar as an option, but it is more meaningful in the end to “root” the problem.
For example, if the bar is swinging out and around the body excessively from the hip to overhead, then consider how the body is moving or setting up before that portion of the lift to likely find the “cause” of the “effect”. If the hips are thrusting excessively forward at extension which is pushing the bar out further than optimal, then simply telling the athlete to “keep the bar close” from hip to overhead will not work. Ask yourself, WHY are the hips thrusting forward? It could be a bad habit directly at extension, or something before that point in the lift such as the hips being too high in the start position (which is contributing to the bar being separated from the body and the hips coming forward at extension to find it). That brings us back to our 3 essential steps to start position for a moment; by nailing these down you fix the most common root to a faulty bar path and/or any faulty technical movement beyond that point (we’ll talk much more about assessing and addressing faults with this “rooting” method later).
Additionally, it should be understood that there is not necessarily any one exact bar path that is optimal, but from each individual we’re looking for an EFFICIENT one. If you look at 100 of the best lifters in the world there is almost no chance that you will see the exact same bar path for any 2 of them. This aspect of the Olympic lifts reminds me of a fingerprint. We all recognize that a fingerprint is a fingerprint even though no 2 are the exact same. We would be able to tell by looking at a given fingerprint if the finger was damaged or had a scar in the print area, or if something was off from what a normal, healthy fingerprint looks like. So it is for a lifter’s bar path (a “barprint” if you will). Once we know the general characteristics of what is efficient and effective, we can tell if something is off for any one that we observe.
What then are the characteristics of an efficient bar path (a normal, healthy “barprint”)? I tried so hard for many years to make the statement and concept of “the shortest distance between 2 points is a straight line” be true and relevant for the snatch and clean. This would have made for such a simple and beautiful story. But the more I taught this and the more I could not confirm it with observation, the more I had to stretch the truth. To continue on a “path” of teaching “straight”, I would have to believe and lead others to believe that every lifter on the elite level is wrong for having some curvature/horizontal movement to their barprint. Additionally, this would indicate that there is only ONE exact bar path that is ideal for everyone and that they should spend a lifetime trying to achieve perfectly and literally straight. Well, at this point, for any lifter at any level to move the bar literally straight throughout the entire lift I’m not sure is even physically possible.
So, here is another “unavoidable” for weightlifting in general and a constant characteristic of bar path: curvature. Let’s think about how most roads have many curves and turns. Within a traveler’s trip from point A to B, even on a long stretch of highway, they will have to follow a path that is not perfectly straight. Why is this? Why didn’t they just make the road straight? It’s because there is terrain to consider that is made up of hills, mountains, trees, bodies of water, buildings, etc. Now, I’m not at all about to tell you that we should be creating a path that completely moves the bar around the “terrain” of the body as it mostly needs to be the other way around (moving the body around the bar). But, there are 2 objects working together here (the bar AND the body) and there will have to be some give and take. With a snatch and clean and moving a bar from point A to point B, we will give some consideration to the “terrain”/shape of the body, best leverages of the body to lift the load, maintaining balance (of the body and between the load and the body which are “offsetting” one another), and leading the 2 objects to work together as much as possible. There is also contact to be made with the bar towards the end of the 1st Ascent as we’ve confirmed before which will at least slightly knock it out of a perfectly straight path.
All that being said, let’s now cover some guidelines on how to read “bar path” or “barbell trajectory” diagrams using a flattened “S” example (taken from “The Weightlifting Encyclopedia” by Arthur J. Drechsler). This will set the stage to move through the rest of the information and to better understand bar path in general:

The base component here is what is called the “vertical reference line”. This line must come straight up from the outer edge of the sleeve of the bar (which is the dot that you see in the middle of the “plates” in the figure shown) and goes at least up to the height the barbell ultimately reaches. Depending on the source, the reference line may start at the “dot” or go through it coming up from the ground (as you see in this first example here). The dot (the outer edge of the sleeve of the bar) is also the point that is tracked as the barbell moves and therefore is the “pen” that “draws” what becomes the image of one’s bar path (their “barprint”). This tracking helps determine any horizontal displacement throughout the whole lift, if and how much it crosses the vertical reference line in either direction, and where the lifter ultimately receives the bar from where it started.
You also see this line drawn in relation to the foot. Though the exact location of the bar in relation to the foot (front to back) is not always known, it can be estimated. One way to get a good idea of this alignment is by determining how much the foot is sticking out from the back and/or front of the plates when looking directly from the side (and ideally at the same level). Another would be stopping the video as soon as the weights leave the floor (to the extent that the foot is showing) and drawing a line straight down from the bar to and through the foot (keep in mind though that the bar may have moved a little front to back by this time). In the example above you see it positioned relatively in line with the ball of the foot. This is the general location in relation to the foot where the bar is starting for most elites and where we will confirm we recommend to set it (BUT without thinking about it; another by-product). (NOTE: The bar starting too far forward or back of this will cause body and bar movement compensations from what will be a disadvantaged position and relationship between body and bar; more on this later).
With all that being said, we can see that with this bar path example, the bar is immediately traveling toward the body when it leaves the floor and continues doing so as it passes the knees and until it reaches the hips. The point at which it begins to travel away from the body is when contact is made (at the “hip”). It is the contact that knocks it forward, BUT this is not a bad thing. It is a necessary and optimal thing, we just don’t want it to be bumped, pushed, thrusted forward too much of which we can gauge with the vertical reference line. Here we see the bar traveling back out to its original placement in relation to the foot (touching the vertical line). The point at which it begins to travel back away from the line (toward the body) is when the arms and remainder of the torso are going under the bar to receive. The last little hook up top is the final turnover of the wrists and the absorption of the load with the entire body (the legs resisting but relenting to end range).
This bar path example is still showing to be, and considered to be an efficient path, but there is an alternative one that is currently being demonstrated by MOST of the best in the world. This has been determined from a recent, detailed, and widely accepted study that was conducted by a group of researchers that included two long-time staples and contributors in the community, Kyle Pierce and Michael Stone. The article expressing the results was published by MDPI (https://www.mdpi.com/) on August 25, 2020 and it surveyed the barbell trajectory and kinematics of the snatch lift from the 2015 World Weightlifting Championships (WWC) and the 2017 Pan-American Weightlifting Championships (PAWC). Data was collected through video analysis of 319 successful attempts from the 2 major international competitions. These 319 attempts were made up of the heaviest successful attempts from all athletes who lifted in the A sessions (THE athletes lifting the most weight).
In summary, the current determination is that there are 4 main TYPES of bar paths being exhibited on the elite level (Type 1, Type 2, Type 3, and Type 4). Remember, since no 2 bar paths are exactly the same, the figures shown are only EXAMPLES of each type of bar path, and the bar path of each lifter is placed into one of those 4 categories.
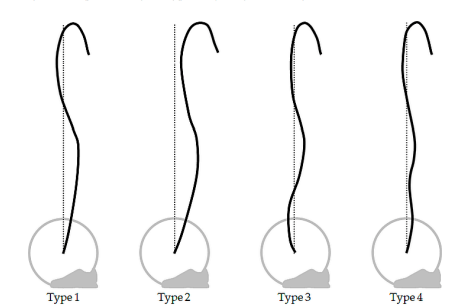
More important than the exact drawing of each example is understanding the horizontal movement relative to the vertical reference line and the lifter. The definitions of each type taken directly from the article are as followed:
Type 1
“The type 1 trajectory exhibits a ‘toward-away-toward’ pattern, crossing the vertical reference line during the ‘away’ phase and may or may not cross during the final ‘toward’ phase.”
Type 2
“The type 2 trajectory also consists of a ‘toward-away-toward’ pattern but does not cross the vertical reference line at any instant during the lift.”
Type 3
“The type 3 trajectory shows an ‘away-toward-away-toward’ pattern.
Type 4
“The type 4 pattern may begin with a ‘toward’ phase, as in the type 1 or 2 trajectories, or an ‘away-toward’ phase as in the type 3 trajectory. The defining feature of the type 4 trajectory is an interceding ‘away-toward’ phase between the first ‘toward’ phase and the final ‘away-toward’ phase.”
NOTE: Also indicated in the article, “Only the type 1 trajectory necessarily crosses the vertical reference line.” This means that it is possible for Type 3 to stay forward of the line through the whole lift, or for Type 4 to stay forward OR behind the line through the whole lift.
It is Type 1 that for many years has been considered most favorable. This is specifically when the bar travels just to or only slightly past the vertical reference line on the ‘away’ phase and then comes back behind it on the final ‘toward’ phase (just as shown in the diagram). (If a Type 1 stays forward of the vertical reference line during the final ‘toward’ phase, this would surely be considered an “unhealthy” barprint.) It is understandable that the conclusion of Type 1 being most favorable could easily be drawn since the bar is moving into the body immediately from the ground (close and finding center is good) and is doing so only slightly (it seems that minimal would be better here).
Additionally, there is generally minimal movement front to back from start to finish (especially in comparison to Type 2 where there is more initial displacement toward the body and the bar is being received further back from where it started). BUT (and this is a BIG “but”), Type 2 AND Type 3 are showing to be far more prevalent than Type 1 here on the international stage! Though Type 2 has been suggested as being advantageous, Type 3 has been generally regarded as being non-beneficial and even potentially detrimental. So it is especially SURPRISING that Type 3 is showing to be the MOST prevalent! Here are the numbers amongst all A session lifters:
Type 1 = 13% at WWC and 8% at PAWC
Type 2 = 30% at WWC and 30% at PAWC
Type 3 = 53% at WWC and 59% at PAWC
Type 4 = 6% at WWC and 3% at PAWC
*The numbers for the results given for the WWC in the article do not add up to 100% (rather 102%) which I am assuming is due to some rounding (ie, circa 30% is indicated for Type 2 at both WWC and PAWC).
Next, we’ll talk about how and why Type 3 might be so common, if it is “right” or “wrong”, and what it means for YOUR best “barprint”.
Until next time,

Chad Vaughn,
2-Time Olympian, USAW
_______
With

Dr. Aaron Horschig, PT,
DPT, CSCS, USAW
_______

2 Comments