Contraption squats help an athlete achieve the optimal foot positioning by reinforcing the “lock and twist” and “tripod.” I cannot appropriately express to you how HUGE this is! Before we get into some specific suggestions and considerations to help you establish your own protocol, you need to know how to set up a contraption and how to place your feet inside and on it. We’ll have two versions that we’ll cover, each indicated for different purposes: the “Single-Piece” version, and the “Multi-Piece” version. The single-piece version is only used while barefoot inside of your squat warm-up sequence; the multi-piece is used with weightlifting shoes on (beyond your warm up).
Single-Piece contraption setup:
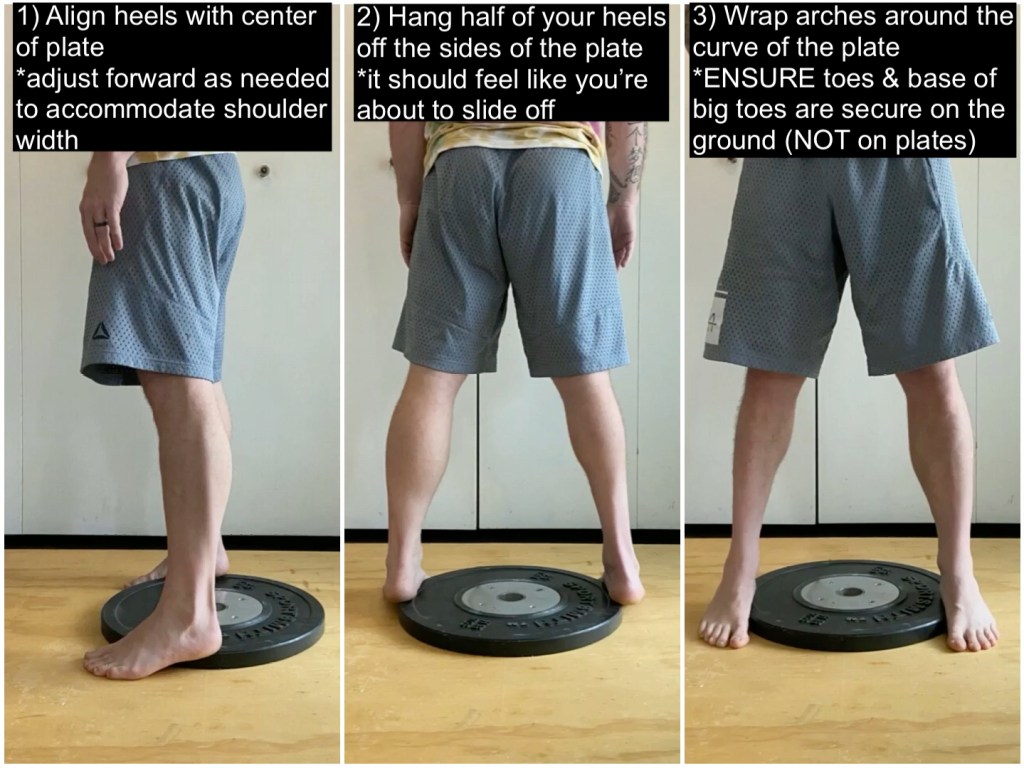
- Grab a single bumper plate that is anywhere from 0.5 to 1.5 inches thick and place it on the ground. I commonly use a 10 or 15-pound hi-temp bumper plate.
- While barefoot, place both heels on the plate at its widest diameter, or heels directly in line with the center hole in the plate. (Note: the width of the bumper plate may not position the feet exactly shoulder-width but no worries. A slightly too narrow stance just plays into the concept of exaggeration, and a smaller athlete who finds this setup too wide, can move forward to narrow the stance slightly.)
- Hang half of each heel off of the sides of the plate, and wrap your arches around the curve while still placing your toes and the base of your toes firmly on the ground. (Pay close attention as this setup makes it easier to lose connection with the ground; the toes should not be floating or at all on the plate).
This setup will position the feet straight forward (zero degrees), and will force balance and stability work in the feet. If you do this correctly, you’ll feel like your heels are about to slip off the sides of the plate, but by wrapping the arches around the curve of the plate and SQUEEZING aggressively – with toes on the ground! – you will strengthen your feet.
For the single-plate version in your warmup, simply replace your current elevated surface with the single bumper plate and follow the instructions above. Be sure to check the quality of each squat and confirm the squat variations you’re using.
Multi-Piece contraption setup:
The multi-piece setup is typically used for extra squats that would be assigned beyond your squat warm-up sequence, or as modification or scaling for squats found in your regular program – in either case, you’ll have weightlifting shoes on. (This could also be used for the squats in your squat warm-up sequence, but while barefoot – as you should be for warm up – a single-piece contraption set up is recommended.)
- Find a dumbbell (or similar solid object) that when placed in between the insides of your heels, and with your heels snug against the dumbbell, sets your feet to shoulder-width apart (the outside of your heels are in line with the outsides of your shoulders; you can establish this exact measurement by laying down and marking where the outsides of your shoulders are).
- Get two heavy bumper plates (e.g., 25-kilogram plates or 45-pound plates) that will be used to keep your toes from turning out. With the insides of your heels snug against the outsides of the dumbbell, position your feet to that ZERO-degree turnout. Remember that this straight line (zero degrees) is measured with the line of the inside of your foot (from inside of the base of your big toe to inside of the heel). Now, lay the plates down and place one on the outside of each foot, specifically at the base of the pinky toe. NOTE: For many athletes, the dumbbell in between the heels alone is enough to lock the feet in (as long as they know where zero degrees is and are consistent with that in the set up). If not, once they learn a little more awareness and control with the feet, this part of the contraption can be progressed out.
With elevation:
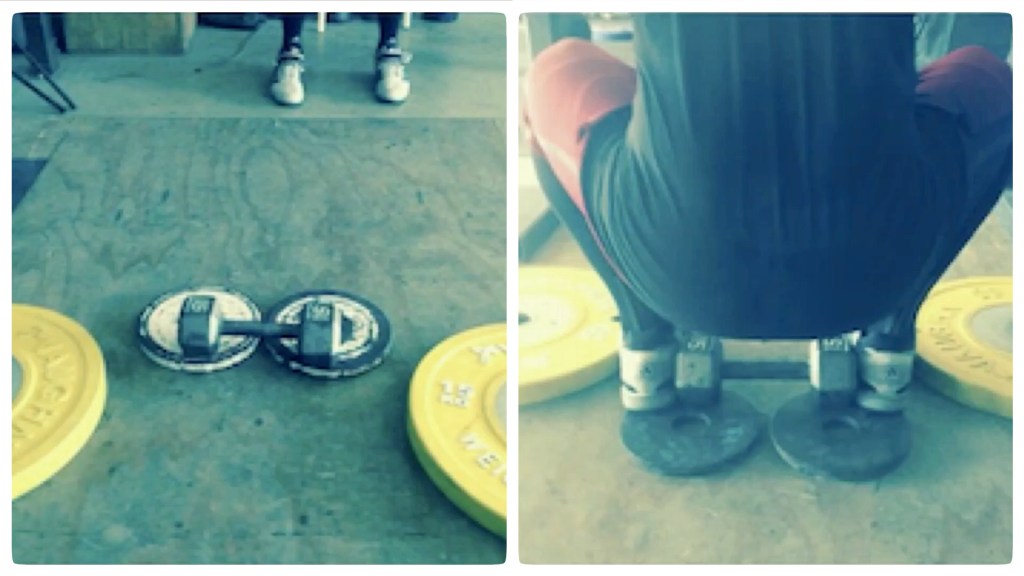
- To add elevation, you’ll place plates (or whatever else you’re using to elevate your heels) under the dumbbell. Be sure that the dumbbell is placed at the front edge of the elevated surface.
- Ensure that only one, and no more than two inches of your heel is on the surface you are using to elevate with. Any more than this will take away from the solidity of the feet in the set up (think “tripod” here, you want to be able to feel and use the heel part of that by that base location being solid on the elevation). If using two bumper plates to elevate, be sure that they are touching; if using smaller metal plates, be sure that they are separated as much as needed to allow for enough surface to place your heels on. NOTE: Two metal plates is preferred here as they will be placing their heels on the curve of those plates; this is ideal as athletes in most need of contraption are used to squatting on the insides of their feet with collapsed arches; this will force them more to the outside of their feet.
- Next, place the insides of your heels snug against the outsides of the dumbbells, and the outsides of the front part of your feet snug against the bumper plates up front.
I need to caution you about any potential lacking attention to these details. Commonly I’ll see the heels not touching the dumbbells, too much heel on the elevation and therefore their feet teetering on the elevation, the forward plates too wide, etc. You must understand the purpose of all this, and set up carefully, with intention. If you miss a detail, it takes away from the effect we are trying to accomplish, i.e., the positions we are trying to strengthen.
Your feet will have some wiggle room, but focus on keeping the big toes – and the base of those toes – in contact with the ground (“tripod”), and squeezing in with your heels against the dumbbells, and out against the plates on the outsides of your feet (“lock and twist”).
Remember, the multi-piece version is prescribed beyond warm ups for athletes that are unable to maintain overall quality and/or depth with the regular squats in their program. For example, an athlete has gone through our assessment and assignment process and a number of limitations have been found. There are only a few squat variations that she is able to use in her warm ups with the amount of quality and depth that we want to see, and elevation is needed as well. On this particular day, she has completed her squat warm-up sequence with the quality we desire. Now it is time to put the weightlifting shoes on to back squat. Her workout today calls for 6 sets of 5 reps at 80%. If you’ve never done this sequence, it gets heavy, it is brutal, and very impactful on your body. (It’s a great way to build strength, but will also further mold your body to the position you are using). As she works through her sets, the quality starts to deteriorate: she is now squatting to parallel only, and the feet are moving wider and more turned out with each rep, leading to the knees directing in and the back rounding. When it’s all said and done, she’s completed THIRTY POOR QUALITY SQUATS; essentially undoing everything she accomplished in her squat warm up sequence. Instead, she should adjust her emphasis away from strength, and utilize contraption squats to build on the quality she is focusing on in her warm-up sequence. This can be done by replacing the regular heavy back squats with much lighter contraption back squats, or an alternative variation of contraption squat (front or overhead). “Lighter” means enough load to assist the position, depth, and mobility work, but up to no more than 50% for any variation in the contraption.
So now you know how to get set up; next we’ll present a standard protocol for Contraption Squats.
Until next time,

Chad Vaughn,
2-Time Olympian, USAW
_______
With
Dr. Aaron Horschig, PT,
DPT, CSCS, USAW
_______

Leave a comment