So it’s been four weeks and you’ve completed the commitment you made, congratulations! I’m excited that you have taken this first step towards increasing your potential, as well as your health and longevity! While we’ve got this momentum, let’s keep going; we are going to Repeat this process – it’s time to Reassess and Reassign.
First, let’s repeat the assessment (reassess!). How do you feel? Have you noticed any changes in the way you move in general? Maybe you are feeling less restricted or a sense of greater ease in your movement? Do you have less pain? Does it seem that you are getting deeper in your squat? Perhaps your toes don’t turn out as much in the descent? Are you seeing a different bottom position sculpture today than when you started? The reality is, most will need more than four weeks to really make significant lasting change so let’s take a moment to celebrate any victory we can find, no matter how small. Remember, this is about taking small bites that you can more easily chew and digest so we can keep chipping away.
Even if you cannot find something to celebrate, there is still hope and information to use moving forward. For example, you just need more time (another four weeks of the same protocol), more frequency (instead of four times/week, try five or six times/week if possible, or add a set of each exercise to the protocol), or additional mobility drills on top of the already established protocol (more on this later).
In the rare instance you feel you’ve actually gone backwards, I’d say there is still reason for celebration. These are signs of change. Again this might indicate simply that the body needs more time to adjust/adapt. Afterall, for many athletes the positions, depths, and patterns we are trying to sculpt are very different than what may have been ingrained for years into your movement vocabulary. We must meet this inevitable resistance to change with relentlessness and resolve, and a more calculated plan.
Note: For the athlete with more or new pain, we’ll go back and take an even smaller bite by being less aggressive with any foot position adjustments, use easier squat variations, and potentially perform less overall reps within the warm-up sequence. This doesn’t mean you’re not going to try to go back to where you initially started (feet shoulder-width apart with a zero-degree turnout of the toes), you’ll just progress back up to that over time. For example, you might turn the feet back out 5-10 degrees and use higher heel elevation for the entirety of your next four-week period. (For extreme cases I have used the instructions of positioning feet 1-inch more narrow on each side and 5-degrees more turned in from where their normal squat stance is; this gives them a specific mark to be aware of and motivated by, and allows them to keep exaggerating but less aggressively.) If all is well at the end of that four weeks, then start doing SOME of your reps adjusted only partially back toward that “gold standard” (SEE the note below for clarification of this standard) and so on from there. REMEMBER, the need for this is not typical. Most athletes going through this process have reported feeling LESS pain almost immediately in implementing the method.
NOTE: JUST IN CASE this is the first blog you’re reading and you’re shocked and/or confused by the fact that we’re giving EVERYONE such a standard foot position to work towards with all the potential “anatomical variations” to consider, you REALLY need to go back and get a base understanding of the WHY behind it. Learn what certain anatomical variations are really specifically limiting and what to do if they are in fact present by reading here, here, and here; if not starting over at the very first post here and making your way back to this point.
If you’ve made progress, dig deeper. Upon making your way back through the assessment and assignment process, is there another daily habit (ground zero) that you can now direct your efforts towards changing? (Don’t rush this, if you need more time with the original one, stick with it.) Are there any deficiencies that are now more glaring you need to address? For example, now that your ankle mobility is cleared up, do you need to spend more time on thoracic spine extension? Additionally, can you increase the difficulty of any of the squat variations you are using? For example, if squatting on a 1-inch elevation is getting easier, let’s try to drop to the flat ground. Have you been consistent with the warm-up sequence (you’ve done it 100% of the times you were supposed to)? Has it become a habitual part of your routine (when you walk into the gym you know it’s what you’re doing first without thinking about; you feel you HAVE to do it)? If yes to both, then it’s likely you can comfortably add a little touch of something else to it. We’ll look to include a few other types of mobility drills to your assignment in the form of smashing (i.e., foam rolling, lacrosse ball work, etc.) and/or longer holds in certain stretches.
These new drills will be done PRE SQUAT SEQUENCE but for now, on only ONE of the areas of the body you’re zoning in on within the squat sequence. This means you need to pick out which of the two you feel is more pressing to improve your bottom position sculpture. If it is not an obvious choice, then go with the area of the body that was tested first (i.e., if you have tight ankles and internal hip rotation, then you would choose ankles for these purposes). Ultimately, there is not really a wrong answer as you’ll certainly benefit from working on either, so no need to dwell here if you’re still uncertain. In any case, after another four weeks you can now switch to the other if you’ve made sufficient change to the first area, OR add the second to the first making a 2-round couplet (as you’ll see below, we’re recommending 2 sets of each indicated drill).
BE AWARE that the exception to all of this is if tibial rotation is your most in-need area. We’ll continue following the rule of always working on the ankle first and incorporate both areas now (meaning you will be doing the newly indicated drills for both ankle AND tibial rotation before you start your squat sequence each day).
Now, with YOUR most in need area in mind, take a look at Dr. Horschig’s “go-to” drills to see what you should add to your warm up:
Ankle Dorsiflexion
Two other methods to improve the movement of dorsiflexion (knee over toe) are:
- Foam Rolling
- Stretching
With your calf propped up on a foam roller, move slowly up and down the lower leg muscles until you find a tender area. Pause on this area and “tack it down” with your opposite leg for about 10 seconds before moving to find another spot. You can also add in some ankle pumps during this pause to increase the effectiveness.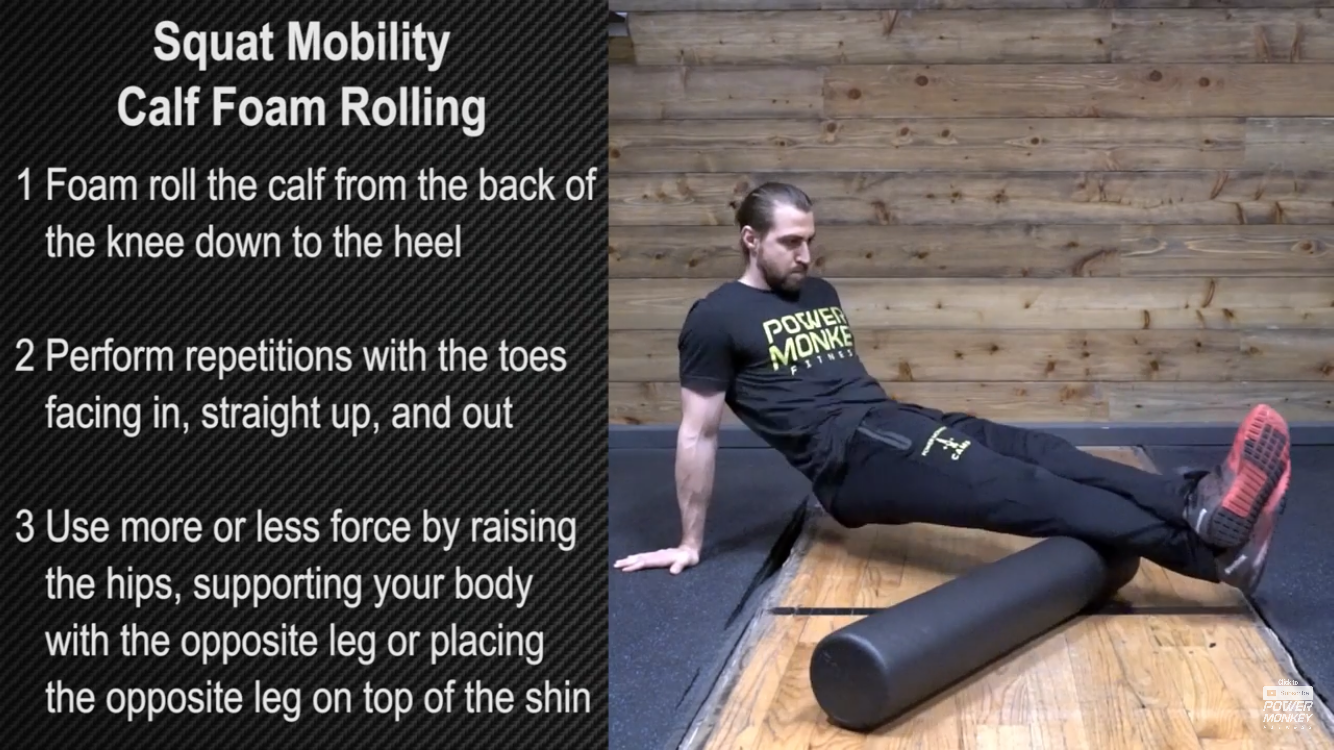
Once foam rolling is complete, stretching the muscles is the next step to addressing soft tissue restrictions. The goblet squat ankle stretch is a very position-specific way to stretch the calves/ankles, meaning it has good carry over to the squat. To start, drop into a deep squat. Hold a kettlebell, or weighted plate out in front of you and place your elbows on top of your knees. From this position, shift your weight onto one foot. Push your knee as far forward over your toes as possible (until the ankle is at end range) where you should feel a stretch in the lower calf. After holding for about 10 seconds, shift to the other leg.
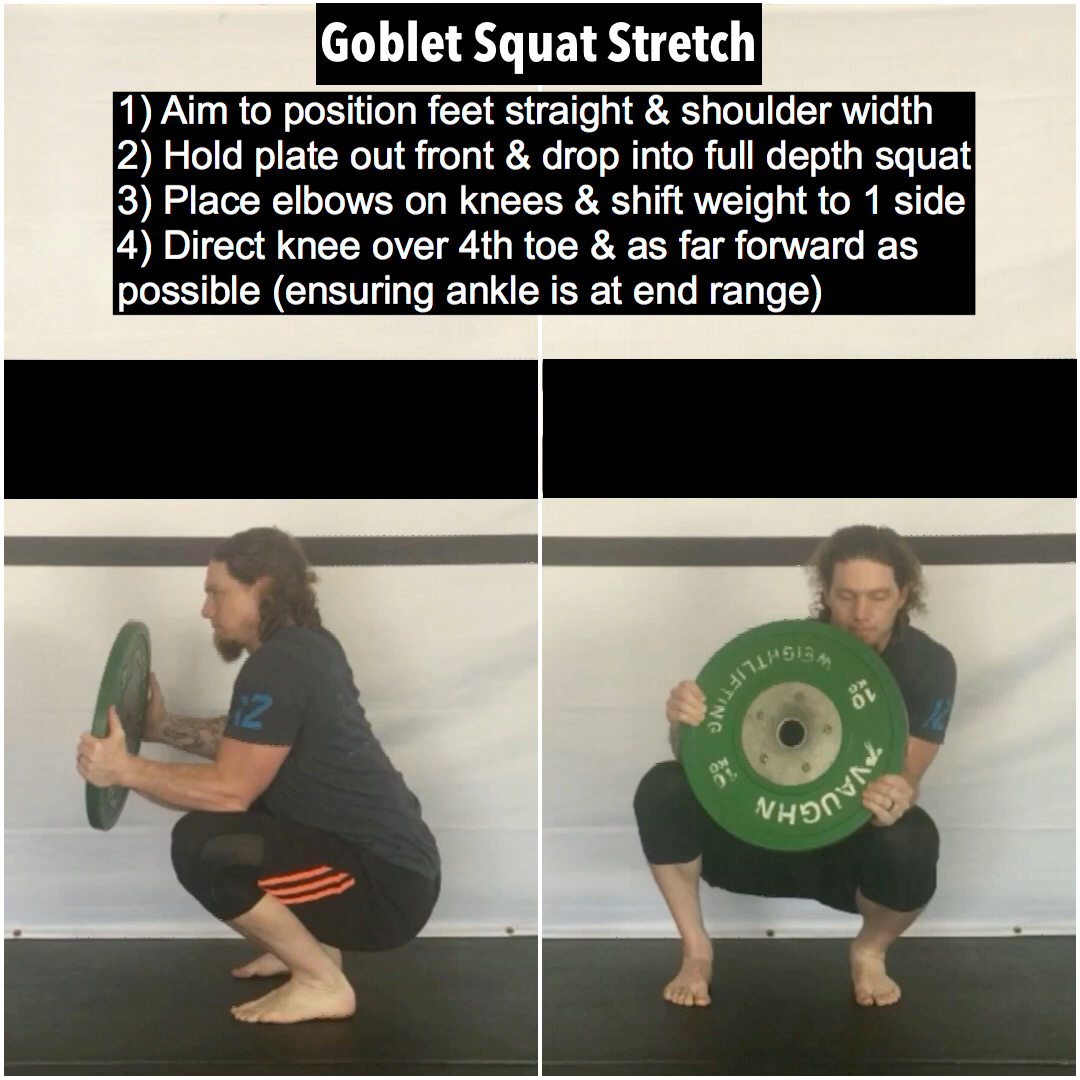
Make sure when you perform this calf/ankle stretch that your knee is moving over your 3rd or 4th toe (as shown above.) Doing so will allow you to mobilize in the exact position we’re trying to create for your deep squat.
Ankle Extension
Adding in some smashing of your anterior tibialis muscle can be another helpful way to find more ankle extension. This muscle helps dorsiflex the ankle, so if stiff/tight it can limit the amount of plantarflexion we are capable of. Start by kneeling on a foam roller or small ball. Apply pressure along the muscle just to the side of your shin bone. Move slowly for 1 minute on each round you perform. Recheck your ankle extension after a few sets to see if this was right for your body.

Knee Flexion/Ankle Extension
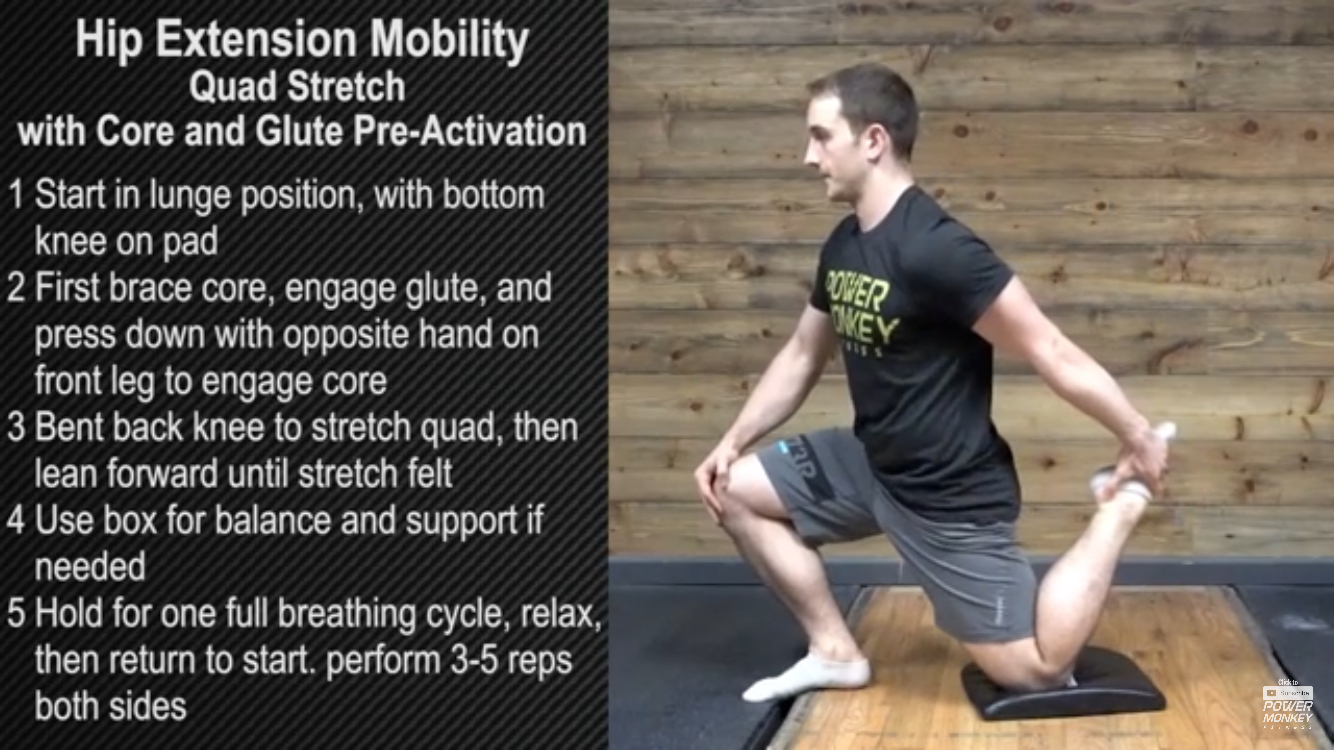
The “couch stretch” against a wall is a great way to promote knee flexion and ankle extension (much like the “hero’ish pose”). While in a kneeling position, flatten out the top of your foot against the wall and lean your body back slowly against the wall. This should bring out a good stretch not only in your quads but also in the front side of your shin. Keep your chest tall while performing this stretch and hold for 30 seconds. This can also be performed by simply lifting and holding the back foot with your hand as shown below.
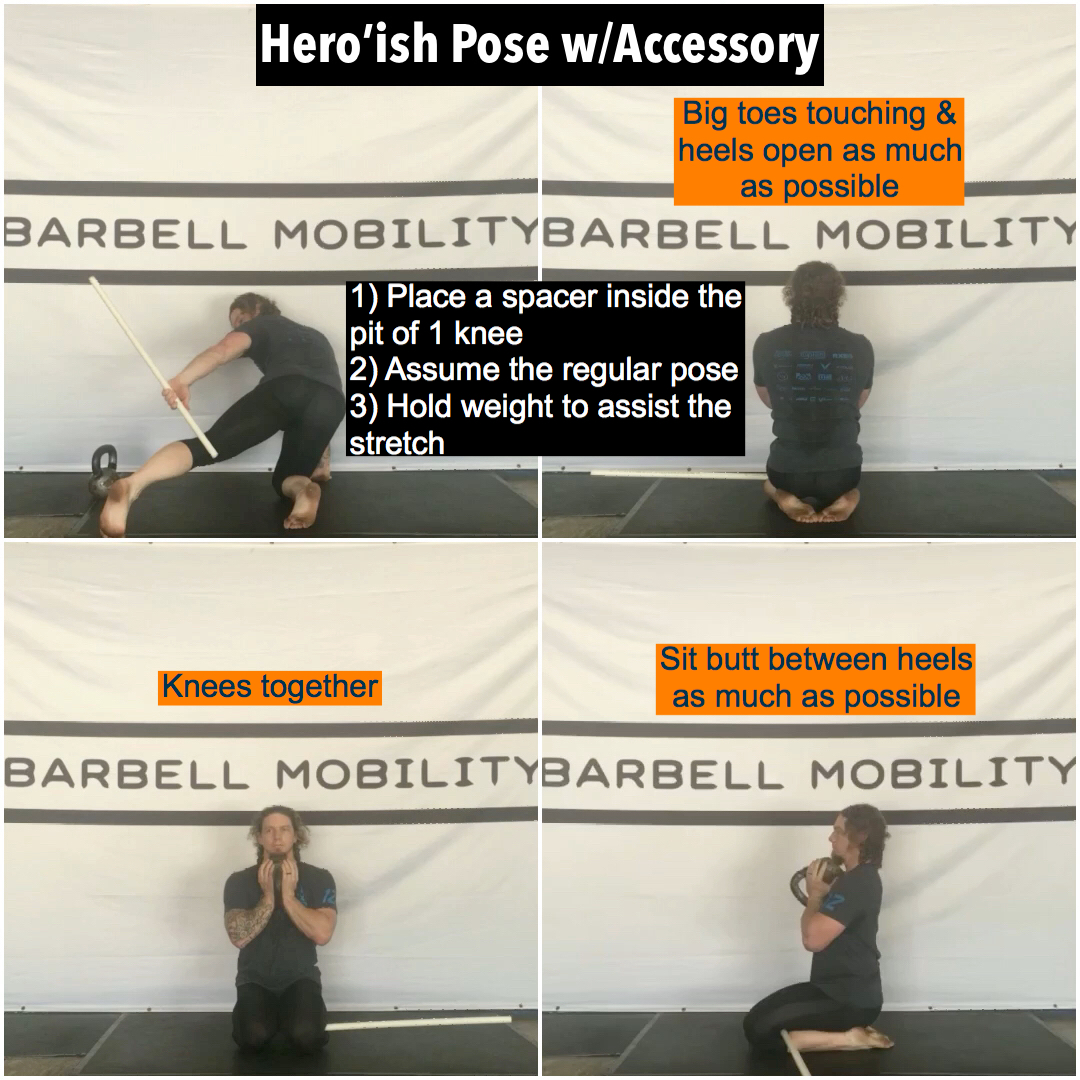
Additionally, as promised, we can now add some accessory to the “Hero’ish” pose you are using in your squat sequence. We’ll do this first by placing a PVC pipe behind your knee, deep into the bend (or “pit”). Applying to one leg at a time, holding the PVC in place and getting into the same pose as before (knees together, big toes touching, heels open as much as possible, and sitting butt between heels as much as possible). Hold here for 30 seconds and then move the PVC to the other leg and hold for 30 seconds. Finish out with 30 more seconds of the regular pose (without the PVC). Once you’re comfortable with that, you can start adding load by holding a kettlebell in front or an empty bar on your back. See the demo video here.
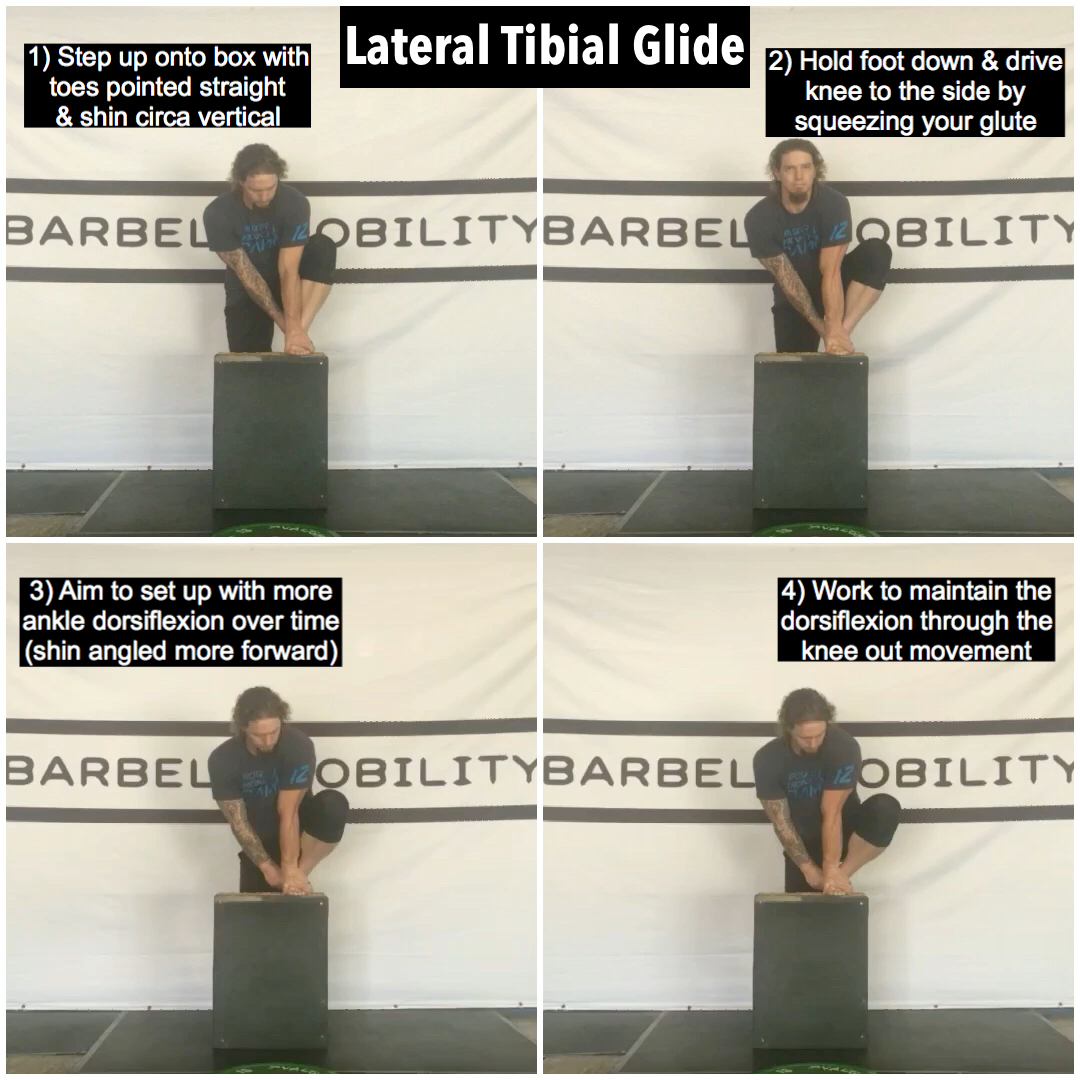
Tibial Rotation
Another accessory motion that is directly tied to rotation of the shin is lateral tibial glide. As you descend into a deep squat, the tibia bone not only internally rotates but also glides laterally so that the knee can move directly over your toes and stay in proper alignment with the rest of the leg.
Start by stepping up onto a box that is circa knee height, or dropping into a lunge position. Your toes should be pointed STRAIGHT forward and your shin at least slightly forward of vertical. Grab your front foot and don’t let it move as you drive your knee out to the side as far as you can by squeezing your glutes. Hold this end position for 5 seconds and perform 10 repetitions. Over time (through sets, days, weeks, etc.) work into setting up with more ankle dorsiflexion (shin angled further forward by driving the knee forward first) and aim to maintain the dorsiflexion through the knee out movement.
Hip External Rotation
To help improve external rotation we want to focus our soft tissue mobilization to the lateral glutes, particularly the TFL muscle. This muscle has the job of internally rotating the femur. This means if it is stiff/tight it will not allow for optimal external rotation of the leg!
Find your greater trochanter (the big hip bone that sticks out on the side of your hip) and find the muscle that lies just in front of it. This is your TFL. Roll on this muscle with a foam roller or ball for 1 minute on each set you perform. Recheck your external rotation after a few sets to see if this was right for your body.

Hip Internal Rotation
One of the best ways to improve hip internal rotation on your own is to use a band for mobilization. The rubber material of the band is elastic and strong enough to affect the tough joint-capsule of the hip (one of the major causes of limited hip internal rotation).
Remember from the banded ankle drill we’ve covered, band distraction joint mobilizations assist with the way our bones glide over each other. A joint glide is sustained while the athlete actively moves into the specific range-of-motion we are trying to improve.
To mobilize the hip in this way, attach a resistance band to the bottom of a solid upright and the other end around your thigh (try to get it as high as you can towards your hip). Position your body perpendicular to the band and step out to create pressure. Assume a kneeling lunge, with the hip you want to work on in the forward position (to confirm, the band should be pulling your leg/hip to the side with a ton of pressure).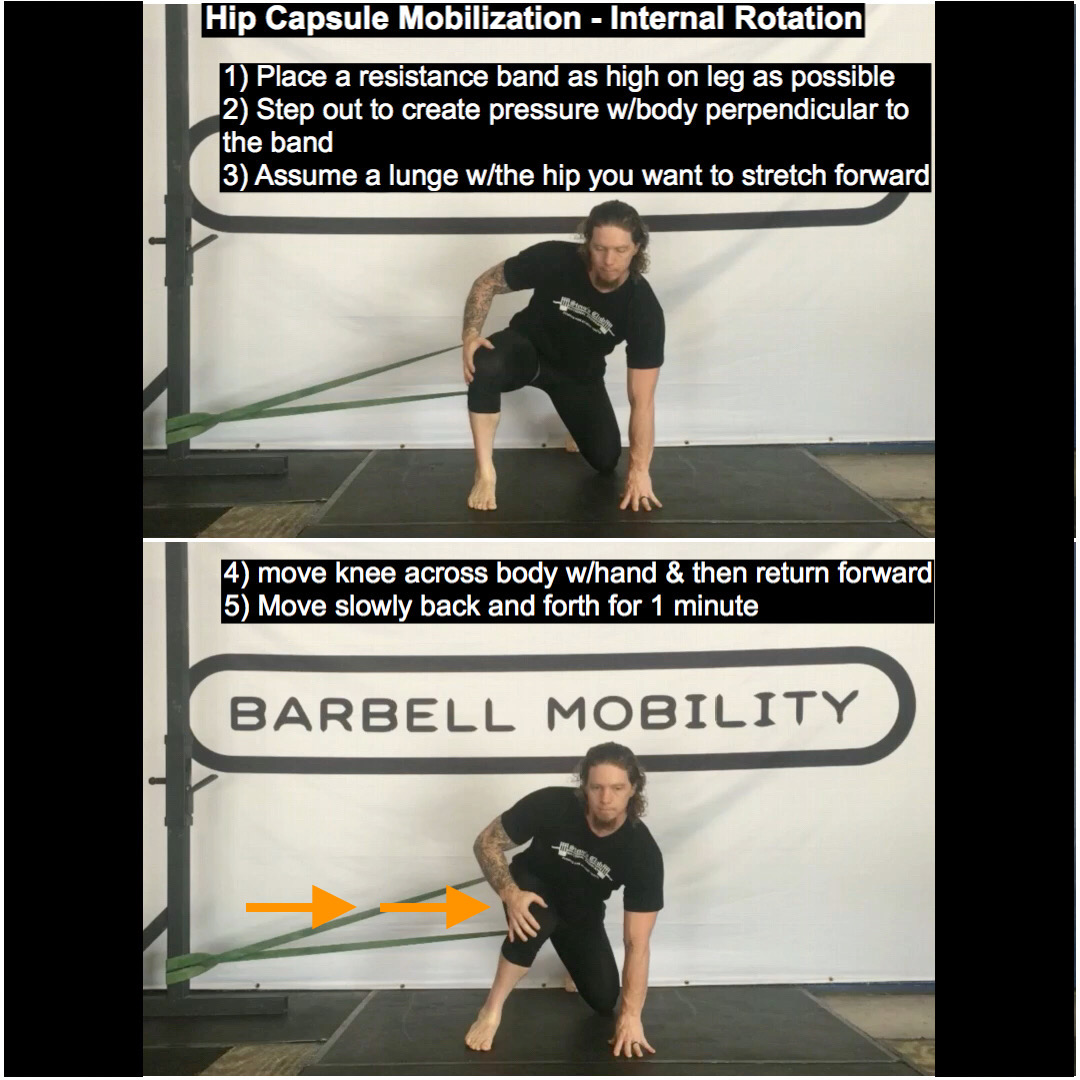
Once in the lunge, take your hand and move your forward knee across your body and back to the start position. This movement (along with the pull from the band) will help stretch the lateral and posterior fibers that surround the hip. If the band is pulling hard enough, the inward knee movement should not bring out any pinch-like pain in the front of the hip but instead a possible light stretch to the side of the hip. Rock the knee back and forth for 1 minute on each set you perform.
Thoracic
A great tool to help further your thoracic spine mobility is to use a “peanut.” Some manufacturers make a fancy peanut, which will cost you a pretty dollar. However, you can save a lot of money by taping two tennis or two lacrosse balls together.
To perform a thoracic spine joint mobilization, lie on your back with your arms crossed in front of you. This will pull your shoulder blades (scapulas) “out” to the side and provide space to place the peanut. The tennis or lacrosse balls should rest on both sides of your spine.
With your arms across your chest, perform a small crunch by raising your shoulders off the ground a few inches. Hold this position for a few seconds before returning to the starting position. Make sure not to hyper-extend your lower back during this movement; we want to only move from the mid-back.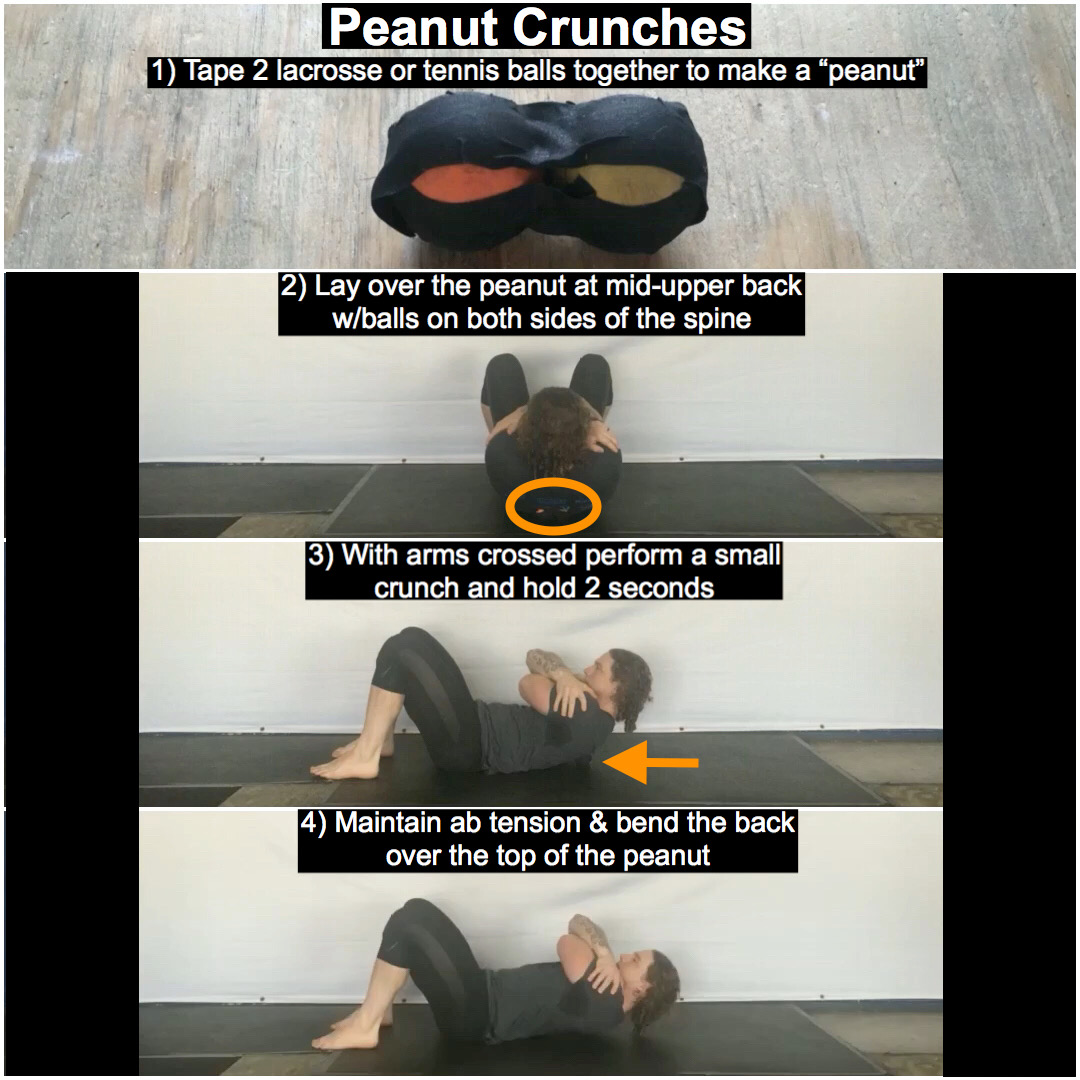
The peanut acts as a fulcrum on the spine (much like the middle of a teeter-totter) during this movement. When this force is applied to a stiff joint, it can help improve mobility.
Perform 2 sets of 15 repetitions on each segment of your mid-back that feels stiff. If you don’t feel any stiffness at a particular part of your spine during the movement, move the peanut up or down to another segment. It is normal to have restrictions in some areas of the thoracic spine and not all.
Bonus Consideration: Hamstrings
For athletes who have shown sufficiency through the entire bottom position mobility assessment, or have only one area of need, it’s worth going ahead and taking a look at the hamstrings. It is common for athletes with very good mobility in all or most of the tested areas (especially if the ankles are beyond sufficient) to HIDE limitation in hamstring flexibility. Remember, the hamstrings alone will not affect the ability of the hips or knees to move into a fully flexed position.
That being said, if limitation is there this should be considered an overall imbalance that can lead to certain injuries and compensations down the road. Additionally, this can hinder one’s ability to set up and move through the pull of the snatch and clean as comfortably and effectively as we’d like once we get to those topics. If we can identify the deficiency now for these otherwise mobile athletes, we can begin some of the work that will need to be done on the hamstrings within their squat sequence.
To test the hamstrings first lay on your back. Lift both legs up to where the hip and knees are both flexed to 90 degrees (your quad/femur should be perpendicular to the floor and your shin parallel to the floor). From here with both ankles extended (toes pointed) straighten one leg as much as you can. If you can straighten the leg completely (no bend in the knee) you’ve created a 180 degree angle and this is ideal. 170 degrees is passing/sufficient with anything less indicating the need for attention to the area.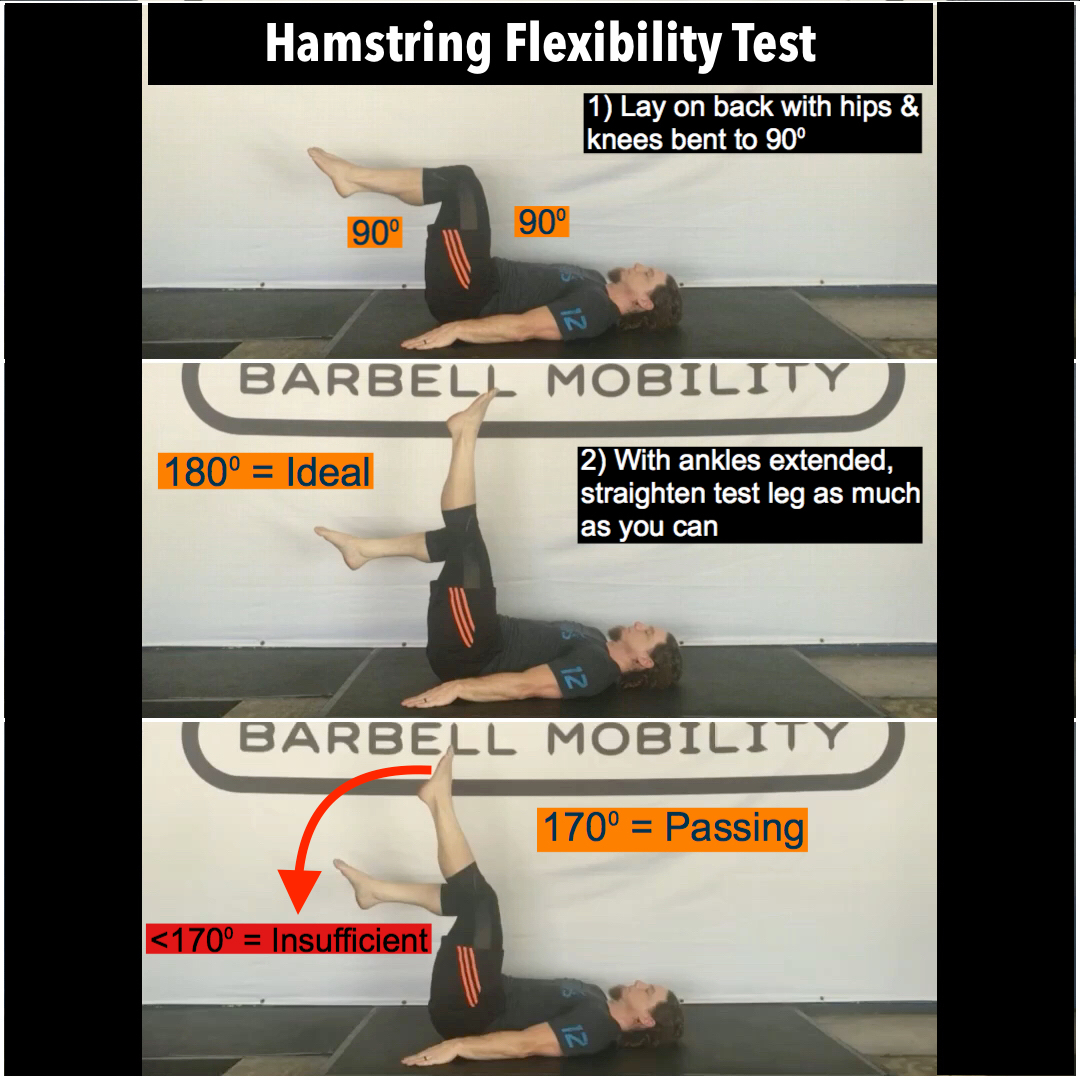
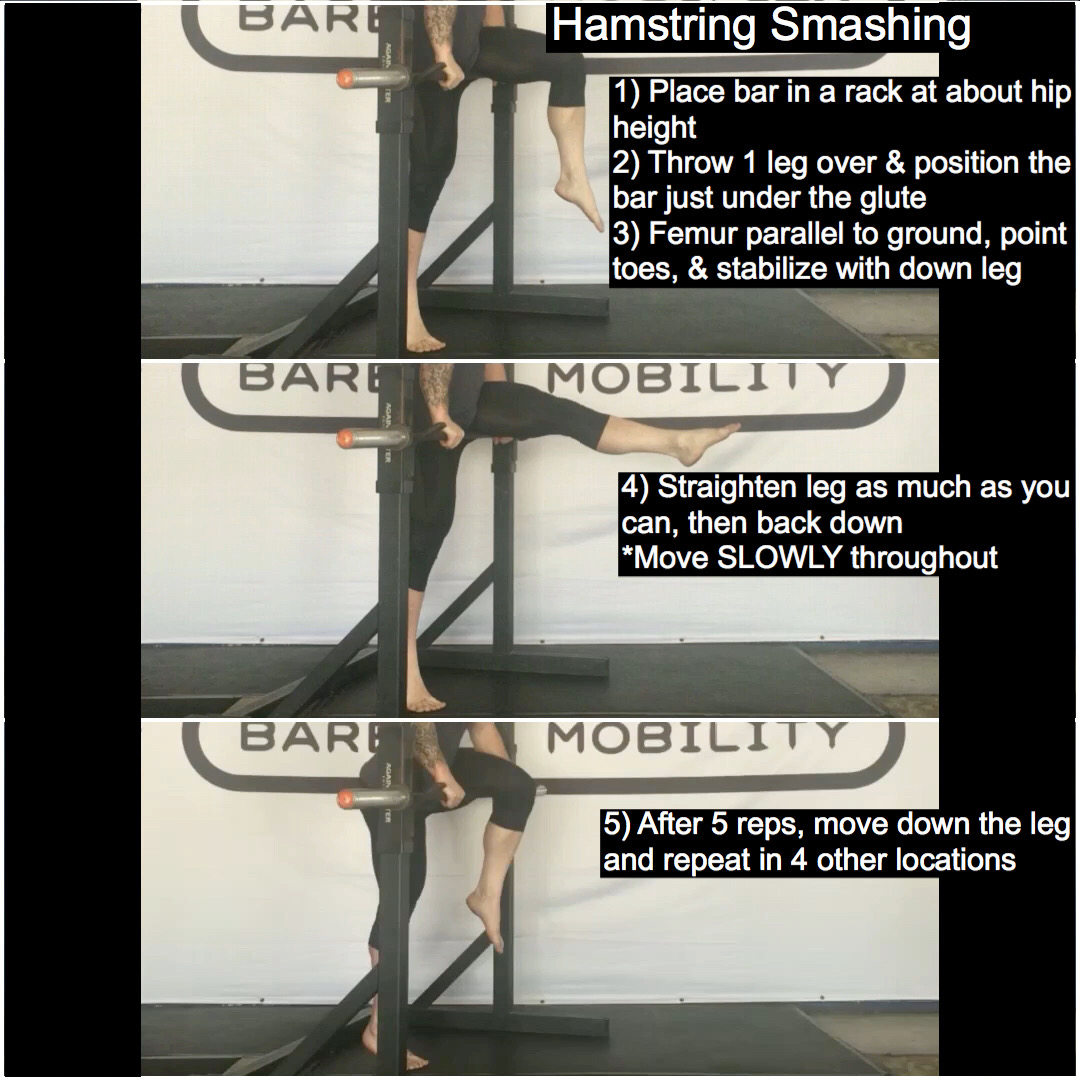
To address the area we’ll incorporate some smashing. Our favorite method is using a barbell that is positioned at about hip height in a squat rack. Standing just behind, throw one leg over and position the bar initially just under the glute. The other foot should be touching the ground (at least on tippy toes) so that you can stabilize and control the amount of pressure being applied. Keeping the femur parallel to the ground and the toes pointed, slowly straighten the leg as much as possible and then back to the starting point (NOTE: If you are unable to straighten the leg completely, that is ok and to be expected if this drill is indicated for you. The goal is to increase your ability to straighten the leg more and more over time and this is a good marker of which to gauge your improvements with). Perform 5 reps here and then 5 reps on 4 more locations as you work down the leg ending just above the back of the knee. Again, specifically for the athletes with no other or only one other insufficient area, this drill is to be added directly into the squat sequence (meaning that you should be getting 2 rounds of it each day). See the demo video here.
Mobility Drill Recap (new additions):
- Ankle Dorsiflexion = 2 Rounds of:
A. Calf Foam Rolling (Demo here) – 1 minute of rolling
B. Goblet Squat Ankle Stretch (Demo here) – 3 reps of 10 second hold - Ankle Extension = 2 Rounds of:
A. Shin Smashing (Demo here) – 1 minute of rolling
B. Quad Stretch (Demo here) – 30 second hold - Knee Flexion = Quad Stretch (Demo here) – 2 sets 30 second hold
- Tibial Rotation = Lateral Tibial Glide (Demo here) – 2 sets 10 reps with 5 second hold on each rep
- Hip External Rotation = TFL Smashing (Demo here) – 2 sets 1 minute of rolling
- Hip Internal Rotation = Banded Hip Rock (Internal Rotation) (Demo here) – 2 sets 1 minute of back and forth movement
- Thoracic = Peanut Crunches (Demo here) – 2 sets 15 reps
* Aside from the “hero’ish” pose that we added accessory to and the bonus considerations we covered for the hamstrings, REMEMBER the drills we’ve covered here are to be performed right before your squat sequence.
Now that you have this information and a few new “sculpting tools,” it’s time to get back to work. On to another four-week commitment to stay inside of the assess, assign, and repeat process. Let’s not forget our purpose here: to chip away at your bottom position sculpture and in turn head towards perfecting your squat to increase potential in the Olympic lifts (as well as health and longevity, don’t want to leave that out). Next up we’ll check in and determine where you currently fall within the three prioritized goals of mobility, comfort, and strength:
- Is your mobility sufficient?
- Are you comfortable in the bottom position?
- Are you ready to begin the emphasis of strengthening the sculpture?
Until next time,

Chad Vaughn,
2-Time Olympian, USAW
_______
With
Dr. Aaron Horschig, PT,
DPT, CSCS, USAW
_______

Leave a comment