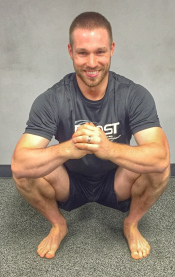
Your Squat Sequence will be a squat progression combined with mobility drills that you’ll use as a general warm up before each of your workouts, with a minimum frequency of four times/week. (This means if you only workout three times/week, we recommend that you try to add this in as well where possible.) The basic setup and method is to alternate between a squat variation and an individualized mobility drill (meaning a drill that is most meaningful to your body as a whole). We’ll help you pinpoint your individualized mobility drills with results from your assessment. Before we get to that, see below to get a feel for what this all looks like (this might look familiar as we gave you a little taste of this to help you work on your foot position):
- Squat Variation
A. Your Mobility Drill #1 - Squat Variation
B. Your Mobility Drill #2 - Squat Variation
C. Your Mobility Drill #1 - Squat Variation
D. Your Mobility Drill #2 - Squat Variation
Going back and forth in this way is beneficial since you can immediately apply the range of motion or action you just worked on inside the specific movement you’re trying to improve (as opposed to just doing a mobility drill and leaving it at that – your body is more likely to go right back to where it was). Additionally, we’ve found that putting this at the beginning of the workout – beyond the athlete being able to more freely get into positions and move better overall through the workout following – means that the athlete will actually DO IT. Therefore, they will get the frequency and consistency needed to make changes. (That being said, after you solidify your routine with this squat sequence, as needed we’ll be urging you to step up your game and add in some post workout “smashing’ or “rolling out” on the few specific areas we are trying to address; but more on that later.)
Now, we need to decide on two mobility drills to plug into the sequence. If we can make even a small impact on one or two parts of our body that are MOST in need, we make the greatest overall changes. I understand that many of you may have found more than two areas that need work (perhaps even all), but let me remind you that within this process it is important to prioritize. By zoning in on only two, those two get all of our time and attention as opposed to spreading ourselves too thin and impacting none.
Additionally, don’t forget that asymmetry from side to side takes priority over any symmetrical limitations here in your assignment. With any asymmetry you’ll perform the accompanied drills only on the more limited side. For example, I’m able to pass all of the tests except for ankle dorsiflexion and internal hip rotation. With the ankle test my left knee touches the wall easily, but my right falls short by about 4 inches due to my clubfoot. With the internal hip test, both sides rotate out to about 20 degrees falling short of the standard range of 30-40 degrees. (I’ve learned that for me, this worsens when I sit a lot, this is the part of my body that pays the price the most, and has in the past led to body tweaks and movement compensations.) So, my mobility drill #1 is for the right ankle only (I do nothing with my left ankle) and my mobility #2 is for internal hip rotation on both sides. With these as part of my daily warmup, I’m able to find up to a few more inches of range in my right ankle and more freedom in my hips, both of which allow me to go into the workout with my squat feeling like “butta” and better overall quality and insurance throughout the whole workout.
See below for a few more rules to follow to help you begin to build your sequence:
- If you tested tight in more than two areas, then consider how far away from “sufficient” you were in each of these tests and use that as a gauge of which to prioritize.
- If you feel that you have more than two areas that are relatively the same, then start from the feet and go up as we did in the assessment. Consider this, the sooner in that “chain” the “kink” happens, the more overall compensation there will be. For example, very good ankle mobility can cover up much of the tightness present up through the body, but tight ankles will very much expose all of it.
- If you found similar restrictions in two areas, then focus on both.
- If you tested tight in only one area, then that will for sure be your Mobility Drill #1. Depending on the extent of restriction in that area, you can use the same mobility exercise for both #1 and #2, or you can alternate different exercises for other areas of your body for #2. This second option allows you to address your primary restriction every day of the week, while also touching on all other areas of the body during the course of the week.
- If you passed all of the tests, then first of all, congratulations! But, before we celebrate too much, let’s make sure that you are moving on that ROM appropriately. One common area of need even for those that have sufficient overall flexibility is the ankle. If you have ingrained a pattern of the knees going inside of the toes when you squat (not tracking optimally), you’ll need to accumulate reps with an ankle mobility drill to learn the action of knees in-line with the toes (or slightly outside). You’ll also want to reinforce that action with the squat variations in the sequence. It is also common to see these mobile athletes have trouble or misunderstand the ideal coordination of the bottom position by relaxing everything within. Remember that while we want to completely SIT in the bottom by disengaging the quads, to maintain good, solid posture we must keep the core engaged so that the back does not round. To develop this coordination, we could perform a core stabilizing/awareness drill in place of the mobility drills, and then of course reinforce that within the squat variations (i.e., holding a plank on elbows directing attention to the bottom of the stomach).
If you already excel in these two areas (knee/toe alignment and coordination), then we still believe you’ll benefit from the sequence for overall maintenance/prehab, and the opportunity to exaggerate. You would rotate through the key areas by performing two different mobility drills each day (more of a moving warm up for that specific area as opposed to trying to force and learn new ROM), and within the squat variations you would continually change up your foot positions (i.e., feet together and knees touching, feet together with knees out, heels touching with toes turned out, shoulder-width with toes in, out, and straight, feet wide with toes in, out, and straight, etc.)
Now that you know the two areas you will be working on within the sequence, or have a plan to fill those slots, take a look at Dr. Horschigs “go-to” drills on each of the areas for you to use within:
Ankle Dorsiflexion
To improve ankle mobility in the motion of dorsiflexion, we’re going to use a 3-step process.
1. Mobilize
2. Foam Roll
3. Stretch
A restriction in joint mobility should be the first area to address when trying to improve range of motion. During the ankle mobility screen, a “pinching” sensation felt in the front of the ankle indicates a bony block. These types of restrictions will not resolve with conventional stretching and foam rolling. Therefore, any pinching sensation or bony block must be addressed first before moving onto possible soft tissue stiffness.
One of the easiest ways to improve joint restrictions on your own is to use a band mobilization. The rubber material of the band is elastic and strong enough to affect the tough joint-capsules.
Band distraction joint mobilizations assist with the way our bones glide over each other. A joint glide is sustained while the athlete actively moves into the specific range-of-motion we are trying to change. If we look at the ankle, the talus bone of the foot moves backwards as the shin moves forward into dorsiflexion as we squat. In order to help improve this movement to increase mobility, the band must help push the talus bone backwards. Often athletes will have the band placed too high on the ankle. This backwards pull on the tibia will actually do the opposite of what we want to achieve.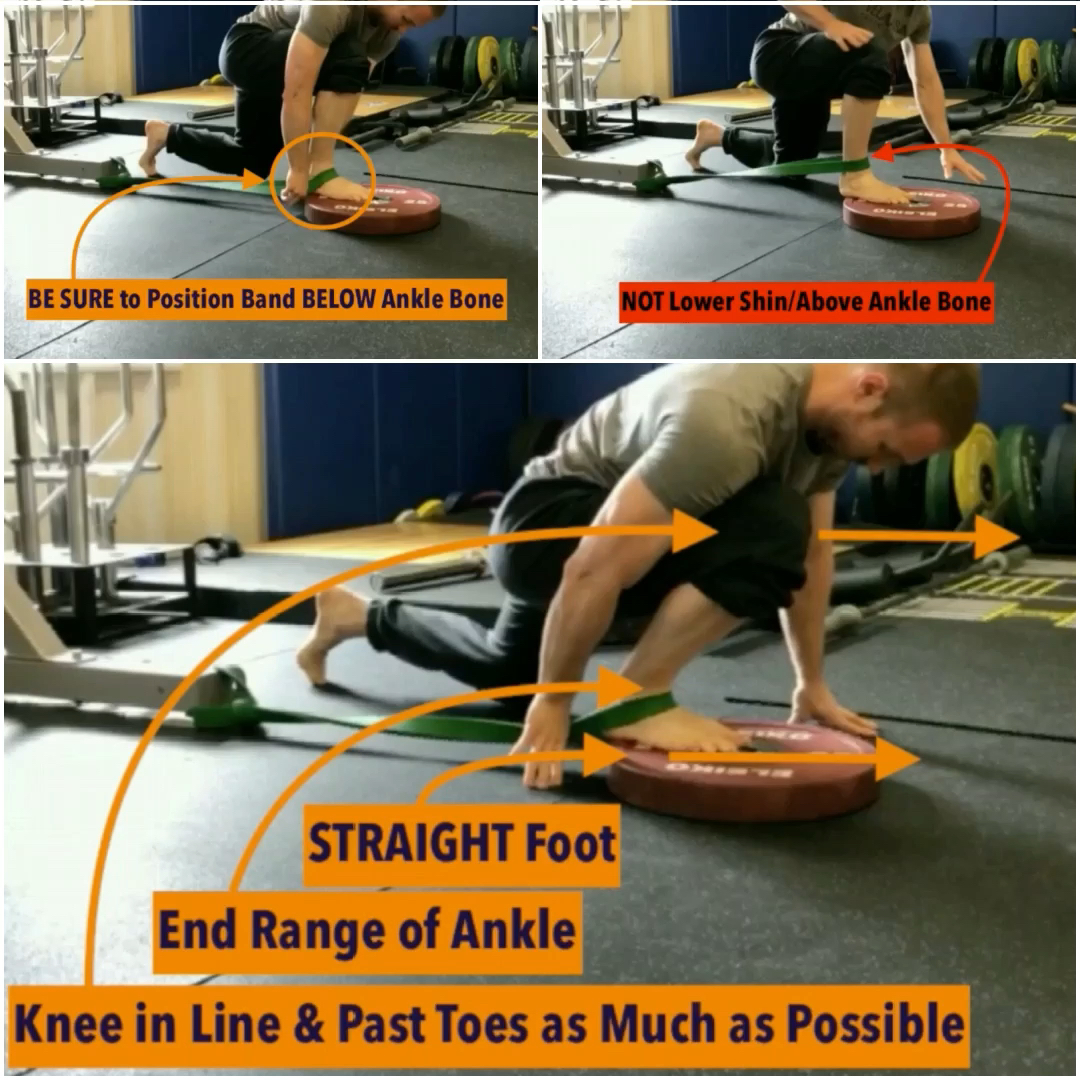
These types of mobilizations (simply termed mobilizations with movement) have been used for years by physical therapists. The goal is to alleviate any painful or pinching feelings deep in the joint. Get some time and reps in with this, and stay tuned for when and how to apply the foam rolling and stretching if it is appropriate for you at that point moving forward.
Ankle Extension/Knee Flexion
If you found an extreme amount of tension in the ankles in this other direction, or space between your butt and your feet when attempting to sit between your heels in the test pose, we’ll use the actual test pose to work on closing that gab and improving your comfort level within for use of that range in your squat.
As a reminder of how to get into the pose, with the top of your feet on the ground in a kneeling position, place your big toes together with heels open as much as possible. Position your knees together in the front and aim to sit your butt between your heels. If this is a needed stretch for you, you are likely somewhat or even extremely uncomfortable so take it very slow as you sit back as much as you can. Stay leaned forward a little with hands on the ground to start with as needed, and over time direct more pressure into the position and stretch. Keep in mind that we’ll be adding some accessory (i.e., load) to this stretch as appropriate/needed after a reassessment.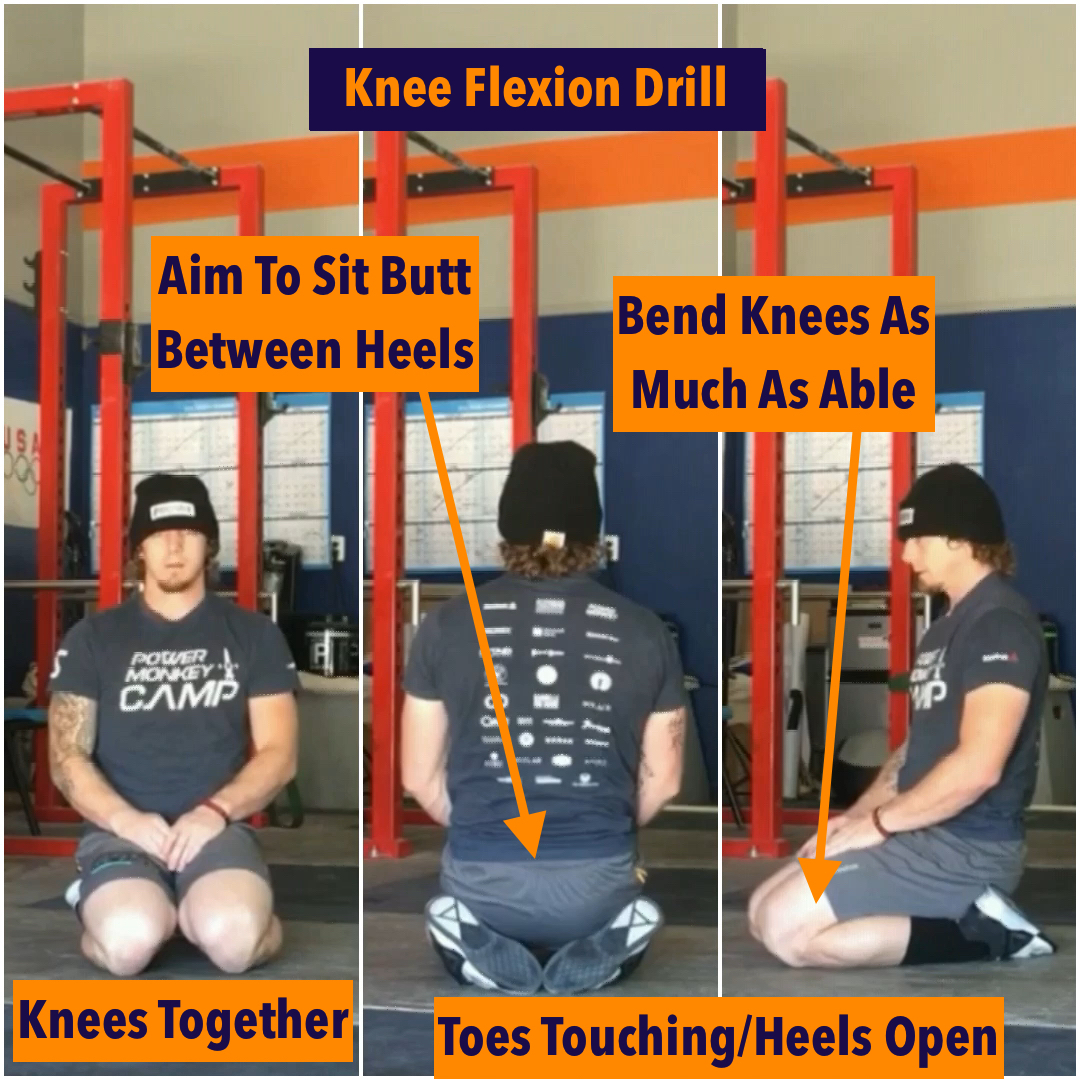
Tibial Rotation
If you found a side to side difference or symmetrical limitations in tibial rotation from the prior testing, I recommend trying this banded rotation drill to improve your mobility and movement quality. Start in a kneeling position and place a narrow resistance band under the base of your first toe (under the connection point of the toe to the rest of the foot). Jam this part of your foot down to trap the band tightly against the ground.
Next, apply some tension to the band as you simultaneously drive your knee slightly to the side. If you maintain sufficient foot stability, the band will remain in place. Hold this end position for 10 seconds and perform 5-10 reps. If you’re doing this correctly, you’ll notice a good amount of fatigue in the lateral hips. If however you lose your foot stability and allow it to roll on its side (into excessive supination) the band will snap out from under your foot (this means that the end position you hold should be with the knee out as far as possible without the band snapping out from under the foot).
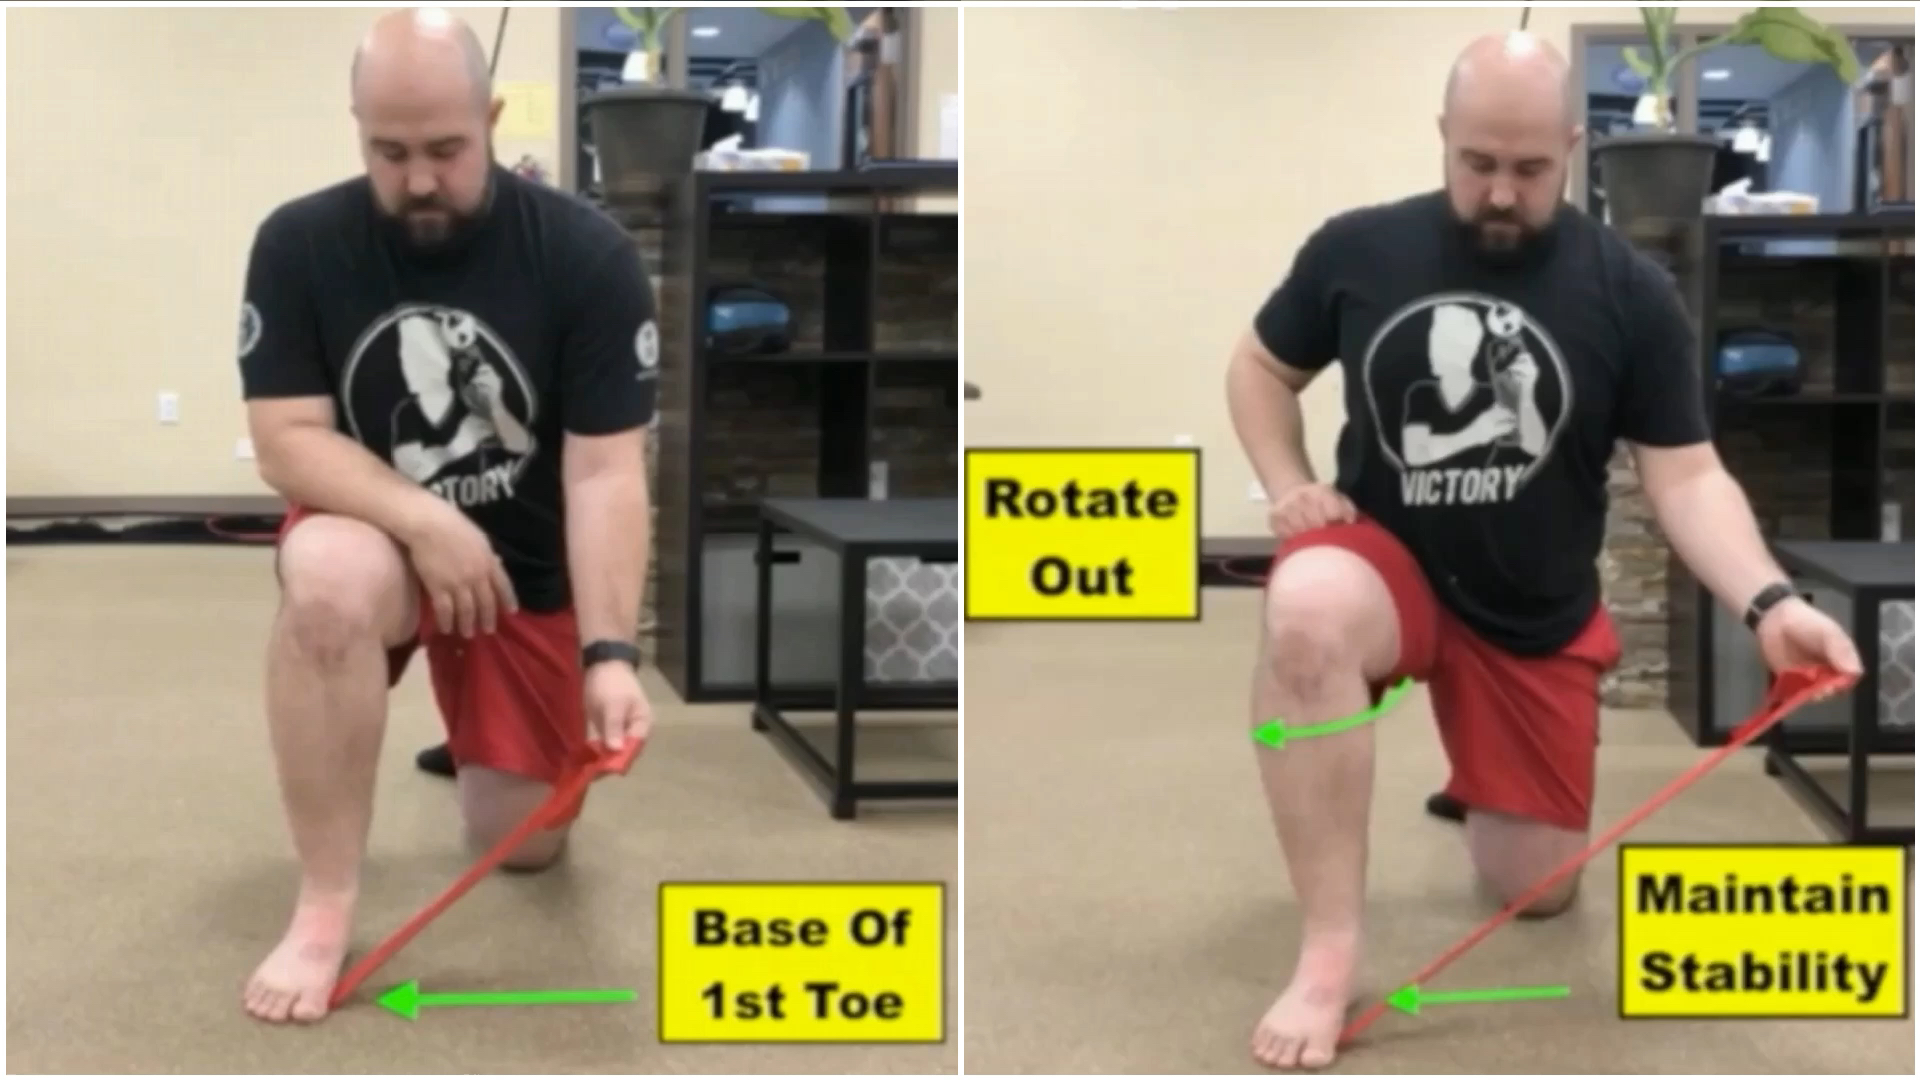
By maintaining a stable foot and driving the knee out to the side, we teach the body how to create the necessary tibial rotation for ideal lower body alignment in the squat.
Hip External & Internal Rotation
A great exercise to improve hip rotation mobility is the Assisted Hip Airplane (also known as the “tippy bird”). If you found limited internal or external rotation with the prior screening, I’d recommend trying this exercise and retesting your mobility after.
Assume a single leg stance. Lock your ribcage down by bracing your core. With your hands in front of you holding onto a rig or racked barbell for balance, rotate your torso forward over your stance leg while kicking your back leg behind you. Keep your trail leg completely straight and your stance leg knee locked in a slightly bent position. Imagine that your body is a teeter-totter or seesaw. The first part of the movement will mimic a single leg RDL.
Once in a position where your torso is no deeper than parallel to the floor, start to rotate your pelvis up towards the sky as far as possible. (If you are unable to reach a parallel to the floor torso position without rounding in the back or excessively bending the knee, then simply lean forward less, only to the extent you can maintain a flat back and slight knee bend.) This motion of hip external rotation may bring out a slight stretch sensation deep in your hip joint. Go as far as you can and hold this for 5 seconds before rotating in the opposite direction. Drop your pelvis as far towards your stance leg as possible. This motion of hip internal rotation may bring out a slight stretch in the lateral hip muscles of your stance leg. Again, hold this position for 5 seconds before moving to the start position and repeating the motion. Perform 5-10 repetitions with a 5 second hold in each end position.
Thoracic
The t-spine box stretch is one of my favorites for improving mid-back mobility. Assume a kneeling position close to a box or bench. Grab a PVC pipe with an undergrip, hands shoulder-width apart, and bend your elbows to 90 degrees. Face the box and place your elbows on the edge of the box directly under your hands.
Next, arch your back aggressively, then sit your hips back on your heels and simultaneously drop your chest towards the ground. This motion should bring out a good stretch to your mid-back (possibly your lat muscles as well). Hold this end range for 5 deep breaths in and out before returning to the starting position. Perform 5 repetitions.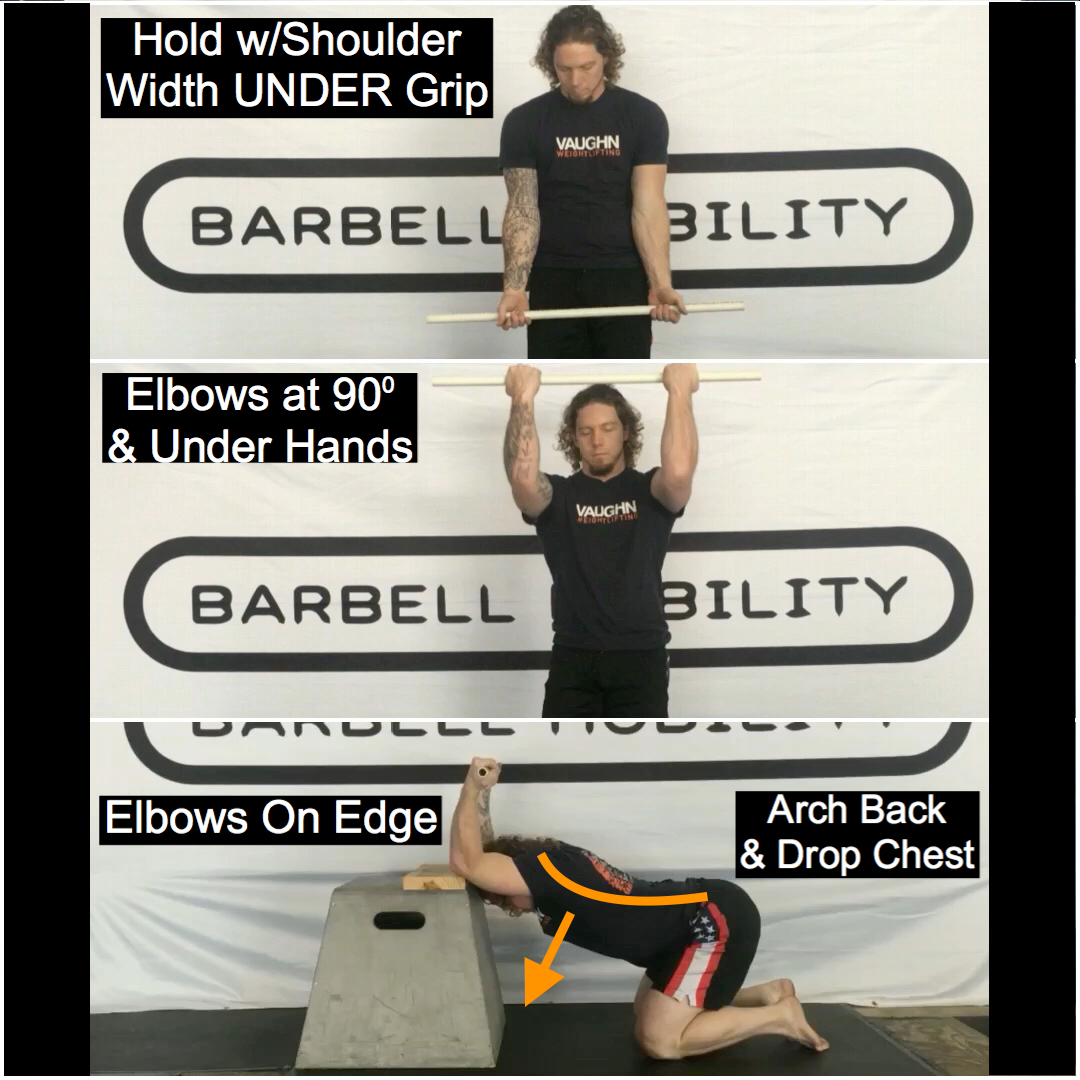
Bonus Consideration: Foot Stability
For your foot to function optimally and provide a firm foundation of stability for the rest of your body, your toes need to be able to splay out. When you look at a baby’s foot when they’re born, the toes are the widest part of the foot. Unfortunately many of our feet have lost this ability due to wearing narrow shoes that pinch our toes together for years.
An active toe spreading drill can help open your foot to its natural form and regain this needed function. Start by holding your foot in the air. Next, press your big toe into the ground. As you progressively do the same with the rest of your toes, try to spread your toes as wide as they can go. Hold this final position for 5 seconds before lifting your foot from the ground and repeating for 5 total reps. As this becomes easier to perform you can work to maintain this foot position while you balance on one foot and progress to a single leg squat (how about applying this with the “Assisted Hip Airplane” if that is one of your assigned drills).
Another thing you can do to improve your foot strength is to use an orthotic. However, the type of orthotic I recommend is far from the prototypical model you may find on the shelf of any drug store. “Correct toes” are a toe spreading orthotic developed by Dr. Ray McClannahan and they help realign the foot back to its natural shape. By aligning the muscles of the foot in a more optimal position with the “correct toes,” the muscles of the foot will get stronger throughout your day without any special exercises. The only caveat is these toe spreaders may not allow your foot to fit into your standard shoe. To use them comfortably, you need to wear a wide toe-box shoe or go barefoot. With this in mind, let’s go back to “ground zero,” this is a perfect example of something one could order and apply to their daily routine when appropriate (in reality, this would be a great “ground zero” assignment for everybody).
Mobility Drill Recap:
- Ankle Dorsiflexion = Banded Ankle Rock (Demo here) – 10 reps with 10 second hold on last rep
- Ankle Extension or Knee Flexion = Hero’ish Pose (Demo here) – 60 second hold
- Tibial Rotation = Banded Tibial Rotation (Demo here) – 5 reps with 10 second hold on each rep
- Hip External Rotation = Assisted Hip Airplane (Demo here) – 5 reps in each direction with 5 second hold on each rep
- Hip Internal Rotation = Assisted Hip Airplane (Demo here) – 5 reps in each direction with 5 second hold on each rep
- Thoracic = T-Spine Box Stretch (Demo here) – 5 reps holding for 5 breaths on each rep
Your next step is to plug those specific drills into the squat variation/mobility sequence. The below includes our “go-to” squat variations that are aligned in a progressive manner:
- Extended Plate Squat w/Elevation (Demo here) – 10 reps with 3 second pause in bottom/rep
A. Your Mobility Drill #1 - Bottom Squat Hold w/support (Demo here) – 30 seconds total
B. Your Mobility Drill #2 - Extended Plate Squat w/Elevation (Demo here) – 10 reps with 3 second pause in bottom/rep
C. Your Mobility Drill #1 - Bottom Squat Hold w/support (Demo here) – 30 seconds total
D. Your Mobility Drill #2 - Extended Plate Squat (no elevation) (Demo here) – 10 reps with 3 second pause in bottom/rep
NOTE: The tibial drill should be paired only with the ankle drill for optimal application and benefit of the tibial drill; the ankle drill would be your Mobility Drill #1 and the tibial drill would follow as #2. That is the only restriction on potential combinations. Remember your Mobility Drill #1 should always be whichever comes first on our list (or rather, the lowest part of your body first, i.e., ankles before hips).
We recommend that you perform this entire warm up barefoot. This will help you develop a stronger foot, learn better connection with the ground, and add to the mobility work in the sequence. Remember, the feet are our foundation! To start, we also recommend the “gold standard” foot position (see here, here and here for more), since again, where we put our feet in the squat is our opportunity to show our feet where we want them to go in the reception of a snatch and clean.
So, what are you waiting for? Go ahead and get started on your individualized mobility work and give the squat variations in the sequence a try. Keep in mind that though these variations will work very well for most athletes (hence, “go-to”), some of you will find greater benefit in individualizing the type of squat you are using here, just as we have your mobility drills. We’ll help you choose which squat variations may be best for you to adjust to and start with, then you will be encouraged to reassess and make changes as necessary.
Until next time,

Chad Vaughn,
2-Time Olympian, USAW
_______
With
Dr. Aaron Horschig, PT,
DPT, CSCS, USAW
_______

Definately need to work on some tibial rotation drills, thank you for such a well written guide.
LikeLike
You’re welcome! Excited to hear you’ve found it useful.
LikeLike
With the squat/mobility sequence, how do we pick which mobility we should work on? I definitly have ankle mobility and thoracic mobility issues, so should I rotate between those two as my mobility exercises between the squat variations?
LikeLike
Hello Andrew! My apologies as I am just now seeing this… were you able to get this figured out? Happy to help if not, no problem at all. Perhaps this is the first blog you saw and had not or have not read any of the previous ones that included the assessment?
LikeLike