Now that you better understand the necessity and benefit of working toward the best foot position you can for optimal carry over into the snatch and clean, we need to consider what the rest of the body is doing up from the feet. Your setup directly affects your squat. Are you setting yourself up for failure…or success? (I couldn’t resist the pun.)
Proper setup for the squat
Beyond positioning your feet appropriately (or at least understanding this is something you’re working towards with a plan over time), you will ensure the least chance for compensation throughout the rest of the squat if your body is stacked prior to initiating down. The word “stacked” comes from the gymnastics world, to indicate the ideal positioning of the joints when in a support position: one stacked atop the other (think of an athlete in a handstand for example). Not only is this an extremely strong alignment, it’s more efficient. Imagine how much more weight you can hold overhead when your elbow is “locked” compared to a bent arm. You could also hold it there much longer since your muscles are no longer working as hard.

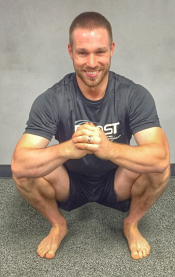
In a standing position just before a squat, stacked means:
- feet under hips
- the knees locked out and directly over the base of the foot
- hips open to 180 degrees and on top of the knees
- the torso completely erect with shoulders directly on top of the hips
- head neutral with eyes looking directly forward

Ever play Jenga? You can easily build a 6-foot tower, each piece braced by the one below it, but as soon as you remove one piece and create space, there is too much stress on the other pieces, ultimately leading to collapse. Your body is a bit more clever and is often able to compensate, but this is certainly not desirable.
When an athlete does not show the ideal “stacked” setup, the first step is NOT always to jump to coaching cues or “corrective” exercises. There is a good chance this stacked position will happen on its own if the athlete learns to relax into their regular standing position & breathe properly.
The most common cues that might lead one astray would be “arch” or “big chest.” An arch creates a curve in the torso by flexing the back muscles, which bows the ribs/stomach out (creating a “C” shape with the spine). Many do this to “feel” locked in (since arching the back is the easiest way to feel tension there), to keep the back from rounding in the other direction, and/or to stay upright as they perform the squat. “Big chest” can be accomplished with or without the “arch,” but is usually executed with a deep breath to fill the lungs and then holding in the chest, sometimes accompanied with a shoulder/trap shrug. These seem logical to assist in engagement and maintenance of positions, but, both of these actions take away from abdominal tension/pressure, and therefore from core tension or bracing as a whole. Arching usually contributes to rounding in the other direction toward the bottom of the squat, and a holding air in the chest is more of a muscled, less sustainable position.
To straighten out and brace a “curved” athlete, they should try to RELAX, and then take a deep breath “into the stomach.” The key is to place that air in the “bottom of the stomach.” Of course the air is still in the lungs, but this idea, along with a relaxed chest/shoulders (naturally aligned atop the hips), usually helps to create the ideal abdominal pressure.
Doctors Note:
When we take a big breath “into the stomach,” we essentially increase the volume of the body’s intra-abdominal cavity. If we couple this expansion in our core by bracing our muscles, the pressure inside the abdominal cavity grows because the volume can no longer expand. This is how intra-abdominal pressure (IAP) is created.Think of IAP like an unopened soda can. If you place a full unopened can of soda on the ground and stand on it, it will remain strong and won’t crumple under the weight of your body. This is because the pressure inside the can gives it strength and stability. Proper breathing and bracing mechanics of the core muscles when lifting activate our body’s “natural weightlifting belt.”
What to do if the athlete is unable to relax into a naturally upright position? Quite simply, an athlete may need to overcome old muscle memory and/or bad habits. Not opening the knees or hip completely is common – either due to lack of discipline, time, or awareness – but this will mold the body over time. Performing all squat reps without standing up completely (extending both the knee and hip joints) will lead to poor positioning. Remember, how you practice is how you play.
Alternatively, an inability to achieve proper positioning could once again be due to mobility limitations.
Doctors Note:
For example, those with tight hips may not be able to open them fully. Try using a screen called the Thomas test.This test is performed while lying on your back. The Thomas test’s primary purpose is to look for stiffness in the Iliopsoas (hip flexor muscle) and/or Rectus Femoris (quad muscle). Either of these soft tissue structures can contribute to hip mobility issues (poor hip extension) therefore limiting your ability to stand completely erect.
Start by standing next to a bed or a bench. Your hips should be in contact with the edge. Grab one of your knees and pull it towards your chest as you gently fall backwards. The knee you grab should be pulled as close to your chest as possible. As you lie on your back while holding onto your knee, allow your other leg to relax completely.
What position does your body end up? Having a friend help you with this screen is extremely beneficial. Once you screen one leg, perform the same movement on the opposite leg and see what you find. If your relaxed leg was unable to lie completely flat on the bench or bed, it is a sign that you are likely dealing with excessive stiffness in your hip flexors that you need to address.
If this is you, start with these simple drills:
Our goal with the foam roller is to decrease the stiffness the Thomas test was able to expose. This means addressing our hip flexors and quads. Start by moving slowly up and down the anterior hip muscles until you find a tender area. Pause on this area and ‘tack it down’ with your bodyweight for about 10 seconds before moving again.
One of my favorite stretches for improving hip extension mobility is the ½ kneeling hip flexor stretch. Assume a kneeling position with one leg forward. Place your hands on your pelvis and pull your hips under yourself as you squeeze your glutes (posteriorly pelvic tilt). You can then lean forward slightly to bring out a good stretch to the anterior hip. Hold for 10 seconds and perform 5 repetitions.
Those who have stiff/tight hip flexors also commonly have under-facilitated glutes. It’s not that the glutes may be weak, but they are often not turning on at the right time or the right intensity. For this reason, it is a good idea to perform some glute activation exercises after you finish the mobility and flexibility work for your hip flexors to help lock in this new motion and address why the stiffness may have started in the first place. The bridge is a great tool for this purpose.
Start on your back with your knees bent and a resistance band across your knees. Drive your feet hard into the ground as you then raise your hips and squeeze your glutes as hard as you can. Hold this position for 5-10 seconds before coming back down and try 15 repetitions.
If you feel like your hamstrings are over dominating the movement and cramping a little, push your toes into the ground (while keeping your feet still flat on the ground) and think about pushing the floor away from your body as you lift your hips from the ground. Doing so will activate the quads and automatically decrease the activity of the hamstrings due to a concept called reciprocal inhibition. Because the hamstrings are now “turned off” due to the quad activation, the only muscles left to extend the hips are… you guessed it, the glutes! After 15 repetitions for a 5 to 10-second hold, your glutes should be on fire with fatigue.
To ensure proper setup, I recommend a checklist of cues necessary for the individual to get stacked prior to descent. Use whatever language works (for you/your athlete); here are some ideas:
- relax, stand up straight
- center the feet, feet under hips
- lock and twist
- flex the glutes, squeeze your butt cheeks
- eyes/chin straight, look straight ahead
- breath into your stomach, deep belly breath, fill your diaphragm
- brace for a punch, flex your core, crunch the abs, pull the ribs down, hollow body (for those that are familiar with gymnastics)
Practice with one or more of these cues, and for as long as necessary, to make this all more automatic.
Stacked = strong. A better setup means a better squat. Now for the squat itself, next up, we’ll actually start moving our bodies and discuss the details of the descent.
Until next time,

Chad Vaughn,
2-Time Olympian, USAW
_______
With
Dr. Aaron Horschig, PT,
DPT, CSCS, USAW
_______

3 Comments